Chocolate Tiramisu
There are days when only a deeply comforting dessert will do, something rich, creamy, and familiar that instantly makes the world feel softer. Chocolate Tiramisu is that dessert for me, the kind I reach for when I want something indulgent yet elegant, cozy yet impressive. It brings together smooth cream, tender layers, and an intense chocolate aroma that fills the kitchen and promises pure satisfaction for anyone lucky enough to get a slice.
Why This Recipe Will Be Your New Favorite
Chocolate Tiramisu is pure comfort with a touch of sophistication, and trust me, you’re going to love this. The balance of creamy, airy layers with deep chocolate flavor makes every bite feel luxurious without being heavy. This one’s a total game-changer when you want a dessert that feels special but still approachable, and let me tell you, it’s worth every bite.
Behind the Recipe
This recipe came from my love of classic tiramisu and an undeniable craving for chocolate on cozy evenings. I wanted something that felt familiar yet a little more indulgent, something that could sit proudly at the center of the table and make people pause before digging in. It became my go-to dessert for quiet nights and celebrations alike, always bringing that same sense of comfort and joy.
Ingredients You’ll Need
These ingredients work together to create layers that are creamy, tender, and deeply chocolatey, with each one playing an important role in flavor and texture.
- Ladyfinger Biscuits: 300 g, they create soft layers that soak up flavor while keeping structure.
- Mascarpone Cheese: 500 g, this provides the signature creamy and rich base.
- Heavy Cream: 250 ml, whipped to add lightness and a silky texture.
- Granulated Sugar: 120 g, balances the bitterness of cocoa and chocolate.
- Egg Yolks: 4 large, they enrich the cream and add smoothness.
- Strong Brewed Coffee: 240 ml, cooled, it adds depth and contrast to the sweetness.
- Unsweetened Cocoa Powder: 40 g, brings intense chocolate flavor and a velvety finish.
- Dark Chocolate: 100 g, finely grated, adds richness and texture to the topping.
- Vanilla Extract: 1 teaspoon, rounds out the flavors and enhances the cream.

Time Needed to Make This Recipe
Prep Time: 30 minutes
Cook Time: 10 minutes
Total Time: 40 minutes plus chilling time
Special Equipment You’ll Need
This recipe is simple, but having the right tools makes the process smoother and more enjoyable.
Electric Mixer: helps whip the cream and yolks to the perfect airy consistency.
Mixing Bowls: for keeping components separate and organized.
Spatula: ideal for gently folding the cream to keep it light.
Serving Dish or Springform Pan: holds the layers neatly and makes slicing easier.
Step-by-Step Instructions
Take your time with these steps, enjoy the process, and let the aromas guide you along the way.
- Prepare the Coffee: Brew strong coffee and let it cool completely so it soaks without melting the cream.
- Whip the Yolks and Sugar: Beat egg yolks with sugar until pale, thick, and slightly fluffy.
- Add Mascarpone: Gently mix the mascarpone into the yolk mixture until smooth and creamy.
- Whip the Cream: In a separate bowl, whip the heavy cream until soft peaks form.
- Fold the Cream: Carefully fold the whipped cream into the mascarpone mixture until light and airy.
- Dip the Biscuits: Quickly dip each ladyfinger into the cooled coffee, making sure they are soaked but not soggy.
- Layer the Base: Arrange a layer of dipped biscuits in your dish.
- Add the Cream: Spread a generous layer of the chocolate cream mixture over the biscuits.
- Repeat the Layers: Continue layering biscuits and cream until all ingredients are used.
- Finish with Chocolate: Dust the top generously with cocoa powder and grated dark chocolate.
- Chill: Refrigerate for at least 4 hours to allow the layers to set and flavors to meld.
Serving Suggestions & Presentation Tips
Serve Chocolate Tiramisu chilled, sliced cleanly to reveal its beautiful layers. The deep brown cocoa top contrasts beautifully with the pale, creamy interior, making it a true showstopper. Pair it with fresh berries for a pop of color or a warm cup of coffee or tea to highlight the chocolate notes and creamy texture.
Extra Tips for Best Results
A few thoughtful touches will make this dessert truly unforgettable.
- Use fully cooled coffee to keep the cream layers stable.
- Fold gently to preserve the airy texture of the cream.
- Chill overnight for even better flavor and cleaner slices.
- Sift cocoa powder just before serving for a fresh, velvety finish.
Variations You Can Try
You can easily adapt this recipe to suit different tastes and occasions.
- Add a layer of chocolate ganache between the cream layers for extra richness.
- Use chocolate-flavored biscuits instead of plain ladyfingers for deeper flavor.
- Incorporate a hint of orange zest into the cream for a bright contrast.
- Create individual portions in small glasses for elegant presentation.
- Mix a small amount of melted dark chocolate into the cream for a more intense chocolate profile.
Make Ahead and Storage
Chocolate Tiramisu is perfect for making ahead, which makes it ideal for gatherings. Prepare it up to 24 hours in advance and keep it covered in the refrigerator. It stays fresh for up to 3 days, maintaining its creamy texture and balanced flavor. Freezing is not recommended, as it can alter the delicate cream layers.
Chef’s Pro Tips for Perfect Results
These insider tips help take your tiramisu from good to unforgettable.
- Chill your bowl and beaters before whipping cream for better volume.
- Dip biscuits quickly to avoid soggy layers.
- Smooth each cream layer evenly for clean slices.
- Let the tiramisu rest overnight for the best flavor development.
Nutrition Facts
Servings: 8
Calories per serving: 420
Note: These are approximate values.
FAQ’s
1. Can I make Chocolate Tiramisu without eggs?
Yes, you can replace the egg yolks with extra whipped cream for a lighter, egg-free version, though the texture will be slightly different.
2. How long does Chocolate Tiramisu need to chill?
A minimum of 4 hours is needed, but overnight chilling gives the best flavor and structure.
3. Can I use instant coffee?
Yes, instant coffee works well as long as it is brewed strong and cooled.
4. What cocoa powder is best for this recipe?
Unsweetened, high-quality cocoa powder provides the richest chocolate flavor.
5. Can I make this dessert in advance for a party?
Absolutely, it is ideal for preparing a day ahead and actually tastes better with time.
6. How do I get clean slices when serving?
Use a sharp knife wiped clean between each cut for neat layers.
7. Can I make individual servings instead of one large dish?
Yes, small glasses or jars work beautifully and are easy to serve.
8. Will the tiramisu be very sweet?
The sweetness is balanced by coffee and cocoa, making it rich but not overly sweet.
9. Can I add more chocolate flavor?
You can add extra grated dark chocolate or mix cocoa into the cream for intensity.
10. How should leftovers be stored?
Cover tightly and refrigerate, consuming within three days for best quality.
Conclusion
Chocolate Tiramisu is the kind of dessert that feels like a warm hug in every bite, rich, creamy, and deeply satisfying. I hope you give it a try and share it with people you love, because desserts like this are meant to be enjoyed together, and I can’t wait for you to experience just how special it is.
Print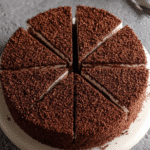
Chocolate Tiramisu
- Prep Time: 30 minutes
- Cook Time: 10 minutes
- Total Time: 40 minutes plus chilling time
- Yield: 8 servings 1x
- Category: Dessert
- Method: No-Bake
- Cuisine: Italian-Inspired
- Diet: Vegetarian
Description
A rich and creamy Chocolate Tiramisu made with layers of coffee-soaked ladyfingers, smooth mascarpone cream, and a generous cocoa and dark chocolate topping for an indulgent yet elegant dessert.
Ingredients
- 300 g ladyfinger biscuits
- 500 g mascarpone cheese
- 250 ml heavy cream
- 120 g granulated sugar
- 4 large egg yolks
- 240 ml strong brewed coffee, cooled
- 40 g unsweetened cocoa powder
- 100 g dark chocolate, finely grated
- 1 teaspoon vanilla extract
Instructions
- Brew strong coffee and allow it to cool completely.
- In a mixing bowl, beat the egg yolks with the granulated sugar until pale, thick, and creamy.
- Add the mascarpone cheese and vanilla extract to the yolk mixture and mix until smooth.
- In a separate bowl, whip the heavy cream until soft peaks form.
- Gently fold the whipped cream into the mascarpone mixture until light and airy.
- Quickly dip each ladyfinger into the cooled coffee, ensuring they are soaked but not soggy.
- Arrange a layer of dipped ladyfingers in the bottom of a serving dish or pan.
- Spread a generous layer of the mascarpone cream mixture over the biscuits.
- Repeat the layering process until all ingredients are used, finishing with cream on top.
- Dust the surface generously with unsweetened cocoa powder and sprinkle with grated dark chocolate.
- Refrigerate for at least 4 hours before serving to allow the dessert to set.
Notes
- Chill overnight for the best flavor and cleaner slices.
- Dip ladyfingers quickly to prevent overly soft layers.
- Sift cocoa powder just before serving for a fresh finish.
- Store covered in the refrigerator for up to 3 days.
Nutrition
- Serving Size: 1 slice
- Calories: 420
- Sugar: 24 g
- Sodium: 85 mg
- Fat: 30 g
- Saturated Fat: 18 g
- Unsaturated Fat: 10 g
- Trans Fat: 0 g
- Carbohydrates: 34 g
- Fiber: 3 g
- Protein: 7 g
- Cholesterol: 145 mg
Keywords: chocolate tiramisu, no bake dessert, mascarpone dessert, coffee dessert, chocolate dessert