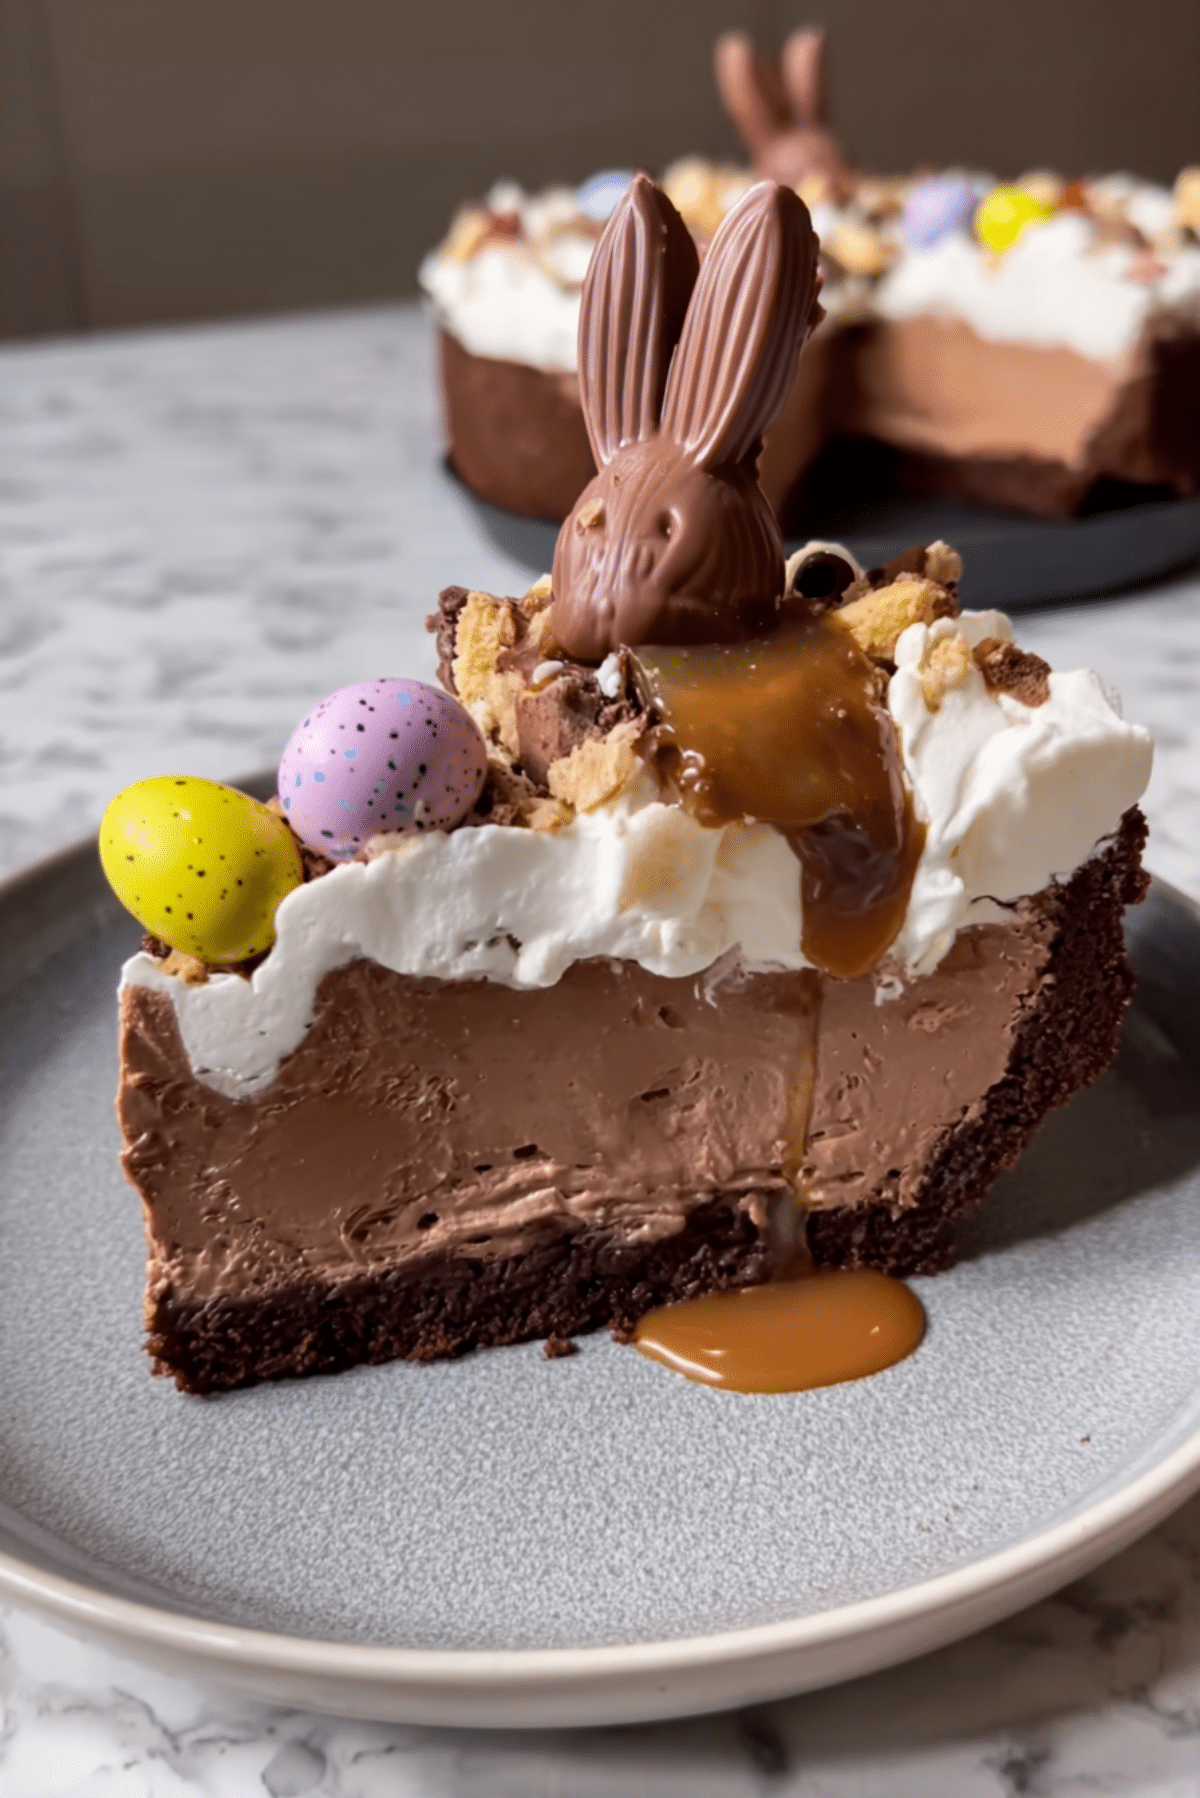
Aster Chocolate Pie
There’s something magical about a dessert that doesn’t just taste good but feels like a celebration on a plate. This Aster Chocolate Pie is one of those recipes that makes people pause after the first bite and go, “Wait, what is this?” It’s rich, velvety, and deeply chocolatey, with a playful surprise of candy eggs, caramel drizzle, and fluffy whipped cream on top. I made it for a spring gathering once and now, it’s the most requested treat from friends and family alike. Trust me, this one’s a total game-changer.
Why This Recipe Will Be Your New Favorite
Whether you’re baking for a holiday, a cozy weekend in, or just because your sweet tooth says so, this pie fits the mood every time.
Adaptable: You can change the toppings, use milk or dark chocolate, or even make it nut-free for different preferences.
Easy on the Wallet: Most ingredients are pantry staples, and there’s no need for fancy tools or expensive chocolate.
No-Fuss: No need to temper chocolate or mess with complicated crusts. It’s as straightforward as it gets.
Easy to Tweak: Want it less sweet? Use bittersweet chips. Want it creamier? Add more whipped cream.
Always a Hit: It looks like a showstopper and tastes even better. People will ask for the recipe, guaranteed.
Great for Planning Ahead: It needs chilling time, so you can easily prep it a day in advance.
Leftover-Friendly: Stores beautifully and tastes even better the next day once the flavors settle.
Behind the Recipe
This pie came from a whim during a chocolate craving session around Easter. I had a pack of mini candy eggs lying around, some leftover condensed milk, and a half-empty box of chocolate cookies. That night, the Aster Chocolate Pie was born. It felt like pure magic watching the layers come together and seeing how well the flavors played. It became my go-to dessert when I wanted to impress without stress.
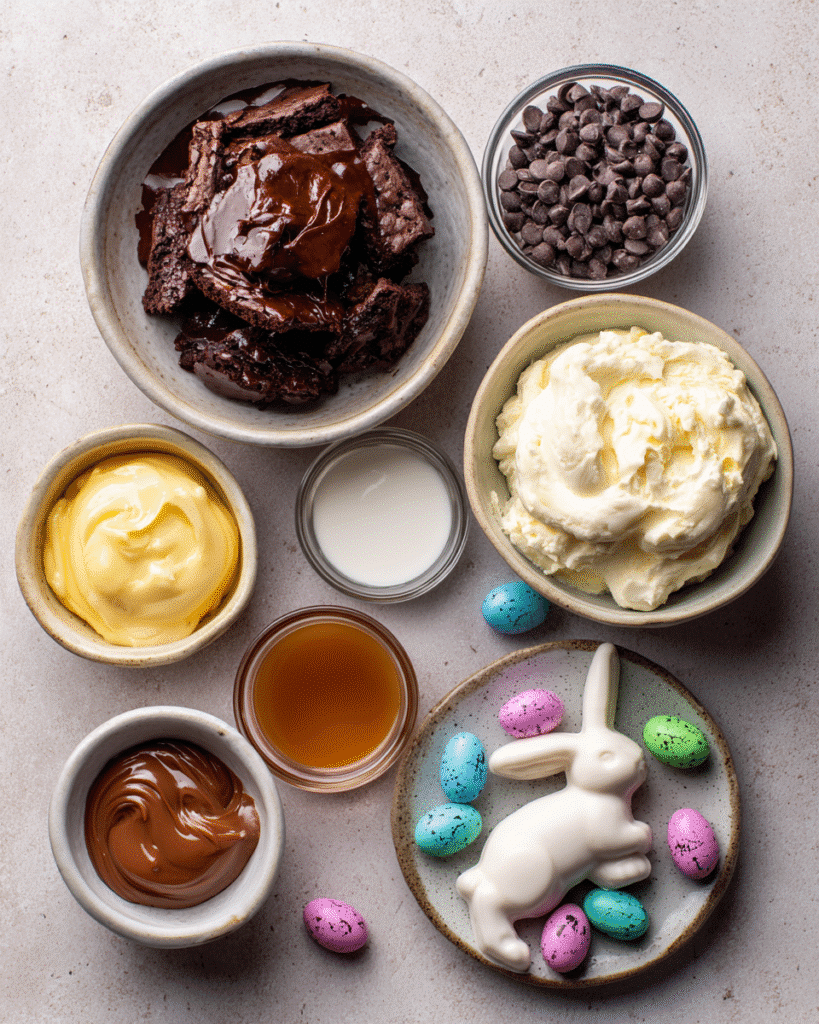
Ingredients You’ll Need
Every layer of this pie brings a different kind of joy. The cookie crust gives a crunchy contrast, the chocolate filling is smooth and lush, and the toppings bring in texture and fun.
- Chocolate Cookies: 2 cups, crushed into fine crumbs. Forms the rich, chocolatey crust base.
- Melted Butter: 6 tablespoons. Binds the cookie crumbs and helps the crust set firmly.
- Dark Chocolate Chips: 1 ½ cups. Delivers deep chocolate flavor to the pie filling.
- Heavy Cream: ¾ cup. Makes the filling creamy and adds a luscious texture.
- Sweetened Condensed Milk: 1 can (14 oz). Adds sweetness and helps the filling set without eggs.
- Vanilla Extract: 1 teaspoon. Enhances the overall flavor and balances the chocolate.
- Caramel Sauce: 2 tablespoons. Drizzled on top for a sweet, buttery accent.
- Whipped Cream: 1 ½ cups. Adds airy lightness and contrast to the dense chocolate layer.
- Mini Candy Eggs: ½ cup. For a pop of color, crunch, and playful Easter touch.
- Chocolate Bunny: 1 small, used for decoration to complete the festive look.
Time Needed to Make This Recipe
Prep Time: 20 minutes
Cook Time: 10 minutes
Total Time: 30 minutes plus chilling time
Special Equipment You’ll Need
You don’t need much to make this pie, which is part of its charm.
9-inch Pie Dish: Perfect size to hold the crust and filling.
Mixing Bowls: For melting, mixing, and combining layers.
Microwave-Safe Bowl or Double Boiler: For melting chocolate safely and evenly.
Spatula: To spread and smooth the filling.
Plastic Wrap: For covering the pie as it chills.
Step-by-Step Instructions
Let’s break it down so you can glide through this recipe like a pro.
- Prepare the Crust: Combine crushed chocolate cookies and melted butter in a bowl. Mix until all crumbs are evenly moistened.
- Press the Crust: Firmly press the mixture into the bottom and sides of a 9-inch pie dish. Chill in the fridge for 10 minutes.
- Melt the Chocolate: In a microwave-safe bowl, combine chocolate chips and heavy cream. Microwave in 20-second bursts, stirring until smooth and silky.
- Mix the Filling: Stir in the sweetened condensed milk and vanilla extract into the melted chocolate mixture until fully combined.
- Fill the Crust: Pour the chocolate filling into the chilled crust. Use a spatula to smooth the surface.
- Chill the Pie: Cover with plastic wrap and refrigerate for at least 4 hours, or until set.
- Add Toppings: Before serving, top with whipped cream, a drizzle of caramel sauce, candy eggs, and the chocolate bunny.
- Serve with a Smile: Slice and serve chilled. It’s rich, so small slices go a long way.
Serving Suggestions & Presentation Tips
Presentation makes this pie unforgettable. Slice with a warm knife for clean edges, then place each portion on a simple dessert plate. A little extra caramel drizzle on the plate adds drama. Garnish with a few extra candy eggs or chocolate shavings. This pie pairs perfectly with a strong cup of coffee or a glass of cold milk.
Extra Tips for Best Results
Here are a few extra ways to make your pie even better.
- Use room temperature cream to help the chocolate melt evenly.
- Chill your crust before adding filling so it holds its shape.
- Don’t overheat the chocolate or it may seize. Gentle heat is key.
- For clean slices, run your knife under hot water and wipe between cuts.
Variations You Can Try
Want to switch it up a bit? Here’s how to make it your own:
- Nutty Crunch: Add crushed hazelnuts or almonds to the crust for extra texture.
- Mint Twist: Stir in ½ teaspoon peppermint extract into the filling for a holiday vibe.
- Fruit Finish: Add a layer of sliced strawberries between the crust and filling for fruity contrast.
- Oreo Whip: Mix crushed Oreos into your whipped cream topping for cookies-and-cream flair.
- Mini Tartlets: Make individual pies using mini tart pans for single-serve desserts.
Make Ahead and Storage
This pie is a dream when made ahead. You can prep the entire thing the night before and keep it in the fridge until ready to serve. Leftovers can be stored in the fridge for up to 5 days. If you want to freeze it, wrap tightly in plastic wrap and freeze for up to one month. Thaw overnight in the fridge before serving. Toppings are best added fresh.
Chef’s Pro Tips for Perfect Results
There are a few insider tricks that bring this dessert to the next level.
- Always use high-quality chocolate for better flavor.
- Let the pie sit at room temp for 10 minutes before slicing.
- Whip your cream just until soft peaks form for the best texture.
- A dash of espresso powder in the filling can deepen the chocolate flavor.
Nutrition Facts
Servings: 10
Calories per serving: 420
Note: These are approximate values.
FAQ’s
Q1: Can I make this pie dairy-free?
Yes, you can use coconut cream in place of heavy cream and a dairy-free condensed milk alternative.
Q2: How long does this pie need to chill?
It’s best to chill for at least 4 hours, but overnight is ideal for clean slices.
Q3: Can I skip the caramel topping?
Absolutely. The pie is rich on its own, but caramel adds a buttery depth.
Q4: Can I use a store-bought crust?
Yes, a pre-made chocolate cookie crust works well if you’re in a hurry.
Q5: How do I prevent the chocolate from seizing?
Use low heat and mix gently. Adding cream while melting helps prevent seizing.
Q6: Can I use milk chocolate instead?
Sure! Just note that it will be a bit sweeter and less intense.
Q7: Will this pie hold up at room temperature?
It will for a short time, but it’s best served chilled to keep the filling firm.
Q8: Can I add peanut butter to the filling?
Yes, swirl in a few tablespoons of smooth peanut butter before chilling.
Q9: Do I need to bake this pie at all?
No baking required! It’s a no-bake dessert from crust to topping.
Q10: Can I double this recipe for a crowd?
You sure can. Just use a larger dish or make two pies side by side.
Conclusion
If you’re looking for a dessert that’s rich, beautiful, and ridiculously easy to make, this Aster Chocolate Pie will absolutely win you over. Let me tell you, it’s worth every bite. Now go ahead and give it a try your taste buds are in for a treat.
Print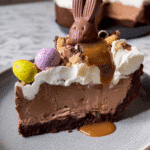
Aster Chocolate Pie
- Prep Time: 20 minutes
- Cook Time: 10 minutes
- Total Time: 30 minutes plus chilling
- Yield: 10 servings 1x
- Category: Dessert
- Method: No-Bake
- Cuisine: American
- Diet: Vegetarian
Description
A rich, no-bake Aster Chocolate Pie with a cookie crust, creamy chocolate filling, and playful Easter toppings like mini candy eggs and a chocolate bunny. Perfect for holidays or whenever you need a crowd-pleasing dessert.
Ingredients
- 2 cups chocolate cookies, crushed
- 6 tablespoons melted butter
- 1 ½ cups dark chocolate chips
- ¾ cup heavy cream
- 1 (14 oz) can sweetened condensed milk
- 1 teaspoon vanilla extract
- 2 tablespoons caramel sauce
- 1 ½ cups whipped cream
- ½ cup mini candy eggs
- 1 small chocolate bunny (for garnish)
Instructions
- Prepare the Crust: Combine crushed chocolate cookies and melted butter in a bowl. Mix until evenly moistened.
- Press the Crust: Press the mixture firmly into the bottom and sides of a 9-inch pie dish. Chill for 10 minutes.
- Melt the Chocolate: Combine chocolate chips and heavy cream in a microwave-safe bowl. Microwave in 20-second intervals, stirring until smooth.
- Mix the Filling: Stir in sweetened condensed milk and vanilla extract into the melted chocolate until fully blended.
- Fill the Crust: Pour the chocolate mixture into the chilled crust. Smooth the top with a spatula.
- Chill the Pie: Cover with plastic wrap and refrigerate for at least 4 hours or overnight.
- Add Toppings: Before serving, top with whipped cream, caramel drizzle, mini candy eggs, and the chocolate bunny.
- Serve: Slice and serve chilled. Enjoy every bite.
Notes
- Use high-quality chocolate for the richest flavor.
- Run your knife under hot water for cleaner slices.
- Make the pie a day ahead for best results.
- Add the toppings right before serving to keep them fresh.
Nutrition
- Serving Size: 1 slice
- Calories: 420
- Sugar: 32g
- Sodium: 210mg
- Fat: 28g
- Saturated Fat: 16g
- Unsaturated Fat: 10g
- Trans Fat: 0g
- Carbohydrates: 42g
- Fiber: 3g
- Protein: 5g
- Cholesterol: 55mg
Keywords: chocolate pie, no bake dessert, Easter pie, easy chocolate tart, sweetened condensed milk pie