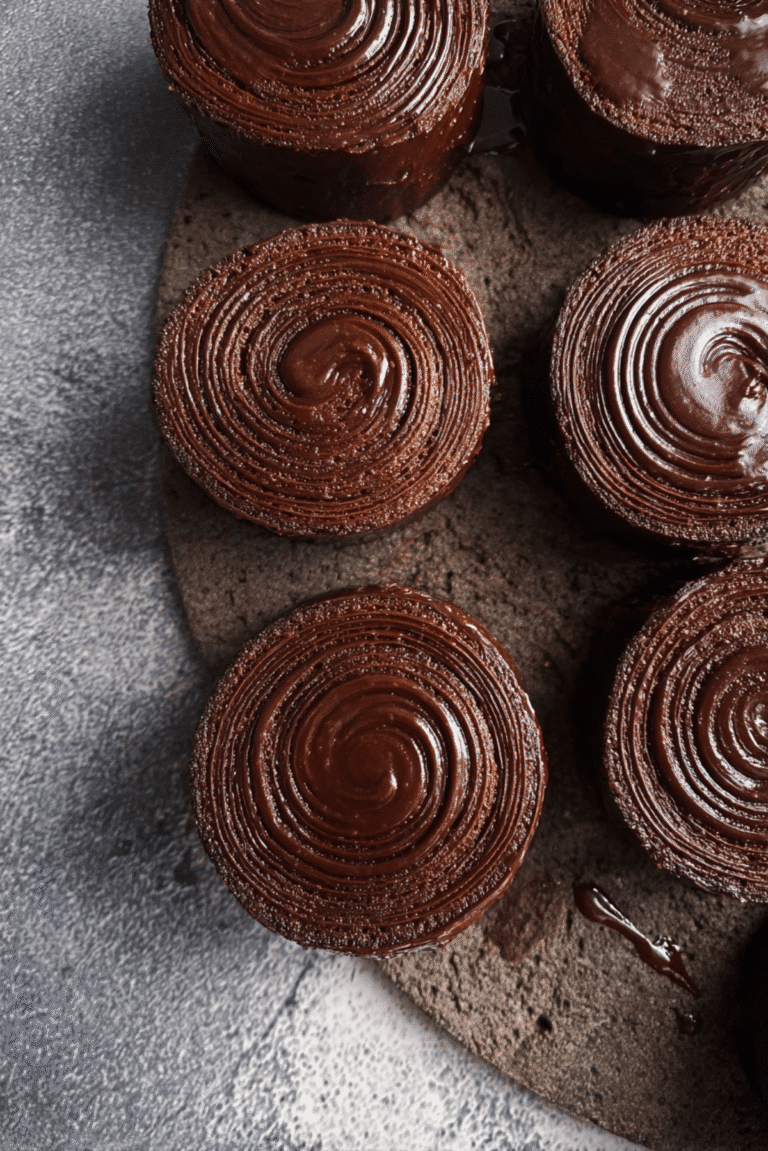
Brown Butter Cadbury Egg Cookies
There is something about a warm cookie packed with melty chocolate and candy shell crunch that instantly feels festive. These cookies bring all of that joy in one bite, with nutty brown butter in the dough, soft centers, golden edges, and little pockets of molten chocolate that make them almost impossible to resist. Trust me, you’re going to love this, especially when one of those chocolate bunnies melts just enough on top to make the whole tray look bakery-worthy.
Why These Cookies Deserve a Spot on Your Baking List
Some cookies are good, and then some cookies make people stop mid-bite and ask for the recipe. This one absolutely belongs in the second group. The brown butter gives the dough a deeper, richer flavor, and the candy eggs bring that signature crisp shell and creamy chocolate center that makes every bite feel a little extra special.
These cookies are soft and chewy in the middle, slightly crisp around the edges, and packed with enough texture to keep things interesting. You get caramel notes from the butter, sweetness from the chocolate, and a playful crunch from the candy shells. This one’s a total game-changer for spring baking, holiday dessert trays, or honestly, any day you want your kitchen to smell incredible.
A Sweet Little Story Behind This Easter Favorite
Now that the craving has officially kicked in, let’s talk about where the inspiration comes from. Cadbury egg treats have become a real seasonal baking favorite, especially around Easter, when those pastel candy shells start showing up in every grocery aisle. Bakers love using them in cookies because they add color, crunch, and that unmistakable creamy chocolate flavor all at once.
Brown butter, on the other hand, has long been a baker’s trick for making simple dough taste more complex. By gently cooking butter until the milk solids turn golden, you get a nutty, toasted aroma that feels almost like caramel. Put those two ideas together and you get a cookie that feels nostalgic and a little elevated at the same time.
What Makes This Recipe So Easy to Love
Before we dive into the mixing bowl, here are all the reasons this batch is worth making again and again.
Versatile: These cookies fit right in at Easter brunch, spring parties, bake sales, or a cozy weekend at home. You can dress them up with bunny chocolates or keep them simple with just candy eggs and chocolate chips.
Budget-Friendly: Most of the ingredients are basic baking staples, and the seasonal candy does the heavy lifting when it comes to decoration. It looks impressive without asking for anything fancy.
Quick and Easy: Once the butter is browned and cooled slightly, the dough comes together with simple mixing steps. The bake time is short, which means warm cookies are never too far away.
Customizable: You can swap in milk chocolate, dark chocolate, or extra candy eggs depending on what you have. A little flaky salt on top also works beautifully.
Crowd-Pleasing: Soft cookies, gooey chocolate, and colorful candy pieces are hard to say no to. Kids love them, adults love them, and they disappear fast.
Make-Ahead Friendly: The dough can be chilled ahead of time, which makes it easy to prep before a party or holiday gathering.
Great for Leftovers: These stay tender for days, and they are ridiculously good warmed up for a few seconds so the centers turn melty again.
Insider Secrets for Bakery-Style Results at Home
And now let’s dive into the little details that make a big difference. A few smart moves can turn a good cookie into a truly unforgettable one.
Brown the butter gently: Keep the heat at medium and stir often so the milk solids toast instead of burn. You want a warm golden color and a nutty aroma.
Let the butter cool slightly: If it is too hot when added to the sugars, the dough can get greasy and the eggs may scramble. Warm is fine, hot is not.
Reserve some mix-ins for the tops: Pressing a few chocolate pieces, candy egg chunks, and bunny candies on the dough right before baking makes the finished cookies look extra beautiful.
Do not overbake: Pull them when the edges are set and the centers still look slightly soft. They will finish setting on the hot pan.
Chill the dough if needed: If your kitchen is warm or the dough feels too soft, a short chill helps the cookies bake up thicker.
The Kitchen Tools That Make It All Easier
Before the magic starts, it helps to gather everything you need so the process feels smooth from start to finish.
Light-colored saucepan: This makes it easier to see when the butter has turned golden brown.
Mixing bowls: You will need one for the dry ingredients and one larger bowl for the dough.
Whisk: Perfect for combining the browned butter and sugars into a glossy base.
Rubber spatula: Great for folding in the flour and mix-ins without overworking the dough.
Cookie scoop: Helps keep the cookies evenly sized so they bake at the same rate.
Baking sheet: A sturdy sheet pan gives the cookies a nice even bake.
Parchment paper: Keeps sticking away and makes cleanup so much easier.
Cooling rack: Lets the cookies finish setting without trapping steam underneath.
Everything You Need for the Best Batch
Once the tools are ready, the ingredients are where the real personality of these cookies starts to shine. Each one has a job to do, and together they create a dough that bakes up rich, chewy, and loaded with texture.
- Unsalted Butter: 1 cup, browned, this is the heart of the recipe and brings that deep nutty flavor that makes the dough taste extra special.
- Light Brown Sugar: 1 cup, packed, this adds moisture and a soft caramel sweetness.
- Granulated Sugar: 1/2 cup, this helps the edges turn lightly crisp while balancing the chewiness.
- Large Egg: 1 whole, this binds the dough and keeps the texture tender.
- Large Egg Yolk: 1 yolk, this adds richness and helps create that soft bakery-style center.
- Vanilla Extract: 2 teaspoons, this rounds out the flavors and makes the dough smell amazing.
- All-Purpose Flour: 2 1/4 cups, this gives the cookies structure while still keeping them soft.
- Baking Soda: 1 teaspoon, this helps the cookies spread just enough and develop a nice texture.
- Baking Powder: 1/2 teaspoon, this adds a bit of lift for a thicker cookie.
- Fine Sea Salt: 1/2 teaspoon, this balances the sweetness and deepens the butter and chocolate flavors.
- Semisweet Chocolate Chunks or Chips: 3/4 cup, these melt into glossy pockets throughout the dough.
- Cadbury Mini Eggs: 1 cup, lightly crushed, these bring crunch, color, and creamy chocolate.
- Chocolate Bunny Candies: 8 pieces, for topping, these make the cookies look festive and playful.
- Flaky Sea Salt: 1 to 2 teaspoons, optional for finishing, this adds a little contrast that makes the chocolate pop.
Smart Swaps That Still Taste Amazing
If you are missing an ingredient or want to play around a little, there is plenty of room to make this recipe work for you.
Unsalted Butter: Salted butter, just reduce the added salt slightly.
Light Brown Sugar: Dark brown sugar, for a deeper molasses flavor.
Semisweet Chocolate Chunks or Chips: Milk chocolate or dark chocolate.
Cadbury Mini Eggs: Extra chocolate chips if the seasonal candy is hard to find.
Chocolate Bunny Candies: Leave them off, or top with a few more crushed candy eggs instead.
Vanilla Extract: Vanilla bean paste for a slightly richer flavor.
The Ingredients That Steal the Show
At this point, you can probably already tell that a couple of ingredients really make these cookies stand out from the usual chocolate chip batch.
Browned Butter: This brings a warm, toasted, almost caramel-like flavor that makes the dough taste richer and more layered.
Cadbury Mini Eggs: These add crisp candy shell pieces and creamy milk chocolate pockets, which gives the cookies a playful crunch and a festive look.

Let’s Bake a Batch Together
Now comes the fun part, and honestly, this is where your kitchen starts smelling so good that people suddenly appear asking what’s in the oven. Here are the steps you’re going to follow.
- Preheat Your Equipment: Preheat your oven to 350°F. Line 2 baking sheets with parchment paper and set them aside.
- Combine Ingredients: In a medium saucepan, melt the butter over medium heat. Continue cooking, stirring often, until it foams and the milk solids turn golden brown and smell nutty. Pour the browned butter into a large bowl and let it cool for about 10 minutes. Whisk in the brown sugar and granulated sugar until glossy. Add the egg, egg yolk, and vanilla, then whisk until smooth. In a separate bowl, whisk together the flour, baking soda, baking powder, and salt. Fold the dry ingredients into the wet mixture until just combined. Stir in the chocolate chunks and crushed candy eggs, reserving a small handful of each for topping.
- Prepare Your Cooking Vessel: Make sure your lined baking sheets are ready and your dough is soft but scoopable. If it feels too loose, chill it for 15 to 20 minutes.
- Assemble the Dish: Scoop the dough into 8 large portions and place them well spaced on the baking sheets. Press a few extra chocolate pieces and candy egg chunks onto the tops. Add one chocolate bunny candy to the top of each dough mound.
- Cook to Perfection: Bake for 11 to 13 minutes, or until the edges are set and lightly golden while the centers still look a little soft. Do not wait for the centers to look fully done.
- Finishing Touches: Let the cookies cool on the baking sheet for 10 minutes. Sprinkle with flaky sea salt while still warm if using.
- Serve and Enjoy: Enjoy them warm while the chocolate is still gooey, or let them cool completely for a slightly chewier texture. Let me tell you, it’s worth every bite.
The Texture and Flavor That Make These So Irresistible
As the cookies bake, the dough puffs slightly and settles into thick rounds with rippled edges and soft middles. The brown butter builds a deep, toasted flavor that tastes warm and almost toffee-like, while the chocolate melts into rich little pools. Then the candy shells come in with tiny crisp bites that break up all that softness in the best way.
It is that contrast that makes these cookies so memorable. You get chewy centers, tender crumb, glossy chocolate, and little crunchy bits all in one bite. The sweet milk chocolate plays beautifully against the hint of salt and the almost nutty depth from the butter.
Extra Baking Tips That Make a Difference
A few final tricks can help you get the exact texture you want.
- Use room temperature eggs: They blend more easily into the warm butter mixture and help keep the dough smooth.
- Roughly crush the candy eggs: You want chunks, not powder, so the cookies keep that signature crunch.
- Space the dough well apart: These are large cookies, and they need room to spread properly.
- Top them before baking: A few visible mix-ins on top make the finished cookies look extra inviting.
Common Cookie Mistakes and How to Dodge Them
Even simple cookies have a few traps, so here are the ones worth watching.
- Burning the butter: If the butter turns dark too fast or smells bitter, start over and lower the heat.
- Adding eggs to very hot butter: This can cook the eggs too early and affect the dough texture.
- Overmixing the flour: That can make the cookies tough instead of soft and tender.
- Overbaking: The cookies should look slightly underdone in the center when they come out.
A Quick Look at the Nutrition
These cookies are definitely a treat, and a very good one at that.
Servings: 8 cookies
Calories per serving: 420
Note: These are approximate values.
Timing Your Bake
The nice thing here is that you do not need to spend all day in the kitchen to get something that feels this special.
Prep Time: 20 minutes
Cook Time: 12 minutes
Total Time: 32 minutes
Make-Ahead and Storage Tips for Busy Days
If you want to get ahead, the dough can be made and chilled for up to 24 hours before baking. In fact, a little chill time can deepen the flavor and help the cookies bake up even thicker.
Once baked, store the cookies in an airtight container at room temperature for up to 4 days. For longer storage, freeze the baked cookies or the portioned dough for up to 2 months. To reheat, warm a cookie in the microwave for about 10 seconds so the chocolate turns soft and glossy again.
The Best Ways to Serve Them
These cookies are wonderful straight from the pan, but there are a few ways to make them feel even more special. Serve them slightly warm with a glass of cold milk, a mug of coffee, or hot chocolate if you are leaning fully into dessert mode.
They also look beautiful on a spring dessert board with berries, pastel candies, and a few extra chocolate treats. For a richer dessert, sandwich a scoop of vanilla ice cream between two cookies and serve right away.
Fun Ideas for Leftovers
If by some miracle you have leftovers, there are some very good ways to use them up. Crumble one over vanilla ice cream for a quick sundae, or chop a cookie into pieces and fold it into whipped cream for an easy dessert cup.
You can also warm a cookie and turn it into the base for a mini ice cream sandwich. Another favorite is crumbling one over yogurt with a little fruit when you want something that feels playful and a little indulgent.
A Few More Helpful Tips Before You Start
Sometimes the small details are the ones that make the bake feel easy and relaxed.
If your candy eggs are hard to crush, place them in a zip-top bag and gently tap them with a rolling pin. Try not to smash them too finely. Big pieces look prettier and taste better in the dough. Also, let the cookies rest on the baking sheet after baking, because that is when the centers finish setting into that perfect chewy texture.
Make Them Look As Good As They Taste
Presentation matters, especially with cookies this cute. Pressing a bunny chocolate on top before baking gives each cookie a playful centerpiece, and a few visible candy shell pieces make the colors pop beautifully.
A tiny sprinkle of flaky salt right after baking adds a subtle sparkle and makes the melted chocolate look even more dramatic. Stack them on a simple plate or cooling rack and they instantly look like they came from a fancy bakery case.
Variations Worth Trying Next Time
Once you make the first batch, it is hard not to start dreaming up the next one.
Double Chocolate Version: Add 2 tablespoons of cocoa powder and reduce the flour by 2 tablespoons for a richer chocolate base.
Dark Chocolate Twist: Use chopped dark chocolate instead of semisweet for a deeper, less sweet cookie.
Extra Crunch Style: Add 1/2 cup chopped toasted pecans for a nutty crunch that works beautifully with the brown butter.
Mini Cookie Version: Scoop smaller portions and reduce the bake time to about 9 to 10 minutes for party-friendly cookies.
Salted Caramel Finish: Drizzle cooled cookies lightly with caramel sauce and finish with flaky salt.
FAQ’s
Q1: Can I make the dough ahead of time?
Yes, the dough can be made up to 24 hours ahead and chilled in the fridge. It actually bakes up beautifully after a little rest.
Q2: Do I have to use brown butter?
Brown butter gives the cookies their signature flavor, so I really recommend it. It is the detail that makes them taste extra rich and special.
Q3: Can I freeze the dough?
Absolutely. Scoop the dough into portions, freeze until firm, then store in a freezer-safe container for up to 2 months.
Q4: What if I cannot find Cadbury Mini Eggs?
You can use extra chocolate chips or another candy-coated chocolate, though the flavor and texture will be a little different.
Q5: Why are my cookies spreading too much?
The butter may have been too warm, or the dough may need a quick chill. Chilling the dough for 15 to 20 minutes usually helps.
Q6: Can I make smaller cookies?
Yes, just use a smaller scoop and reduce the bake time. Keep an eye on them so the centers stay soft.
Q7: Should I crush the candy eggs finely?
No, leave them in small chunks. That way you get little pockets of crunch instead of candy dust disappearing into the dough.
Q8: Can I skip the bunny chocolates on top?
Yes, the cookies will still be delicious. The bunny candies are mostly for decoration and a little extra chocolate on top.
Q9: How do I know when the cookies are done?
Look for lightly golden edges and centers that still seem a little soft. They finish setting as they cool on the pan.
Q10: Can I add flaky salt on top?
Yes, and it is amazing. Just a little sprinkle adds contrast and makes the chocolate flavors shine.
Conclusion
These cookies are everything a fun seasonal bake should be, soft, gooey, rich, and full of little crunchy chocolate surprises. The brown butter gives them depth, the candy eggs make them festive, and the melted chocolate keeps every bite dreamy. Trust me, once you pull a tray of these out of the oven, your whole kitchen feels warmer and happier. Bake a batch, share a few if you must, and save one for yourself while it is still warm.
Print
Brown Butter Cadbury Egg Cookies
- Prep Time: 20 minutes
- Cook Time: 12 minutes
- Total Time: 32 minutes
- Yield: 8 large cookies 1x
- Category: Dessert
- Method: Baking
- Cuisine: American
- Diet: Vegetarian
Description
Soft and chewy brown butter cookies packed with semisweet chocolate, crushed Cadbury Mini Eggs, and topped with chocolate bunny candies for a festive, bakery-style treat.
Ingredients
- 1 cup unsalted butter, browned
- 1 cup light brown sugar, packed
- 1/2 cup granulated sugar
- 1 large egg
- 1 large egg yolk
- 2 teaspoons vanilla extract
- 2 1/4 cups all-purpose flour
- 1 teaspoon baking soda
- 1/2 teaspoon baking powder
- 1/2 teaspoon fine sea salt
- 3/4 cup semisweet chocolate chunks or chips
- 1 cup Cadbury Mini Eggs, lightly crushed
- 8 chocolate bunny candies
- 1 to 2 teaspoons flaky sea salt, optional
Instructions
- Preheat oven to 350°F and line 2 baking sheets with parchment paper.
- Brown the butter in a medium saucepan over medium heat, stirring often, until the milk solids are golden brown and smell nutty. Transfer to a large bowl and cool for 10 minutes.
- Whisk the brown sugar and granulated sugar into the browned butter until glossy. Add the egg, egg yolk, and vanilla extract, then whisk until smooth.
- In a separate bowl, whisk together the flour, baking soda, baking powder, and sea salt.
- Fold the dry ingredients into the wet ingredients until just combined. Stir in the semisweet chocolate and crushed Cadbury Mini Eggs, reserving a small handful for topping.
- If the dough feels too soft, chill it for 15 to 20 minutes.
- Scoop the dough into 8 large portions and place them on the prepared baking sheets, spacing them well apart. Press extra chocolate and candy egg pieces on top, then place one chocolate bunny candy on each cookie.
- Bake for 11 to 13 minutes, until the edges are lightly golden and the centers are still soft.
- Cool on the baking sheet for 10 minutes. Sprinkle with flaky sea salt if desired, then transfer to a wire rack.
- Serve warm or cool completely before storing.
Notes
- Do not overbake, the cookies should look slightly underdone in the center when removed from the oven.
- Let the browned butter cool slightly before adding the eggs.
- Roughly crush the Cadbury Mini Eggs so you keep small crunchy pieces.
- The dough can be chilled up to 24 hours before baking.
Nutrition
- Serving Size: 1 cookie
- Calories: 420
- Sugar: 29g
- Sodium: 210mg
- Fat: 22g
- Saturated Fat: 13g
- Unsaturated Fat: 7g
- Trans Fat: 0g
- Carbohydrates: 52g
- Fiber: 2g
- Protein: 4g
- Cholesterol: 62mg
Keywords: brown butter cookies, Cadbury Mini Egg cookies, Easter cookies, chocolate chip cookies, bakery style cookies