Strawberry Baked Oatmeal Bars
There is something so comforting about pulling a pan of warm baked oats from the oven and catching that sweet strawberry aroma right away. These bars have that cozy breakfast feel, but they also land somewhere between snack and dessert, especially once the creamy glaze and little ribbons of chocolate go on top. Trust me, you’re going to love this. They are soft in the center, lightly golden around the edges, and packed with fruity pockets that make every bite feel a little special.
The kind of bake that makes mornings feel easier
Some recipes earn a spot in the regular rotation because they taste good, and others stay because they make life feel simpler. This one does both. You mix everyday ingredients, pour everything into one pan, and bake until the top is lightly set and the strawberries turn jammy and sweet. The result is hearty enough for breakfast, sweet enough for a midday treat, and pretty enough to set out when friends stop by for coffee.
And now let’s dive a little deeper, because there is more charm here than just convenience.
A cozy oat bake with breakfast roots
Baked oatmeal has long been a practical favorite in home kitchens, especially in places where oats are a pantry staple and make-ahead breakfasts are part of the weekly routine. It sits somewhere between porridge, cake, and breakfast casserole, which is probably why it keeps showing up in so many family kitchens.
Fruit baked into oats is a natural pairing, and strawberries bring brightness that cuts through the richer, comforting flavor of the oats. Add a touch of chocolate and a creamy glaze, and the whole thing feels like a modern brunch bake that still keeps its homestyle heart. Let me tell you, it’s worth every bite.
Why this bake keeps winning people over
Before we get to the mixing bowl, it helps to know exactly why this one works so well.
Versatile: You can serve it warm for breakfast, chilled for meal prep, or dressed up with glaze and chocolate for a sweeter finish. It fits into busy weekdays and slower weekend mornings just as easily.
Budget-Friendly: Most of the ingredients are simple pantry and fridge basics, which means you can make a full pan without needing anything fancy or hard to find.
Quick and Easy: The prep is straightforward, the steps are simple, and the oven does most of the work. That is always a win.
Customizable: You can play with the fruit, tweak the sweetness, or adjust the toppings depending on what you have on hand and what mood you are in.
Crowd-Pleasing: Oats, strawberries, and chocolate are one of those combinations that almost everybody leans toward. It feels familiar, cozy, and just indulgent enough.
Make-Ahead Friendly: Bake the pan ahead, slice it once cool, and keep it ready for grab-and-go mornings or easy snacks.
Great for Leftovers: The bars hold up beautifully in the fridge, and they reheat well too, which makes them especially useful for busy weeks.
Smart little tricks that make the texture even better
A good baked oat bar is all about balance. You want enough moisture for a soft center, enough structure for clean slices, and just enough sweetness to keep the berries shining.
One helpful trick is to let the mixture sit for a couple of minutes before baking so the oats begin absorbing the liquid. Another is to dice the strawberries instead of leaving them too large, which helps them distribute more evenly through the pan. And if you want neater slices, let the bars cool before glazing. This one’s a total game-changer when it comes to presentation.
The kitchen tools that make this feel effortless
You do not need much here, which is part of the appeal. A few reliable tools will carry the whole process from start to finish.
Mixing Bowl: A large bowl gives you enough room to combine the wet and dry ingredients without making a mess.
Whisk: This helps blend the eggs, milk, maple syrup, melted butter, and vanilla smoothly so the mixture bakes evenly.
Spatula or Wooden Spoon: Perfect for folding in the strawberries and chocolate without overworking the mixture.
8×8-Inch Baking Dish: This size gives the bars enough depth to stay tender while still baking through nicely.
Measuring Cups and Spoons: Precise measuring keeps the texture consistent, especially with oats, flour, and liquid.
Cooling Rack: Letting the pan cool properly helps the bars firm up for cleaner slicing.
What goes into every cozy, fruity bite
The beauty of this bake is how each ingredient pulls its weight. Nothing feels unnecessary, and together they create a pan that is soft, hearty, and full of flavor.
- Old-Fashioned Rolled Oats: 2 cups, these make up the hearty base and give the bars their satisfying chew.
- Oat Flour: 1/2 cup, this adds a little structure so the bars hold together without feeling heavy.
- Brown Sugar: 1/3 cup, it brings a warm sweetness that pairs beautifully with the oats and berries.
- Baking Powder: 1 teaspoon, this gives the bars a gentle lift and keeps them from feeling dense.
- Ground Cinnamon: 1/2 teaspoon, it adds a soft warmth that rounds out the fruit and chocolate.
- Salt: 1/4 teaspoon, just enough to sharpen all the sweet flavors.
- Large Eggs: 2, these bind the mixture and help create a tender, sliceable texture.
- Milk: 1 1/2 cups, this softens the oats and keeps the bars moist as they bake.
- Maple Syrup: 1/4 cup, it adds natural sweetness and a little depth.
- Unsalted Butter, melted: 2 tablespoons, this adds richness and helps the edges bake up beautifully.
- Vanilla Extract: 1 teaspoon, it gives the whole pan that cozy bakery-style aroma.
- Strawberries, diced: 1 1/2 cups, these bake into juicy little pockets that brighten every bite.
- Dark Chocolate, chopped: 1/3 cup, this melts into the oats and gives the bars a richer finish.
- Plain Greek Yogurt: 1/2 cup, this becomes the creamy topping that adds tang and contrast.
- Powdered Sugar: 2 tablespoons, this lightly sweetens the yogurt topping without making it too heavy.
- Milk for the glaze: 1 tablespoon, this loosens the topping just enough for a soft drizzle.
- Dark Chocolate, melted for topping: 2 tablespoons, this gives the finished bars that glossy final touch.
- Fresh Strawberry Halves, for garnish: 3 to 4 halves, these make the top look fresh, bright, and extra inviting.
Easy swaps when you need to work with what you have
That ingredient lineup is lovely as written, but this is also the kind of bake that bends easily.
Oat Flour: Use all-purpose flour in the same amount if that is what you have.
Brown Sugar: Coconut sugar works nicely for a slightly deeper sweetness.
Milk: Dairy milk or unsweetened almond milk both work well here.
Maple Syrup: Honey can step in if needed, though the flavor will be a little different.
Greek Yogurt: Vanilla yogurt can work for the topping if you want a sweeter finish.
Dark Chocolate: Semi-sweet chocolate is a perfectly good substitute if that is your preference.
The stars that really make this pan shine
A few ingredients deserve a little spotlight because they do so much of the flavor work.
Strawberries: These soften into sweet, juicy pockets as the bars bake, which keeps the oat base from feeling too plain or too dry. They bring color, freshness, and that bright pop that makes each square feel lively.
Dark Chocolate: Even a small amount changes the whole mood of the bake. It adds richness, a bit of indulgence, and that dreamy contrast against the fruit and creamy glaze.

Let’s get these bars into the oven
Now that the ingredients are lined up, this is where it all starts to come together. The process is simple, and each step builds on the one before it so the final pan feels easy and natural from the first stir to the final drizzle.
- Preheat Your Equipment: Preheat your oven to 350°F. Lightly grease an 8×8-inch baking dish or line it with parchment paper for easier lifting and slicing later.
- Combine Ingredients: In a large bowl, whisk together the rolled oats, oat flour, brown sugar, baking powder, cinnamon, and salt. In a second bowl, whisk the eggs, milk, maple syrup, melted butter, and vanilla extract until smooth. Pour the wet mixture into the dry mixture and stir until combined. Fold in the diced strawberries and chopped dark chocolate.
- Prepare Your Cooking Vessel: Pour the mixture into the prepared baking dish and spread it into an even layer so the bars bake uniformly from edge to center.
- Assemble the Dish: Gently press the top with the back of a spoon if needed so the strawberries and oats sit evenly in the pan. This helps the surface bake up neatly.
- Cook to Perfection: Bake for 35 minutes, or until the center is set and the edges look lightly golden. A knife inserted near the center should come out mostly clean, with moisture from the berries but no raw batter.
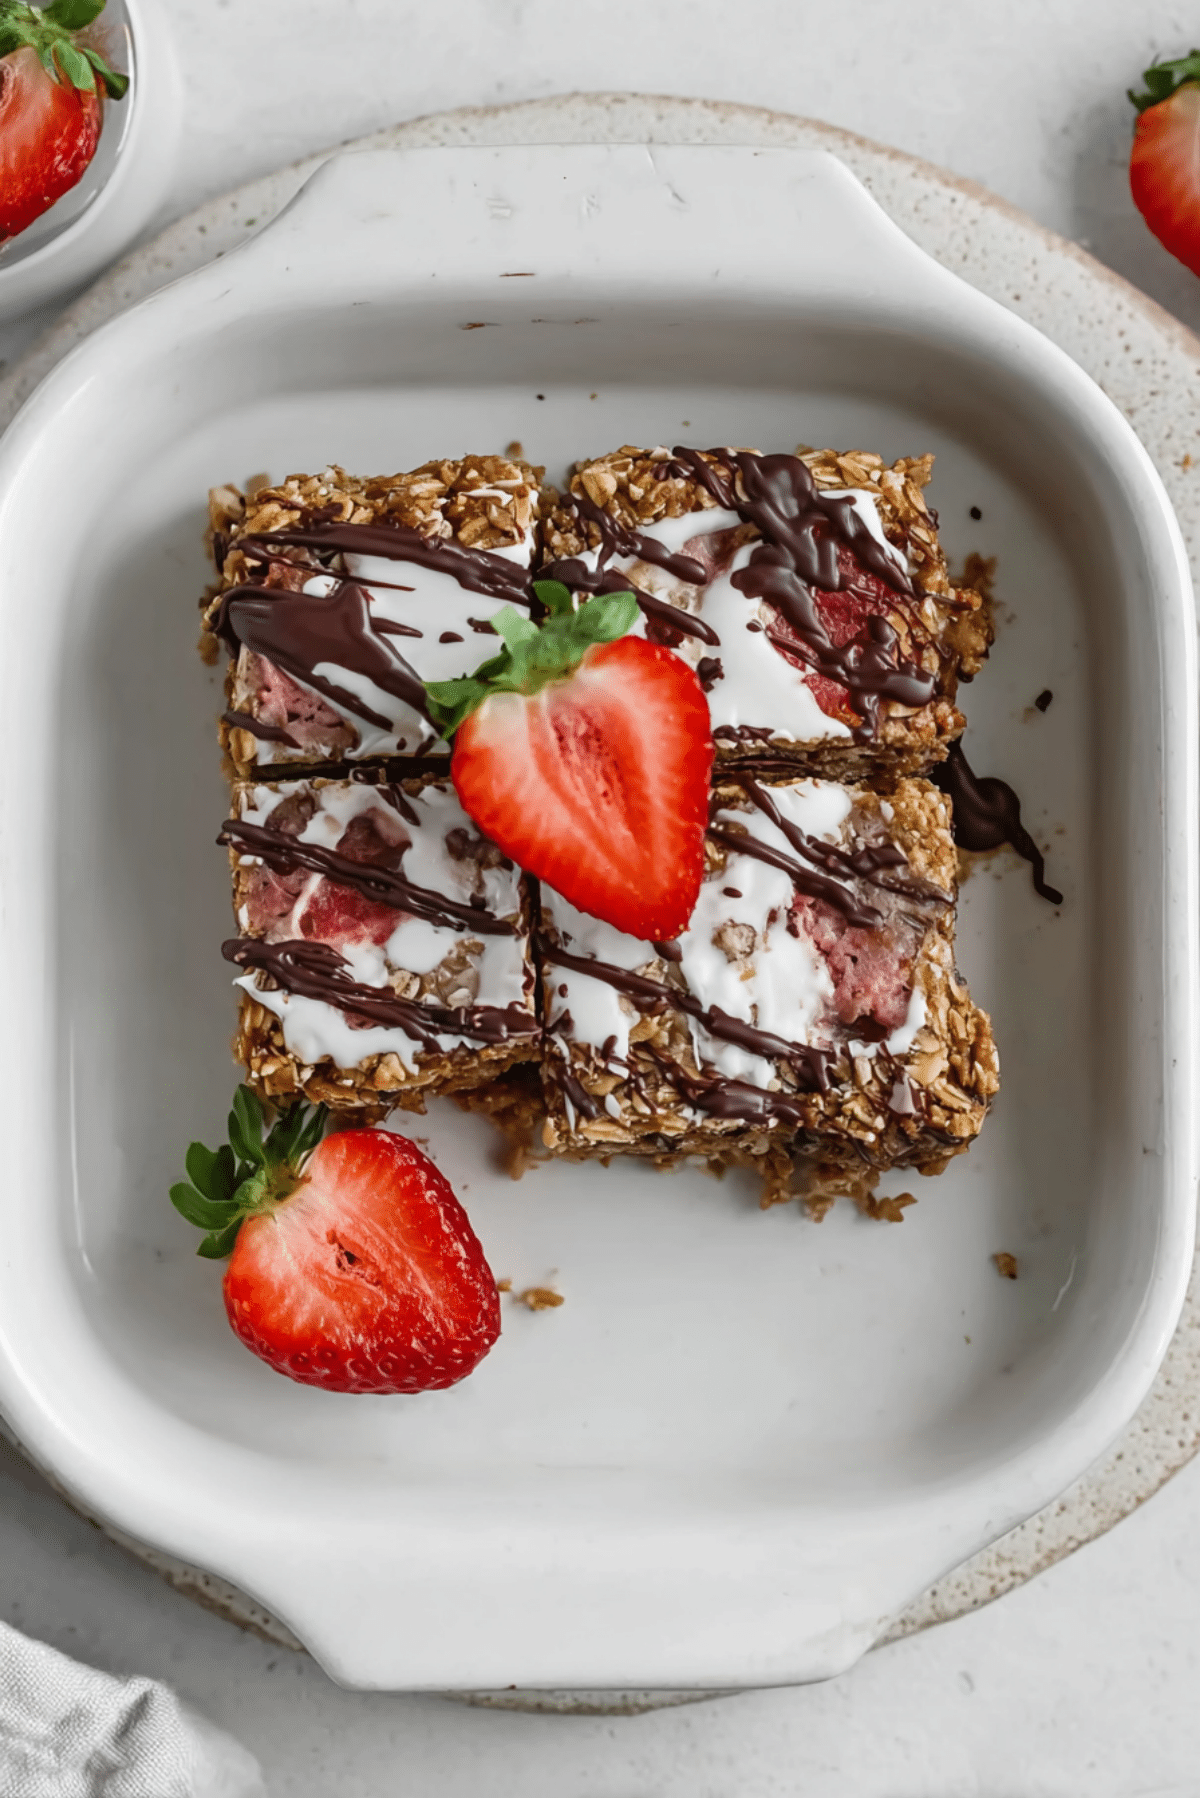
- Finishing Touches: Let the baked oats cool for at least 15 minutes. Stir together the Greek yogurt, powdered sugar, and 1 tablespoon milk until smooth. Drizzle over the bars, then finish with the melted dark chocolate and fresh strawberry halves.
- Serve and Enjoy: Slice into 9 bars and serve slightly warm or completely cooled. They are delicious either way, and the texture gets even better as they rest.
The texture gets better with every layer
One of the best things about these bars is the contrast. The oats bake into a soft, sturdy base that feels wholesome and satisfying, while the strawberries turn tender and jammy in little bursts throughout. Then comes the creamy yogurt topping, which cools everything down and adds a smooth tangy layer, followed by the dark chocolate that brings richness and a little snap once it sets.
As the bars cool, the flavors settle and deepen. The cinnamon becomes gentler, the berries taste sweeter, and the chocolate feels more pronounced against the creamy glaze. It is the kind of bake that somehow tastes comforting and fresh at the same time.
A few extra tips to help you nail it on the first try
The process is simple, but a few small details can make the final result even better.
- Use ripe but firm strawberries: They bring great flavor without releasing too much excess liquid into the batter.
- Let the bars cool before slicing: This helps them hold their shape and keeps the glaze from slipping too much.
- Do not skip the salt: A small amount sharpens the sweetness and keeps the flavors balanced.
- Chop the chocolate small: Smaller bits melt more evenly through the bars and make every bite more consistent.
Common slip-ups, and how to avoid them
Even easy bakes have their little trouble spots, so here are the ones worth watching.
- Using too much fruit: Extra strawberries can make the bars overly wet, so stick to the measured amount for the best texture.
- Pulling the pan too early: If the center still looks loose, give it a few more minutes. The bars should look set before they come out.
- Glazing while too hot: The topping can melt away instead of sitting nicely on top, so give the pan time to cool first.
- Cutting huge strawberry pieces: Large chunks can create uneven pockets, while smaller diced pieces distribute more nicely.
A quick look at the numbers
If you like to plan ahead, these approximate nutrition details make it easier to fit into your day while still enjoying every bite.
Servings: 9
Calories per serving: 245
Note: These are approximate values.
The timing you can plan around
This is one of those bakes that feels impressive without demanding half your day, which is always a relief.
Prep Time: 15 minutes
Cook Time: 35 minutes
Total Time: 50 minutes
Make-ahead magic and smart storage
One of the reasons these bars are so easy to love is that they fit beautifully into real life. You can bake the pan the night before, cool it completely, and keep it covered in the fridge. Then just add the glaze and chocolate before serving, or store the toppings separately if you want everything to look especially fresh.
For storage, keep the sliced bars in an airtight container in the refrigerator for up to 4 days. For freezing, wrap individual bars well and freeze them without the fresh garnish for up to 2 months. Reheat gently in the microwave or let them thaw overnight in the fridge. The texture stays pleasantly soft, and the flavor still feels fresh and cozy.
Serving ideas that make them feel extra special
These bars are lovely on their own, but they are also easy to dress up. Serve them with hot coffee for a cozy breakfast, with tea in the afternoon, or with an extra spoonful of Greek yogurt for a more filling start to the day.
For brunch, place the bars on a platter with fresh berries on the side so the colors really pop. For a sweeter moment, warm a slice slightly and let the chocolate soften just a little. That combination is hard to beat.
Leftovers never stay boring around here
If you happen to have a few bars left, there are plenty of good ways to keep them interesting. Crumble one over yogurt with extra sliced strawberries for a breakfast parfait feel. Warm a square and top it with a spoonful of nut butter for a richer snack. You can even cube a bar and layer it into a simple dessert glass with yogurt and berries.
That is the nice thing about a bake like this, it keeps finding new ways to be useful.
A few final little upgrades worth knowing
Sometimes it is the smallest touches that make the biggest difference.
For extra strawberry flavor: Stir a spoonful of strawberry jam into the yogurt topping.
For a softer bar: Let the batter rest for 5 minutes before baking so the oats start soaking up the liquid.
For cleaner slices: Chill the pan briefly before cutting if you want especially neat edges.
For more sweetness on top: Add a tiny extra drizzle of maple syrup right before serving.
How to make the pan look party ready
Presentation matters, especially with a bake this pretty. The white yogurt glaze gives you a bright base, and the dark chocolate drizzled over that creates lovely contrast. Add the strawberry halves at the end so the color stays vibrant and fresh.
If you are serving for brunch or guests, slice the bars evenly and arrange them on a simple plate or platter with a few extra berries nearby. The red fruit, creamy topping, and golden oat base make the whole thing look cheerful and polished without much effort at all.
Fun ways to switch things up next time
Once you make the first pan, it is easy to start imagining different versions.
Berry Blend Version: Swap half the strawberries for raspberries or blueberries for a mixed berry twist.
Nutty Crunch Version: Add 1/4 cup chopped walnuts or pecans to the batter for extra texture.
Coconut Lover’s Version: Stir in 2 tablespoons shredded coconut for a tropical little note.
Chocolate Forward Version: Increase the chopped dark chocolate to 1/2 cup if you want a more dessert-like finish.
Citrus Bright Version: Add 1 teaspoon lemon zest to the batter or the yogurt topping to make the berries pop even more.
FAQ’s
Q1: Can I make these the night before?
Yes, absolutely. Bake the pan, let it cool, and store it covered in the fridge. Add the glaze and garnish before serving if you want the freshest look.
Q2: Do I have to use oat flour?
No. All-purpose flour works well in the same amount, though oat flour keeps the texture especially soft and oat-forward.
Q3: Can I use frozen strawberries?
Yes, but thaw and drain them well first. Too much extra moisture can make the bars softer than intended.
Q4: How do I know when the bars are done?
The center should look set, and the edges should be lightly golden. A knife inserted near the middle should come out mostly clean.
Q5: Can I leave off the glaze?
You can. The bars are still delicious without it, though the yogurt topping adds a lovely creamy contrast.
Q6: Are they sweet enough for dessert?
Yes, especially with the glaze and chocolate drizzle. They still feel balanced, but they definitely lean into treat territory.
Q7: Can I make them dairy-free?
Yes. Use a dairy-free milk and swap the butter and Greek yogurt for dairy-free alternatives.
Q8: What is the best way to reheat them?
A few seconds in the microwave works well. You want them just warm enough to soften slightly, not steaming hot.
Q9: Can I double the recipe?
Yes, bake it in a 9×13-inch pan and add a few extra minutes as needed. Watch the center for doneness.
Q10: Do they hold together well for meal prep?
They do. Once cooled, they slice nicely and travel well, which makes them great for breakfast boxes and snacks.
Conclusion
These bars bring together everything that makes a homemade bake feel worth it, warm oats, sweet strawberries, creamy topping, and that little touch of chocolate that makes the whole pan feel extra special. They are simple enough for a weekday, pretty enough for brunch, and comforting enough to make you look forward to the next slice. Give them a try, settle in with something warm to drink, and enjoy every cozy, fruity bite.
Print
Strawberry Baked Oatmeal Bars
- Prep Time: 15 minutes
- Cook Time: 35 minutes
- Total Time: 50 minutes
- Yield: 9 bars 1x
- Category: Breakfast
- Method: Baking
- Cuisine: American
- Diet: Vegetarian
Description
Soft and cozy baked oatmeal bars filled with juicy strawberries and dark chocolate, then finished with a creamy yogurt glaze and fresh strawberry garnish. Perfect for breakfast, snacking, or a light dessert.
Ingredients
- 2 cups old-fashioned rolled oats
- 1/2 cup oat flour
- 1/3 cup brown sugar
- 1 teaspoon baking powder
- 1/2 teaspoon ground cinnamon
- 1/4 teaspoon salt
- 2 large eggs
- 1 1/2 cups milk
- 1/4 cup maple syrup
- 2 tablespoons unsalted butter, melted
- 1 teaspoon vanilla extract
- 1 1/2 cups strawberries, diced
- 1/3 cup dark chocolate, chopped
- 1/2 cup plain Greek yogurt
- 2 tablespoons powdered sugar
- 1 tablespoon milk, for the glaze
- 2 tablespoons dark chocolate, melted for topping
- 3 to 4 fresh strawberry halves, for garnish
Instructions
- Preheat the oven to 350°F. Lightly grease an 8×8-inch baking dish or line it with parchment paper.
- In a large bowl, whisk together the rolled oats, oat flour, brown sugar, baking powder, cinnamon, and salt.
- In a separate bowl, whisk the eggs, milk, maple syrup, melted butter, and vanilla extract until smooth.
- Pour the wet mixture into the dry mixture and stir until combined. Fold in the diced strawberries and chopped dark chocolate.
- Transfer the mixture to the prepared baking dish and spread it into an even layer.
- Bake for 35 minutes, or until the center is set and the edges are lightly golden.
- Let the baked oatmeal cool for at least 15 minutes.
- In a small bowl, stir together the Greek yogurt, powdered sugar, and 1 tablespoon milk until smooth.
- Drizzle the yogurt glaze over the bars, then drizzle with the melted dark chocolate and top with fresh strawberry halves.
- Slice into 9 bars and serve warm or cooled.
Notes
- Use ripe but firm strawberries for the best texture.
- Let the bars cool before slicing for cleaner edges.
- Frozen strawberries can be used, but thaw and drain them well first.
- Store leftovers in an airtight container in the refrigerator for up to 4 days.
Nutrition
- Serving Size: 1 bar
- Calories: 245
- Sugar: 14g
- Sodium: 170mg
- Fat: 8g
- Saturated Fat: 4g
- Unsaturated Fat: 3g
- Trans Fat: 0g
- Carbohydrates: 36g
- Fiber: 4g
- Protein: 8g
- Cholesterol: 48mg
Keywords: strawberry baked oatmeal bars, baked oats, strawberry oatmeal bars, breakfast bars, healthy baked oatmeal, make-ahead breakfast