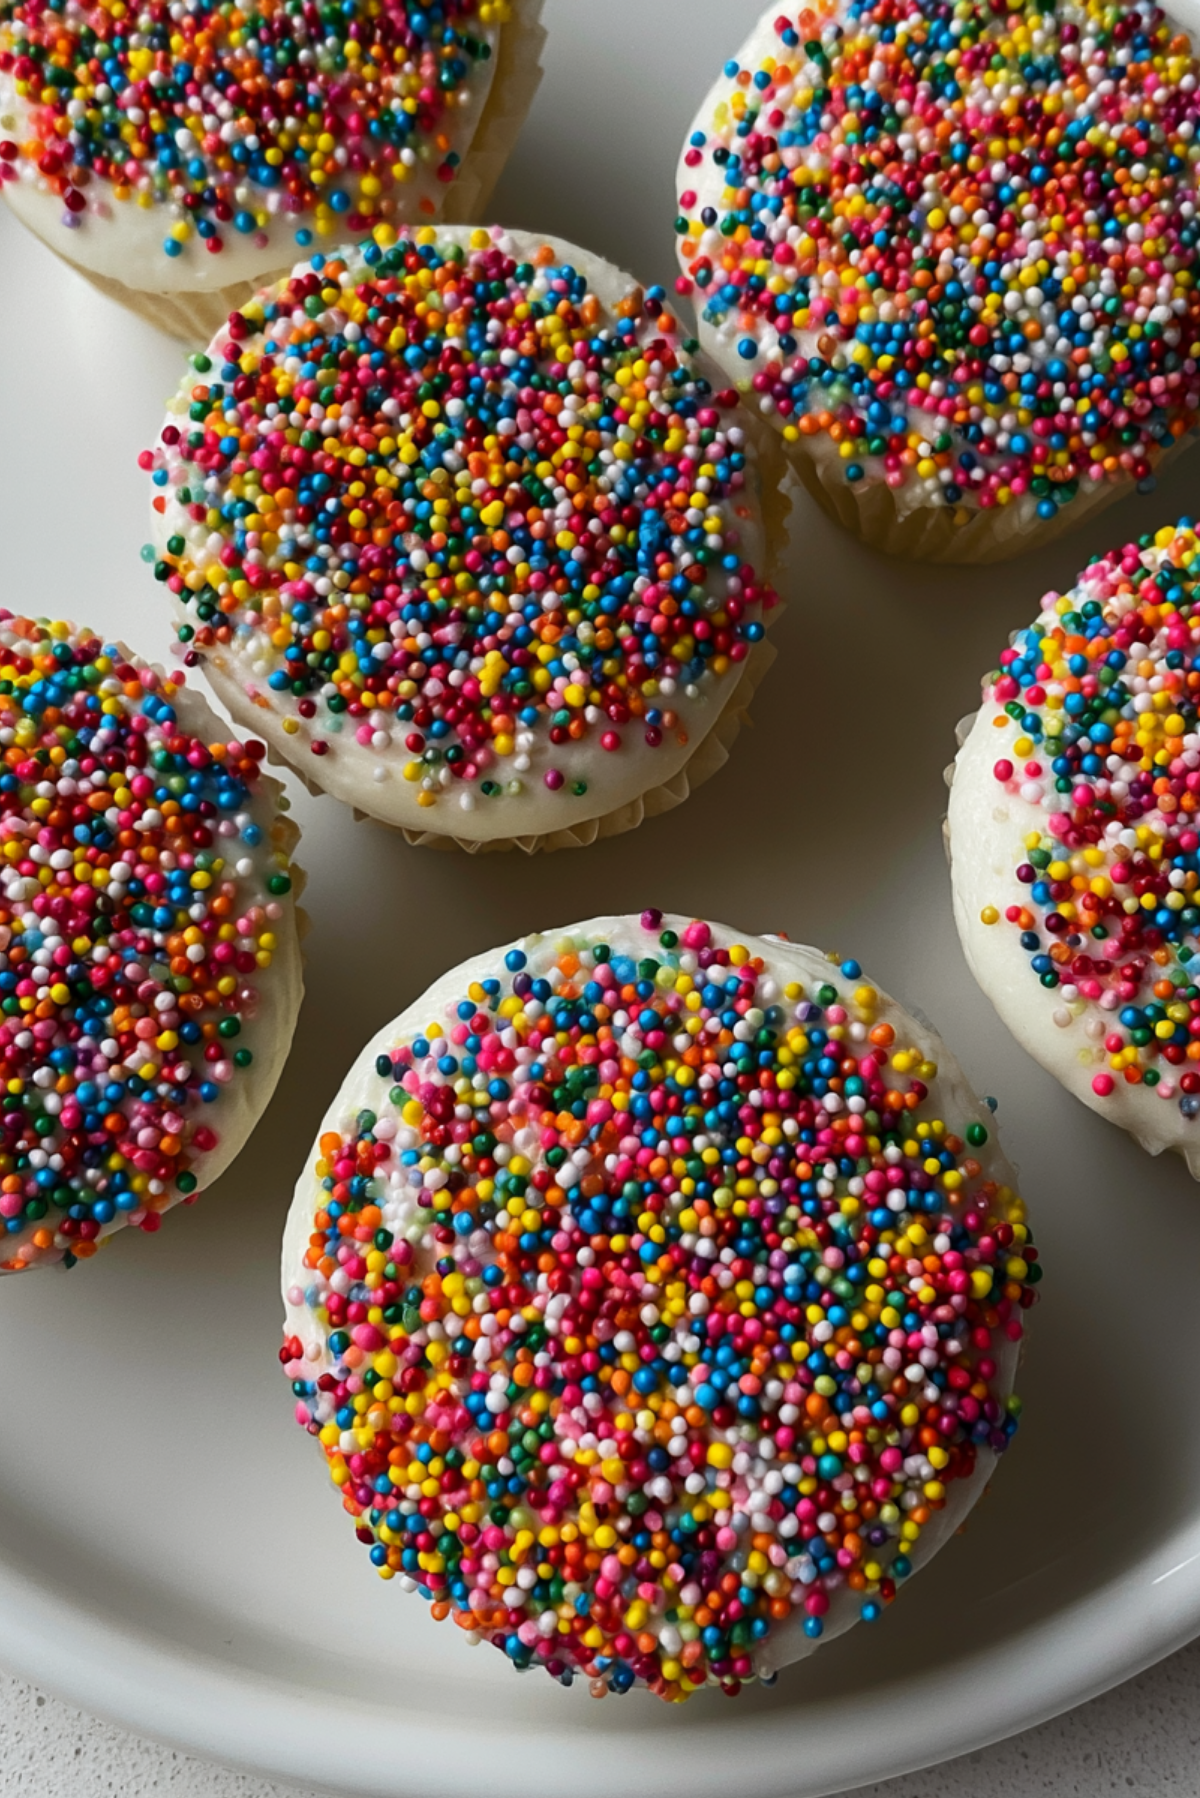
Viral DIY Dot Cakes
There is something magical about the moment you pull back a spoon and watch that perfect dome of rainbow sprinkles crack open to reveal soft vanilla cake and creamy frosting underneath. These little cups of joy have taken over every corner of the internet, and once you make a batch in your own kitchen, you will completely understand why. They smell like a birthday party in the oven, they look like confetti exploded on a dessert, and they taste exactly like the nostalgic celebration cake you grew up loving. Grab a few small cups, a bag of sprinkles, and let’s bring this trend home.
Why Everyone Is Obsessed With This Sprinkle Cake Trend
There is a reason your feed is suddenly full of tiny cups covered in rainbow dots. This dessert hits every craving at once. It is soft, it is sweet, it is playful, and it gives you that nostalgic birthday cake feeling in a single scoopable serving. Unlike a big layered cake that requires careful slicing and serving, these little cups are grab and go, mess free, and somehow taste even better because every bite has the perfect ratio of cake, frosting, and crunchy sprinkles. People are not just making these because they look cute for the camera. They are making them because one bite in, you immediately understand the hype.
The Story Behind The Dot Cake Craze
If you have spent any time on TikTok lately, you have probably seen people lining up around the block for these. The trend started at a small mother daughter bakery on Long Island, where rows of little cups topped with thick coats of nonpareil sprinkles became an overnight sensation. Customers were limited to just two cups each, and the cups sold out within the hour, every single day. Food lovers online quickly pointed out that this is really just a modern, photogenic spin on something bakeries have made for decades, simple sprinkle topped birthday cakes served in individual portions. Whatever you want to call it, the internet fell in love all over again, and now home bakers everywhere are recreating the magic without the wait in line.
Why This Recipe Works So Well
Before we get into the kitchen, let’s talk about why this particular version of the trend is one you will want to keep on repeat. It checks every box for a dessert you will actually make again and again.
Versatile: This base recipe works beautifully with almost any cake flavor you love, so you can swap in chocolate, red velvet, or even a citrus twist depending on your mood.
Budget-Friendly: You only need a handful of pantry staples and a bag of sprinkles, which makes this one of the most affordable desserts you can serve a crowd.
Quick and Easy: From mixing the batter to dipping the final cup in sprinkles, the whole process comes together in under an hour with very little hands on effort.
Customizable: Change the cup size, the cake flavor, or the sprinkle color scheme and you instantly have a brand new dessert for any holiday or celebration.
Crowd-Pleasing: Kids and adults both light up the moment they see a tray of these, and the nostalgic flavor combination means there is rarely a leftover cup in sight.
Make-Ahead Friendly: You can bake the cake layer a day or two in advance, which makes party prep so much more manageable.
Great for Leftovers: Any extra cake scraps can be pressed into more cups or snacked on with fresh fruit, so nothing goes to waste.
Baker’s Secrets For The Best Results
Before you start mixing, let me share a few things that make a real difference once you have made these a handful of times.
- Let the cake cool completely before assembling. A warm cake will melt your frosting and ruin that clean sprinkle finish.
- Use a small offset spatula to smooth your frosting layer. It gives you that flawless, bakery style flat top that the sprinkles stick to evenly.
- Be generous with the sprinkles. A thin layer will look patchy, so press firmly and add more than you think you need.
- Keep your buttermilk substitute resting for the full five minutes if you are making it from milk and vinegar. That slight curdle is what keeps the crumb soft.
- Chill your assembled cups for ten to fifteen minutes before serving if your kitchen is warm. It helps the frosting set just enough to hold its shape.
Kitchen Tools You Will Need
You do not need anything fancy for this recipe, just a few basics that make the process smoother.
Hand or Stand Mixer: This makes creaming the butter and sugar, and whipping the frosting, so much faster and gives you a fluffier texture than mixing by hand.
9×13 Inch Baking Pan: This is the perfect size for baking your sheet cake evenly before cutting it into rounds.
Small Offset Spatula: This little tool is a game changer for spreading an even, smooth layer of frosting across each cup.
Round Cutter or Small Cup: You will use this to cut clean circles out of your cooled cake to fit perfectly inside your serving cups.
Small Dessert Cups or Jars: Choose cups around three inches wide so the cake rounds fit snugly with just enough room for that thick frosting and sprinkle layer.
Ingredients You Will Need For Viral Dot Cakes
Every ingredient here plays a specific role in getting that soft, bakery style crumb and that thick, creamy frosting layer just right. Nothing fancy, just classic baking staples coming together in harmony.
- All-Purpose Flour, 3 cups: This forms the structure of the cake and gives it a soft, tender crumb.
- Granulated Sugar, 1¾ cups: This sweetens the batter and helps create a moist, tender texture as it bakes.
- Baking Powder, 1 tablespoon: This is your leavening agent, giving the cake its light and fluffy rise.
- Fine Sea Salt, ½ teaspoon: This balances the sweetness and brings out the vanilla flavor.
- Whole Milk, 1 cup: This adds moisture and richness to the batter.
- White Vinegar, 1 tablespoon: Combined with the milk, this creates a quick buttermilk substitute that keeps the crumb soft.
- Neutral Oil, ½ cup: This keeps the cake moist for days and contributes to that soft, tender bite.
- Vanilla Extract, 1 tablespoon: This is the backbone flavor of the entire cake, so use a good quality extract.
- Large Egg, 1: This binds the batter together and adds structure.
- Unsalted Butter, 1 cup, softened: This is the base of your buttercream and gives it that classic rich flavor.
- Powdered Sugar, 4 cups: This sweetens and thickens your frosting into that signature fluffy texture.
- Heavy Cream or Whole Milk, 4 tablespoons: This loosens the frosting to the perfect spreadable consistency.
- Rainbow Nonpareil Sprinkles, 1 cup: These create the iconic dotted crust that gives this dessert its name and signature crunch.
Easy Ingredient Swaps
Do not have everything on hand? Here are some friendly substitutions that still get you that same nostalgic flavor.
Whole Milk: Any dairy or non dairy milk works fine in the batter.
Neutral Oil: Melted and cooled butter can be used instead for an even richer flavor.
White Vinegar: Lemon juice works just as well to create the quick buttermilk effect.
Heavy Cream: Whole milk can be used in the frosting if that is what you have available.
Rainbow Nonpareils: Any small sprinkle works, though nonpareils give the most authentic dot cake texture.
The Star Ingredients Worth Knowing
A couple of ingredients here truly make this dessert what it is, so let’s give them their moment.
Rainbow Nonpareil Sprinkles: These tiny round sprinkles are the entire identity of this dessert. Their small, uniform shape is what creates that signature dotted, almost beaded texture across the top, and it is part of why this trend looks so satisfying in every video.
Vanilla Extract: A good quality vanilla extract is what gives both the cake and the frosting that warm, comforting flavor that makes this dessert taste like a classic birthday cake rather than something generic.
Let’s Make Dot Cakes Together
Now for the fun part. Grab your mixing bowls and let’s bring this trend to life step by step.
- Preheat Your Equipment: Preheat your oven to 350°F and line a 9×13 inch baking pan with parchment paper, making sure the paper covers the bottom and sides for easy removal later.
- Combine Ingredients: Whisk together the flour, baking powder, and salt in a medium bowl and set aside. In a separate bowl, combine the milk and vinegar and let it sit for five minutes to slightly curdle.
- Prepare Your Cooking Vessel: Cream the butter and sugar together in a large bowl or stand mixer until pale and fluffy, about three to five minutes, scraping down the sides halfway through.
- Assemble the Dish: Add the egg, oil, and vanilla to the milk mixture and whisk until smooth, then slowly pour this into the creamed butter and sugar, mixing until combined. Gradually add the flour mixture and mix just until no streaks remain, being careful not to overmix.
- Cook to Perfection: Pour the batter into your prepared pan and smooth the top evenly. Bake for 35 to 40 minutes, or until a toothpick inserted in the center comes out clean. Let the cake cool completely in the pan before handling.
- Finishing Touches: While the cake cools, beat the softened butter until pale and fluffy, then gradually add the powdered sugar and cream, beating until light and spreadable. Use your round cutter to cut circles from the cooled cake to fit your serving cups, then place each round inside a cup and top generously with frosting, smoothing it flat with your offset spatula.
- Serve and Enjoy: Pour your sprinkles onto a flat plate, then flip each cup upside down and press firmly into the sprinkles to coat the top evenly. Flip back over, grab a spoon, and dig in.
How The Texture And Flavor Come Together
What makes this dessert so satisfying is the contrast in every single bite. You get the soft, almost cloud like crumb of the vanilla cake, followed by the rich, slightly sweet pillow of buttercream, and then that surprising little crunch from the sprinkles right at the very top. As you sit with it for even a minute, the sprinkles soften ever so slightly against the frosting, adding a gentle chew that balances the crunch you get with that very first bite. It is a dessert that plays with texture just as much as it plays with flavor, and that balance is exactly why people cannot stop eating these.
Helpful Tips And Tricks
A few small adjustments can take your dot cakes from good to genuinely bakery quality.
- Use room temperature butter for your frosting so it whips up smooth without any lumps.
- If your frosting feels too stiff to spread evenly, add an extra teaspoon of cream at a time until it loosens.
- Work with one cup at a time when adding sprinkles so the frosting does not start to set before you press the dots on.
What To Avoid When Making This Recipe
A little awareness here goes a long way toward dot cake success.
- Frosting a warm cake: This will melt your buttercream instantly, so be patient and let the cake cool fully before assembling.
- Overmixing the batter: This can make your cake dense rather than soft, so mix just until the ingredients are combined.
- Skimping on sprinkles: A thin layer will look patchy and uneven, so press the sprinkles on generously for that full coverage look.
Nutrition Facts
Servings: 10
Calories per serving: 690
Note: These are approximate values and will vary depending on the exact brands and quantities used.
Preparation Time
Prep Time: 20 minutes
Cook Time: 38 minutes
Total Time: 58 minutes
Make-Ahead And Storage Tips
If you want to get ahead on party prep, this recipe is wonderfully flexible. You can bake the cake layer up to two days in advance, simply wrap it tightly in plastic once fully cooled and store it at room temperature. The frosting can also be made a day ahead and kept covered in the refrigerator, just bring it back to room temperature and give it a quick re-whip before using. Once assembled, the finished cups can be stored loosely covered at room temperature for up to two days, or refrigerated for up to three days if your kitchen runs warm. These do not freeze particularly well once fully assembled, since the texture of the frosting and sprinkles can change once thawed.
How To Serve Your Dot Cakes
These little cups are practically made for entertaining. Set out a tray of them at a birthday party and watch them disappear within minutes, or pair them with a pot of strong coffee for a cozy afternoon treat. They also make a fun addition to a larger dessert spread, especially next to something cold like ice cream, where the temperature contrast makes every bite feel a little more exciting.
Creative Ways To Use Leftovers
If you happen to have any leftover cake scraps or frosting, do not let them go to waste. Crumble extra cake pieces over a bowl of vanilla ice cream for an instant sundae, or layer them with fresh berries and whipped cream for a quick trifle. Leftover frosting can be piped onto cookies or used as a dip for fresh fruit.
A Few More Helpful Tips
For the cleanest cut rounds, chill your cake in the freezer for fifteen to twenty minutes before cutting, this firms it up just enough to get clean edges. If you want a slightly more grown up flavor, a small drizzle of warm fruit sauce over the top before adding sprinkles adds a lovely contrast.
Make It A True Showstopper
For an extra special presentation, try alternating thin layers of cake and frosting inside a clear cup so the layers are visible from the outside, almost like a tiny trifle. You can also match your sprinkle colors to whatever celebration you are hosting for an instantly festive look.
Fun Variations To Try
- Chocolate Dot Cakes: Swap the vanilla cake base for a rich chocolate version for a deeper, more decadent flavor.
- Lemon Dot Cakes: Add lemon zest and juice to the batter for a bright, citrusy twist.
- Holiday Dot Cakes: Match your sprinkle color scheme to the season, think red and green for the holidays or pastels for spring.
- Cookies And Cream Dot Cakes: Fold crushed cookies into the frosting before topping with sprinkles for extra crunch.
- Berry Dot Cakes: Swap the sprinkle topping for freeze dried berry dust for a fruity finish.
FAQ’s
1. Can I use a box cake mix instead of making the cake from scratch?
Yes, a box cake mix works perfectly fine and saves time, just bake it according to the package instructions before cutting your rounds.
2. What size cups should I use?
Cups around three inches wide work best, giving you enough room for a cake layer, a thick frosting layer, and a generous sprinkle coating.
3. Why did my sprinkles bleed color into the frosting?
This usually happens if the sprinkles sit too long before serving, or if the frosting was too soft when the sprinkles were pressed on.
4. Can I make these ahead of a party?
Yes, you can bake the cake a day or two ahead, and even assemble the cups several hours before serving if kept chilled.
5. Do I need a stand mixer for this recipe?
No, a hand mixer works just as well for both the batter and the frosting, it will just take a little longer to get that fluffy texture.
6. Can I freeze the assembled cups?
It is not recommended, since the frosting and sprinkle texture can change once thawed.
7. What other cake flavors work well for this recipe?
Chocolate, red velvet, and citrus based cakes all work beautifully with this same method.
8. How do I keep my frosting from melting onto the cake?
Always make sure your cake is completely cool to the touch before adding any frosting.
9. Can kids help make these?
Absolutely, the sprinkle dipping step is especially fun for kids and requires no special skill.
10. Why are these called dot cakes?
The name comes from the small round nonpareil sprinkles that coat the top, creating a dotted pattern across the surface.
Conclusion
There is something so joyful about a dessert this simple bringing this much happiness to a table. Whether you are making these for a birthday, a weekend treat, or just because your feed convinced you that you needed to try them, these little cups deliver every single time. Trust me, once you take that first sprinkle covered bite, you will completely understand why this trend refuses to slow down. Grab your cups, your sprinkles, and get ready for a dessert that disappears just as fast as you can make it.
Print
Viral DIY Dot Cakes
- Prep Time: 20 minutes
- Cook Time: 15 minutes
- Total Time: 35 minutes
- Yield: 6 individual cakes 1x
- Category: Dessert
- Method: Baking
- Cuisine: American
- Diet: Vegetarian
Description
A viral, single-serve dessert trend featuring a moist buttermilk vanilla sponge cake built inside individual ramekins, topped with a smooth layer of sweet frosting and a dense, crunchy shell of rainbow nonpareil sprinkles.
Ingredients
- 2 cups Premium Cake Flour
- 1.25 cups Granulated White Sugar
- 0.5 cups Unsalted Softened Butter
- 1 cup Whole Buttermilk
- 2 Large Room Temperature Eggs
- 1.5 teaspoons Pure Vanilla Extract
- 1 teaspoon Baking Powder
- 0.25 teaspoon Baking Soda
- 4 tablespoons Softened Cream Cheese
- 3 cups Sifted Powdered Sugar
- 1 cup Rainbow Nonpareil Sprinkles
Instructions
- Set your oven to 350 degrees Fahrenheit and carefully line a standard baking sheet with premium parchment paper.
- Whisk the dry flour, baking powder, soda, and salt together in a bowl while creaming the butter and sugar in a mixer.
- Alternately stream the buttermilk and dry ingredients into the creamed butter mixture until a smooth batter forms.
- Pour the smooth vanilla batter onto your prepared baking sheet, smoothing it into an even layer with your spatula.
- Bake the sheet cake for fifteen to eighteen minutes until the top springs back lightly when pressed with a finger.
- Once cooled, stamp out neat circles using your cutter, press them into the bottom of your ramekins, and spread frosting flush to the top.
- Invert each chilled, frosted ramekin directly into a deep bowl of nonpareils, press firmly to coat, and serve with a spoon.
Notes
- Freeze the frosted ramekins for twenty minutes before dipping to ensure a clean edge and prevent sprinkle bleeding.
- Use a narrow, deep bowl for the nonpareils to guarantee full, thick coverage across the entire surface.
- Level the tops of your cake layers with a serrated knife if they rise unevenly during baking.
Nutrition
- Serving Size: 1 individual cake
- Calories: 420
- Sugar: 52g
- Sodium: 180mg
- Fat: 16g
- Saturated Fat: 10g
- Unsaturated Fat: 5g
- Trans Fat: 0g
- Carbohydrates: 68g
- Fiber: 0.5g
- Protein: 4g
- Cholesterol: 75mg
Keywords: viral DIY dot cakes, sprinkle dot cake, single serve dessert cup, funfetti ramekin cake