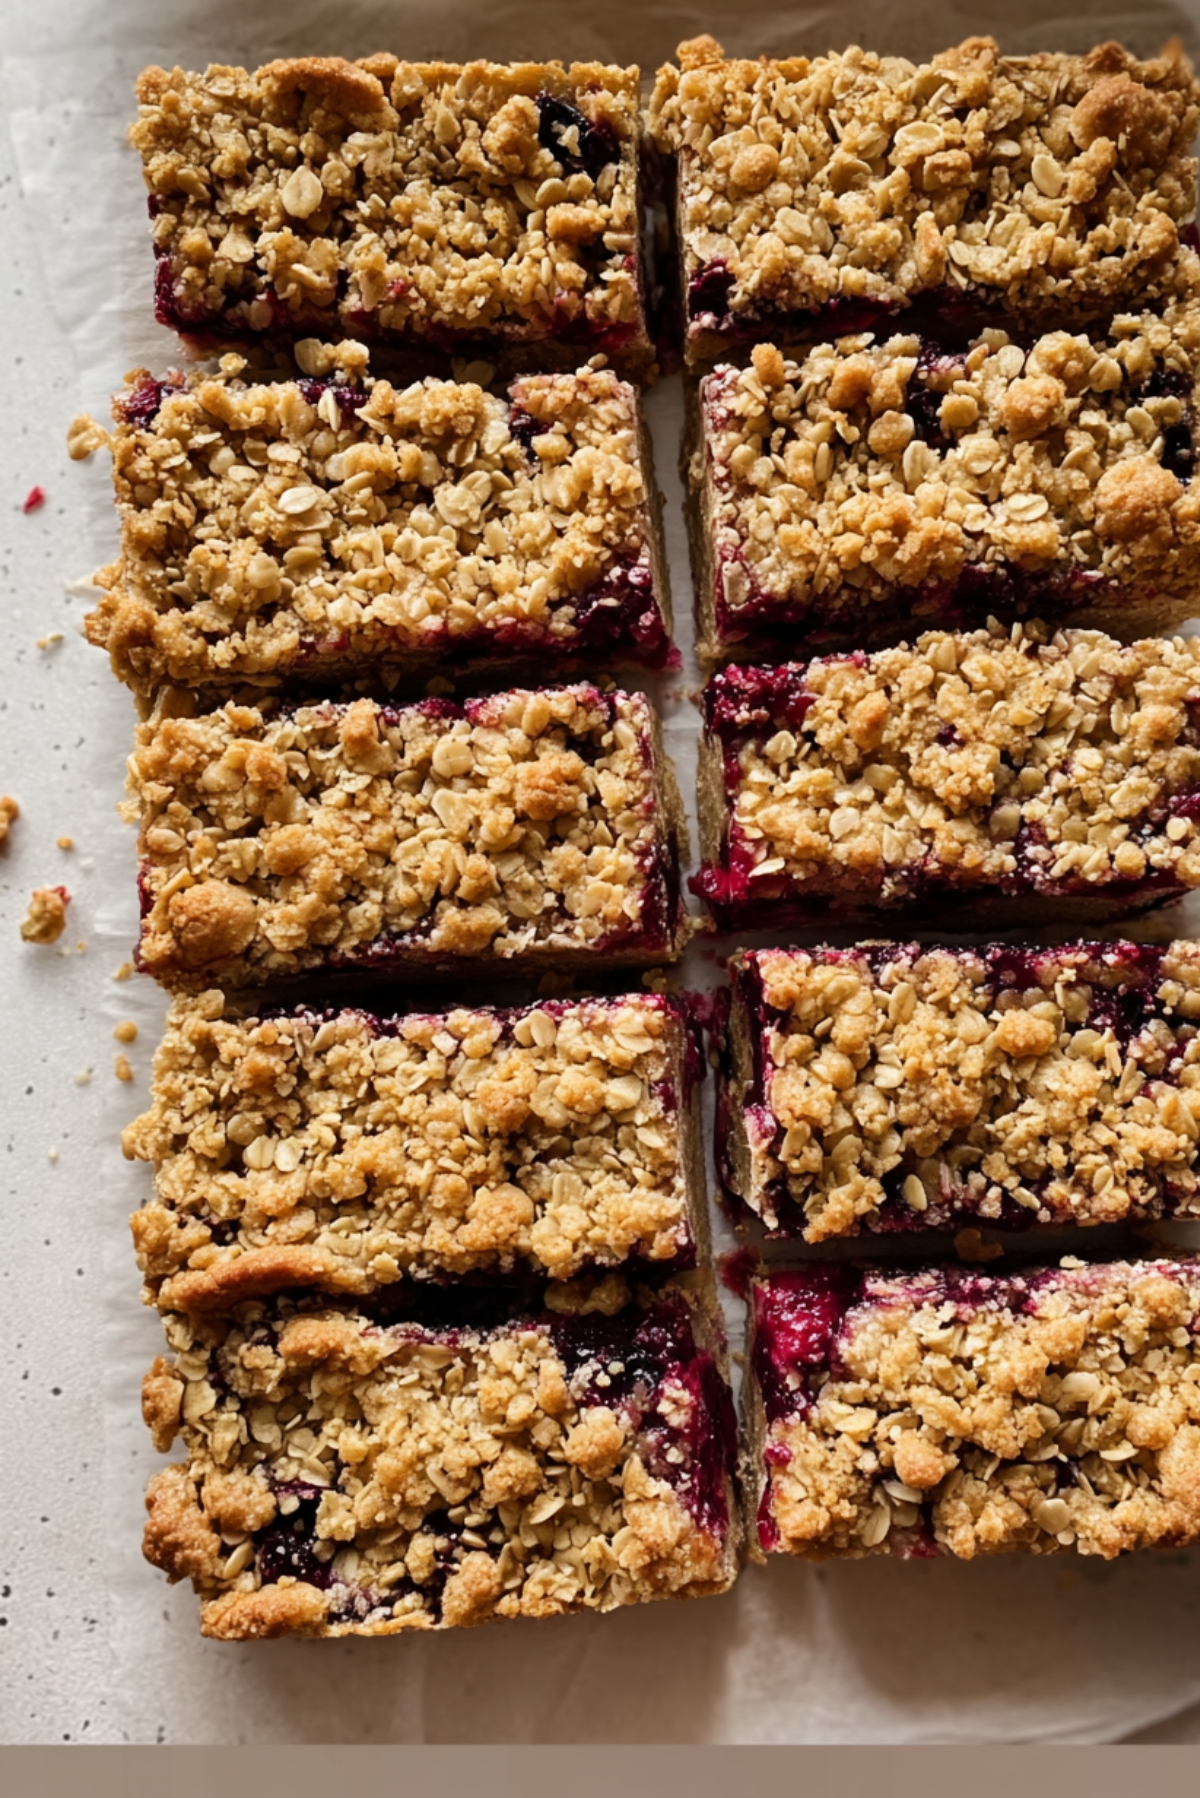
Berries Bar
There is something so comforting about a pan of berry bars cooling on the counter. The buttery oat crumble, the soft jammy center, and that sweet little contrast between crisp edges and tender filling make every bite feel like a treat you accidentally made even better than planned. Trust me, you’re going to love this, because it feels homey, cozy, and just fancy enough to bring to the table with pride.
The kind of dessert that disappears faster than you expect
Some recipes are nice, and then some recipes make people wander back into the kitchen for “just one more piece.” This one definitely belongs in that second group. You get a golden, crumbly topping with a bright berry layer underneath, and the whole thing bakes into bars that are easy to slice, easy to serve, and honestly hard to stop thinking about.
They are sweet, but not overly sweet. They feel rustic in the best way, and that mix of tart fruit with buttery oats makes them taste like something from a favorite little bakery. Let me tell you, it’s worth every bite.
A simple baked treat with old-school charm
Bars like this have been loved for generations because they sit right in that lovely space between a fruit crisp and a cookie square. They carry a bit of that old-fashioned bake sale energy, the kind of dessert you might find on a family table, at a picnic, or tucked onto a plate beside coffee in the afternoon.
Berry-filled bakes have long been popular in American home kitchens because they are practical, flexible, and deeply comforting. Oats, flour, butter, and fruit come together in a way that feels unfussy, but the result still tastes special. And now that we’ve got that sweet backstory in mind, let’s dive into why this one earns a regular spot in the baking rotation.
Why this recipe earns a spot in your regular baking lineup
This is one of those dependable bakes that feels generous from the first stir to the last crumb. It comes together with pantry basics, and the result looks and tastes like you put in far more effort than you really did.
Versatile: You can serve these as dessert, a snack, or even a little something with afternoon tea or coffee. They feel right at home at brunch tables and holiday trays too.
Budget-Friendly: Most of the ingredients are inexpensive pantry staples, and berries can be used fresh or frozen. That makes this a smart bake when you want something special without stretching the grocery bill.
Quick and Easy: The steps are simple and straightforward, with no complicated techniques hiding in the middle. A bowl, a pan, and a little mixing are really all it takes.
Customizable: You can switch the berries, add a little cinnamon, or even brighten things up with more lemon zest later on. It is the kind of recipe that welcomes little personal touches.
Crowd-Pleasing: The texture does a lot of the work here. You get crisp crumble, soft fruit, and a sturdy bar shape that everyone seems to love.
Make-Ahead Friendly: These slice beautifully after cooling, which means you can make them ahead and keep them ready for guests or busy weekdays. In fact, the flavor settles in even more as they rest.
Great for Leftovers: They hold up well and stay delicious the next day. A quick warm-up makes them taste freshly baked all over again.
A few smart baking secrets before you start
Before we get to the mixing bowl, a couple of small choices can make a big difference. This one is a total game-changer when you want bars that slice neatly and still keep that soft, luscious center.
- Use melted butter that is warm, not hot, so the crumb mixture stays even and easy to work with.
- Toss the berries well with cornstarch so the filling thickens instead of running all over the pan.
- Press the bottom layer firmly into the pan so the bars hold together after baking.
- Let the pan cool completely before slicing, because warm fruit filling is delicious but messy.
- If using frozen berries, do not thaw them first, which helps keep the filling from turning watery.
The basic tools that make everything easier
Now that the little pro tips are tucked away, it helps to gather the few tools that keep the process smooth and stress-free. Nothing fancy is needed here, which is part of the charm.
Mixing Bowl: A large bowl gives you enough room to combine the crumble mixture without making a mess.
Small Bowl: This is handy for tossing the berries with cornstarch and lemon juice before layering.
8×8-Inch Baking Pan: This size gives the bars a nice thickness and helps the layers bake evenly.
Parchment Paper: Lining the pan makes lifting and slicing much easier, especially once the filling has cooled.
Measuring Cups and Spoons: Accurate measuring keeps the crumble balanced and the filling set just right.
Spatula or Spoon: Useful for pressing the base into the pan and spreading the berry layer evenly.
The ingredients that make every layer shine
And now we get to the heart of it, the ingredients. Each one plays a real role here, and together they create that tender base, juicy center, and crisp oat topping that make these bars so satisfying.
- Old-Fashioned Rolled Oats: 2 cups, these bring the hearty texture and rustic crumble that give the bars their signature bite.
- All-Purpose Flour: 1 1/2 cups, this helps bind the crust and topping so everything bakes into neat, sliceable layers.
- Light Brown Sugar: 3/4 cup, packed, this adds warmth and a light caramel note that pairs beautifully with berries.
- Granulated Sugar: 1/2 cup, this sweetens the crumble and balances the tartness in the fruit.
- Baking Powder: 1 teaspoon, this gives the base a little lift so it does not feel heavy.
- Fine Sea Salt: 1/2 teaspoon, this sharpens the flavor and keeps the sweetness from tasting flat.
- Unsalted Butter: 3/4 cup, melted, this brings richness and helps the crumble turn golden and crisp.
- Large Egg: 1, this adds structure and helps the crust hold together nicely.
- Vanilla Extract: 1 teaspoon, this rounds out the sweetness and adds that cozy bakery aroma.
- Mixed Berries: 2 cups, fresh or frozen, these create the bright, juicy filling with sweet and tart flavor in every bite.
- Cornstarch: 2 tablespoons, this thickens the berry layer so the bars stay sliceable instead of soupy.
- Lemon Juice: 1 tablespoon, this wakes up the fruit and gives the filling a fresh, lively finish.
Easy swaps if you want to make it your own
Once you see how forgiving this bake is, it becomes even more inviting. A few simple swaps can help you work with what you already have in the kitchen.
Mixed Berries: Blueberries, raspberries, blackberries, or chopped strawberries all work well.
Light Brown Sugar: Dark brown sugar can be used for a deeper, richer sweetness.
All-Purpose Flour: A good 1:1 gluten-free flour blend can replace it if needed.
Vanilla Extract: Almond extract can be used in a smaller amount for a slightly different flavor.
Lemon Juice: Orange juice can step in if that is what you have on hand.
The ingredients that quietly do the heavy lifting
A couple of ingredients really carry this bake, and once you notice what they bring, the whole recipe makes even more sense.
Mixed Berries: They give the bars their bright, juicy center and create that gorgeous contrast against the golden topping. Their natural tartness keeps every bite lively.
Old-Fashioned Rolled Oats: These create the crumbly texture that makes the top and bottom layers feel hearty, buttery, and incredibly satisfying.

Let’s bake these beauties step by step
This is the part where it all comes together, and honestly, it is a very satisfying process. You mix, press, layer, and bake, and before long the kitchen starts smelling sweet, buttery, and impossible to ignore.
- Preheat Your Equipment: Preheat the oven to 350°F. Line an 8×8-inch baking pan with parchment paper, leaving a little overhang so the bars are easy to lift out later.
- Combine Ingredients: In a large mixing bowl, stir together the rolled oats, flour, light brown sugar, granulated sugar, baking powder, and fine sea salt. Add the melted butter, egg, and vanilla extract, then mix until the texture looks crumbly and evenly moistened.
- Prepare Your Cooking Vessel: Scoop out about 1 1/2 cups of the crumble mixture and set it aside for the topping. Press the remaining mixture firmly and evenly into the bottom of the prepared pan to form the base.
- Assemble the Dish: In a small bowl, toss the mixed berries with the cornstarch and lemon juice until well coated. Spread the berry mixture evenly over the crust, then sprinkle the reserved crumble mixture all over the top.
- Cook to Perfection: Bake for 35 minutes, or until the top is golden and the berry layer is bubbling gently around the edges.
- Finishing Touches: Remove the pan from the oven and let it cool completely in the pan. This part matters, because the filling needs time to set before slicing.
- Serve and Enjoy: Lift the cooled slab out using the parchment, place it on a cutting board, and slice into 9 bars. Serve as is, or warm a piece slightly for an extra cozy treat.
What makes the flavor and texture so good
What really makes these bars shine is the contrast. The top gets lightly crisp and golden, while the middle stays soft and fruity with that gorgeous jammy texture. Underneath, the crust has enough structure to hold everything together without turning hard or dry.
As the bars bake, the butter toasts the oats, the sugars deepen into something warm and caramel-like, and the berries soften into a bright layer that tastes both fresh and rich. Every bite gives you sweet, tart, buttery, and just a little chewy all at once.
Little tricks that make the whole batch better
Once you have the basics down, a few extra touches can make the final pan even more satisfying. These are the kinds of small moves that bakers quietly rely on.
- Press the crust firmly so the base slices cleanly and does not crumble apart.
- Spread the berries in an even layer so every bar gets a balanced filling-to-crumble ratio.
- Cool the bars fully before cutting, which helps the center hold its shape.
- Use parchment overhang so lifting the whole slab out feels easy and clean.
Mistakes worth skipping from the start
Even easy bakes have a few little traps, but they are easy enough to avoid once you know where they are. Here are the ones to keep in mind.
- Do not skip the cornstarch, because the filling may turn too loose and messy.
- Do not overpack the top crumble, or it can bake into one dense layer instead of staying nicely textured.
- Do not slice while warm if you want neat bars, because the filling needs time to settle.
- Do not forget to line the pan, or removing the bars becomes much trickier than it needs to be.
A quick look at the nutrition side
If you like knowing the basics before serving, here is the simple snapshot. These are approximate values, but they give a helpful idea of what each piece brings to the plate.
Servings: 9
Calories per serving: 320
Note: These are approximate values.
Timing that fits into a busy day
One of the nicest things about this recipe is how manageable it feels. You can mix it, bake it, and have it cooling on the counter in under an hour.
Prep Time: 15 minutes
Cook Time: 35 minutes
Total Time: 50 minutes
How to prep ahead and store them well
If you like baking in advance, this recipe makes that easy. You can prepare the crumble mixture and keep it chilled for a short time before assembling, or bake the full batch a day ahead and slice once completely cooled.
Store the bars in an airtight container at room temperature for up to 2 days, or in the refrigerator for up to 5 days. For longer storage, wrap individual bars and freeze them for up to 2 months. Reheat gently in the microwave for a few seconds, or let them come to room temperature for a softer texture.
The best ways to serve them
These bars are lovely on their own, but they also play well with all kinds of simple extras. A spoonful of yogurt makes them feel brunch-ready, while a scoop of vanilla ice cream turns them into a full dessert.
They are also excellent with coffee, black tea, or a cold glass of milk. For a prettier plate, dust lightly with powdered sugar right before serving, though they are just as charming without it.
Clever ways to use up every last piece
Leftovers rarely last long, but when they do, there are some fun ways to give them a second life. And now let’s dive into a few ideas that keep things interesting.
You can crumble a bar over vanilla yogurt for breakfast, warm one up and top it with a spoonful of whipped cream, or chop the bars into chunks and layer them into a quick dessert parfait. They also make a lovely sweet addition to a lunchbox or picnic basket.
Extra little notes that make baking feel easier
Sometimes it is the small details that make a recipe feel relaxed instead of fussy. Keeping those in mind can make the whole experience smoother from start to finish.
Use fresh berries when they are in season for a brighter, juicier flavor. Use frozen berries when convenience matters, because they work beautifully too. If your berries are very tart, you can add an extra tablespoon of sugar to the filling next time without changing the structure of the bars.
Simple ways to make them look bakery-worthy
Presentation is half the fun, especially with a bake this pretty. The deep berry color peeking through the golden top already does a lot of the work for you.
Slice the bars evenly and wipe the knife between cuts for clean edges. Arrange them on a simple plate or wooden board, and let a few berry streaks show because that rustic look is part of their charm. A small dusting of powdered sugar right before serving can make them feel extra special.
Fun variations to keep things interesting
Once you have made the original version, it is hard not to start imagining little twists. This one welcomes them beautifully.
Lemon Berry Version: Add 1 teaspoon of lemon zest to the crumble for a brighter citrus note.
Strawberry Only Version: Use all chopped strawberries for a softer, sweeter fruit filling.
Berry Almond Version: Replace 1/2 teaspoon of the vanilla extract with almond extract for a nutty bakery-style flavor.
Spiced Crumble Version: Add 1/2 teaspoon of ground cinnamon to the dry ingredients for extra warmth.
Extra Crumb Version: Increase the oat mixture by a small amount if you love a thicker topping with more crunch.
FAQ’s
Q1: Can I use frozen berries?
Yes, absolutely. Use them straight from the freezer and do not thaw first, which helps keep the filling from getting watery.
A1:
Frozen berries work very well here and still give you a vibrant, juicy center once baked.
Q2: Can I use only one type of berry?
Yes, you can. Blueberries, raspberries, blackberries, or chopped strawberries all work nicely on their own.
A2:
Using one berry creates a more focused flavor, while mixed berries give a more layered, balanced taste.
Q3: Why do my bars fall apart when sliced?
This usually happens when the bars are still warm or the crust was not pressed firmly enough.
A3:
Let them cool completely and use parchment to lift them out before cutting for cleaner slices.
Q4: Can I double the recipe?
Yes, you can double it and bake it in a 9×13-inch pan.
A4:
You may need to add a few extra minutes to the baking time, depending on how thick the layers are.
Q5: Do I need fresh lemon juice?
Fresh is lovely, but bottled lemon juice also works in a pinch.
A5:
The main job of the lemon juice is to brighten the berries and help balance the sweetness.
Q6: Can I make these ahead for guests?
Yes, and they are actually great for that.
A6:
Bake them the day before, cool completely, and store covered until ready to serve.
Q7: How do I know they are done baking?
Look for a golden top and bubbling fruit around the edges.
A7:
The center will continue to set as the bars cool, so do not wait for it to look fully firm in the oven.
Q8: Can I reduce the sugar?
A small reduction is possible, but too much can affect both texture and flavor.
A8:
Start by reducing only a couple of tablespoons if you want a slightly less sweet result.
Q9: Should I refrigerate them?
You can keep them at room temperature for a short time, but refrigeration is best for longer freshness.
A9:
Chilled bars are firmer, while room temperature bars feel softer and more tender.
Q10: What pairs well with these bars?
Coffee, tea, yogurt, and vanilla ice cream all pair beautifully.
A10:
The buttery crumble and berry filling make them flexible enough for breakfast-style serving or dessert.
Conclusion
There is something deeply satisfying about a recipe like this, because it feels simple while delivering so much comfort and flavor. The buttery crumble, the bright berry center, and the easy slice-and-share format make it the kind of bake you come back to again and again. This one’s a total game-changer when you want something homemade, cozy, and guaranteed to make people happy, so go ahead and bake a pan and enjoy every last crumb.
Print
Berries Bar
- Prep Time: 15 minutes
- Cook Time: 35 minutes
- Total Time: 50 minutes
- Yield: 9 bars 1x
- Category: Dessert
- Method: Bake
- Cuisine: American
- Diet: Vegetarian
Description
Buttery oat crumble bars layered with a bright mixed berry filling and baked until golden, crisp on top, and soft in the center.
Ingredients
- 2 cups old-fashioned rolled oats
- 1 1/2 cups all-purpose flour
- 3/4 cup light brown sugar, packed
- 1/2 cup granulated sugar
- 1 teaspoon baking powder
- 1/2 teaspoon fine sea salt
- 3/4 cup unsalted butter, melted
- 1 large egg
- 1 teaspoon vanilla extract
- 2 cups mixed berries, fresh or frozen
- 2 tablespoons cornstarch
- 1 tablespoon lemon juice
Instructions
- Preheat the oven to 350°F and line an 8×8-inch baking pan with parchment paper.
- In a large bowl, mix the rolled oats, all-purpose flour, light brown sugar, granulated sugar, baking powder, and fine sea salt.
- Add the melted butter, egg, and vanilla extract, then stir until the mixture is crumbly and evenly moistened.
- Set aside 1 1/2 cups of the crumble mixture for the topping.
- Press the remaining mixture firmly into the bottom of the prepared pan.
- In a small bowl, toss the mixed berries with the cornstarch and lemon juice.
- Spread the berry mixture evenly over the crust.
- Sprinkle the reserved crumble mixture evenly over the berries.
- Bake for 35 minutes, or until the top is golden and the filling is bubbling around the edges.
- Cool completely in the pan before lifting out and slicing into 9 bars.
Notes
- Do not thaw frozen berries before using.
- Let the bars cool completely for the cleanest slices.
- Store in an airtight container at room temperature for up to 2 days or refrigerate for up to 5 days.
- Freeze individual bars for up to 2 months.
Nutrition
- Serving Size: 1 bar
- Calories: 320
- Sugar: 21g
- Sodium: 180mg
- Fat: 13g
- Saturated Fat: 7g
- Unsaturated Fat: 5g
- Trans Fat: 0g
- Carbohydrates: 46g
- Fiber: 3g
- Protein: 4g
- Cholesterol: 45mg
Keywords: berries bar, mixed berry oat bars, berry crumble bars, oat berry dessert bars