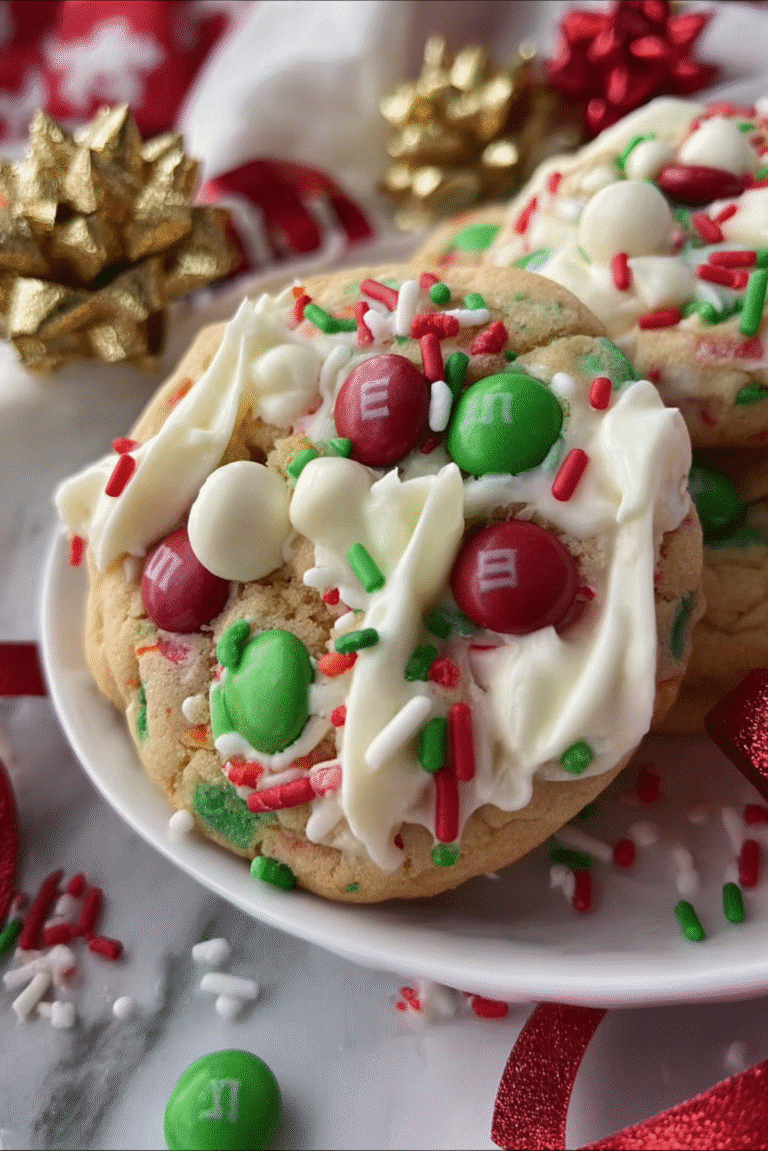
Red velvet chocolate chunk cookies
There is something magical about a tray of warm cookies cooling on the counter. The rich cocoa aroma drifting through the kitchen, the glossy chocolate melting across the surface, and that vibrant red color that makes everyone stop and look. Trust me, you are going to love this one. These cookies come out soft in the center, slightly crisp around the edges, and packed with generous chunks of chocolate that melt into every bite.
They are the kind of treat that disappears quickly. One minute the tray is full, and the next someone is sneaking the last one while it is still warm. Let me tell you, it is worth every bite.
A Cookie That Always Steals the Show
Some cookies are simple, and some instantly grab attention the moment they appear. These definitely fall into the second category. The deep red color paired with dark chocolate chunks makes them feel special even before the first bite.
Beyond the visual appeal, the flavor is what truly keeps people coming back. The gentle cocoa base, the buttery dough, and the pockets of melted chocolate combine into a cookie that feels rich without being overwhelming. Whether you bake them for a celebration, a holiday, or a quiet afternoon craving, they always feel like a treat.
The Story Behind the Red Velvet Flavor
Red velvet has a long and fascinating baking history. Originally, the soft texture came from the reaction between cocoa powder and acidic ingredients, which created a smooth crumb and subtle reddish tone. Over time, bakers enhanced the color to create the bold red dessert that people recognize today.
While the flavor is often associated with cakes, turning it into cookies brings a fun twist. Instead of slicing a cake, you get a handheld dessert with the same cocoa warmth and eye catching color. The result is familiar yet playful.
Why This Recipe Works So Well
Before we step into the baking process, it helps to understand why this cookie recipe is such a reliable favorite.
Versatile: These cookies fit almost any occasion, from holiday platters to everyday dessert cravings.
Budget-Friendly: Most of the ingredients are pantry staples that you probably already have at home.
Quick and Easy: The dough comes together quickly, making this perfect for a spontaneous baking session.
Customizable: You can easily swap the chocolate chunks for chips or even white chocolate pieces.
Crowd-Pleasing: The vibrant color and rich flavor make them instantly appealing to both kids and adults.
Make-Ahead Friendly: The dough can rest in the refrigerator so you can bake fresh cookies later.
Great for Leftovers: The cookies stay soft for days when stored properly.
Insider Tips From the Baking Counter
A few small tricks can make a big difference in the final result.
- Use room temperature butter so it creams smoothly with the sugar.
- Add a few extra chocolate chunks on top of the dough before baking for that bakery style look.
- Slightly underbake the cookies if you love a soft center.
- Let the cookies cool for a few minutes on the tray before moving them so they keep their shape.
Kitchen Tools That Help Everything Run Smoothly
Before starting, gathering the right tools makes the baking process feel effortless.
Mixing Bowls: Needed to combine wet and dry ingredients separately.
Electric Mixer: Helps cream the butter and sugars into a light fluffy base.
Rubber Spatula: Perfect for folding ingredients together without overmixing the dough.
Baking Sheet: Provides even heat distribution for consistent baking.
Parchment Paper: Prevents sticking and keeps cleanup simple.
Cookie Scoop: Ensures evenly sized cookies that bake at the same rate.
Ingredients You Will Need For This Recipe
Every ingredient works together to create the soft texture and rich flavor that makes these cookies special.
- All Purpose Flour: 2 cups, this forms the structure that holds the cookies together.
- Unsweetened Cocoa Powder: 2 tablespoons, adds a gentle chocolate flavor that defines the base of the dough.
- Baking Soda: 1 teaspoon, helps the cookies rise slightly while staying soft inside.
- Salt: 1/2 teaspoon, balances sweetness and enhances the chocolate flavor.
- Unsalted Butter: 1/2 cup softened, provides richness and creates a tender crumb.
- Granulated Sugar: 3/4 cup, sweetens the dough and contributes to lightly crisp edges.
- Brown Sugar: 1/2 cup, adds moisture and a subtle caramel depth.
- Large Egg: 1 egg, binds the ingredients together and supports the cookie structure.
- Vanilla Extract: 1 teaspoon, adds warmth and enhances the overall flavor.
- Red Food Coloring: 1 tablespoon, gives the cookies their iconic vibrant color.
- Chocolate Chunks: 1 cup, melt into rich pockets throughout the cookies.
Easy Ingredient Substitutions
Sometimes you might want to make small adjustments depending on what you have available.
Butter: Coconut oil can be used as an alternative for a slightly different richness.
Chocolate Chunks: Chocolate chips or chopped chocolate bars work beautifully.
Brown Sugar: Coconut sugar can replace it for a deeper caramel flavor.
Food Coloring: Gel coloring can provide a stronger shade with less liquid.
The Ingredients That Make the Magic Happen
A couple of ingredients truly define the personality of these cookies.
Cocoa Powder: Even though the amount is small, it adds the signature flavor associated with red velvet desserts.
Chocolate Chunks: These create pockets of melted chocolate that make every bite indulgent.

Let’s Bake These Cookies Together
Now comes the fun part, bringing everything together into warm homemade cookies.
- Preheat Your Equipment: Preheat the oven to 350°F and line a baking sheet with parchment paper.
- Combine Ingredients: In a bowl whisk together the flour, cocoa powder, baking soda, and salt.
- Prepare Your Cooking Vessel: In another bowl cream the butter, granulated sugar, and brown sugar until the mixture becomes light and fluffy.
- Assemble the Dish: Add the egg, vanilla extract, and red food coloring, then mix until smooth before gradually folding in the dry ingredients.
- Cook to Perfection: Stir in the chocolate chunks, scoop dough portions onto the baking sheet, and bake for about 10 to 12 minutes.
- Finishing Touches: Remove the tray from the oven and allow the cookies to rest for several minutes so they set properly.
- Serve and Enjoy: Transfer the cookies to a rack and enjoy them slightly warm when the chocolate is still soft and melty.
The Flavor and Texture Experience
As these cookies bake, they develop a wonderful contrast. The outer edges gently firm up while the centers remain soft and tender. The cocoa adds subtle richness while the chocolate chunks melt into glossy pools that make every bite satisfying.
The bright red color also adds a visual element that makes the cookies feel festive and fun.
Helpful Baking Tips
A few small tips can help ensure the best possible results.
- Measure flour carefully so the cookies stay soft and not dry.
- Leave enough space between dough portions on the tray.
- Press a few extra chocolate chunks on top before baking.
What to Avoid While Baking
Even experienced bakers sometimes run into small issues, but they are easy to avoid.
- Overmixing the dough can make the cookies dense.
- Using melted butter instead of softened butter can affect texture.
- Baking too long can dry the cookies out.
Nutrition Facts
Servings: 16 cookies
Calories per serving: 210
Note: These values are approximate.
Preparation Time
Prep Time: 15 minutes
Cook Time: 12 minutes
Total Time: 27 minutes
Make Ahead and Storage Tips
If you like to plan ahead, the cookie dough can be prepared and stored in the refrigerator for up to two days before baking. This actually deepens the flavor slightly.
Once baked, keep the cookies in an airtight container at room temperature for up to four days. They also freeze well. Simply thaw them at room temperature or warm briefly in the oven to refresh their soft texture.
Serving Ideas That Make Them Even Better
These cookies pair beautifully with a glass of cold milk or a warm cup of coffee. They also work wonderfully as a dessert centerpiece when stacked on a cake stand.
For an extra indulgent treat, serve them with vanilla ice cream and warm chocolate sauce.
Creative Leftover Transformations
If a few cookies survive the first round, there are fun ways to enjoy them again.
- Crumble them over ice cream.
- Turn them into cookie ice cream sandwiches.
- Chop them and mix into milkshakes.
Extra Baking Advice
Keeping the dough slightly chilled can help the cookies stay thick while baking. If you prefer larger cookies, simply scoop bigger portions and extend the baking time by a minute or two.
Small adjustments like these can easily personalize the final result.
Make It a Showstopper
Presentation can make homemade cookies feel even more special. Arrange them in neat rows on a serving board or stack them high on a dessert stand. The vibrant red color and glossy chocolate pieces make them instantly eye catching.
Variations to Try
- Add white chocolate chunks for a beautiful color contrast.
- Mix chopped pecans into the dough for a nutty crunch.
- Add a cream cheese filling inside the dough for a surprise center.
- Sprinkle a little sea salt on top before baking for a sweet and salty balance.
- Stir in dark chocolate chips for a deeper chocolate flavor.
FAQ’s
Q1: Can I chill the dough before baking?
Yes. Chilling the dough for about 20 minutes can help control spreading and improve texture.
Q2: Why are my cookies flat?
The butter may have been too soft or melted. Chilling the dough can help.
Q3: Can I freeze the dough?
Yes. Scoop the dough into balls, freeze them, and bake directly from frozen with a couple extra minutes of baking time.
Q4: Can I use chocolate chips instead of chunks?
Absolutely. Chocolate chips work just as well.
Q5: Do I need food coloring?
Food coloring gives the classic appearance, but the cookies will still taste great without it.
Q6: How do I keep the cookies soft?
Store them in an airtight container and avoid overbaking.
Q7: Can I double the recipe?
Yes. Simply double all ingredients while keeping the same baking temperature.
Q8: Can I make them gluten free?
You can substitute a gluten free baking flour blend designed for cookies.
Q9: Why did my cookies turn dry?
Too much flour or too much baking time can cause dryness.
Q10: Can I add nuts to the dough?
Yes. Chopped walnuts or pecans work well in this recipe.
Conclusion
Few things feel as comforting as baking a fresh batch of homemade cookies. The vibrant color, the soft cocoa flavored dough, and those melting chocolate chunks make this treat unforgettable. Whether you bake them for a celebration or simply to satisfy a sweet craving, these cookies bring warmth and joy to the kitchen. Once you try them, you will probably find yourself making another batch sooner than expected.
Print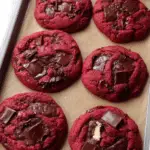
Red velvet chocolate chunk cookies
- Prep Time: 15 minutes
- Cook Time: 12 minutes
- Total Time: 27 minutes
- Yield: 16 cookies 1x
- Category: Dessert
- Method: Baking
- Cuisine: American
- Diet: Vegetarian
Description
Soft and chewy red velvet chocolate chunk cookies with a rich cocoa flavor and melty pockets of chocolate. These bakery style cookies are vibrant, tender in the center, and slightly crisp on the edges.
Ingredients
- 2 cups all purpose flour
- 2 tablespoons unsweetened cocoa powder
- 1 teaspoon baking soda
- 1/2 teaspoon salt
- 1/2 cup unsalted butter, softened
- 3/4 cup granulated sugar
- 1/2 cup brown sugar
- 1 large egg
- 1 teaspoon vanilla extract
- 1 tablespoon red food coloring
- 1 cup chocolate chunks
Instructions
- Preheat the oven to 350°F and line a baking sheet with parchment paper.
- In a mixing bowl whisk together the flour, cocoa powder, baking soda, and salt.
- In another bowl cream the softened butter, granulated sugar, and brown sugar until light and fluffy.
- Add the egg, vanilla extract, and red food coloring to the butter mixture and mix until smooth.
- Gradually fold the dry ingredients into the wet ingredients until a soft dough forms.
- Stir in the chocolate chunks evenly throughout the dough.
- Scoop portions of dough onto the prepared baking sheet, leaving space between each cookie.
- Bake for 10 to 12 minutes until the edges are set and the centers remain soft.
- Allow the cookies to cool on the baking sheet for several minutes before transferring to a rack.
Notes
- For thicker cookies, chill the dough for about 20 minutes before baking.
- Press a few extra chocolate chunks onto the top of each dough ball before baking for a bakery style look.
- Avoid overbaking to keep the centers soft and chewy.
Nutrition
- Serving Size: 1 cookie
- Calories: 210
- Sugar: 18g
- Sodium: 120mg
- Fat: 10g
- Saturated Fat: 6g
- Unsaturated Fat: 3g
- Trans Fat: 0g
- Carbohydrates: 28g
- Fiber: 1g
- Protein: 3g
- Cholesterol: 30mg
Keywords: red velvet cookies, chocolate chunk cookies, chewy cookies, homemade cookies, cocoa cookies