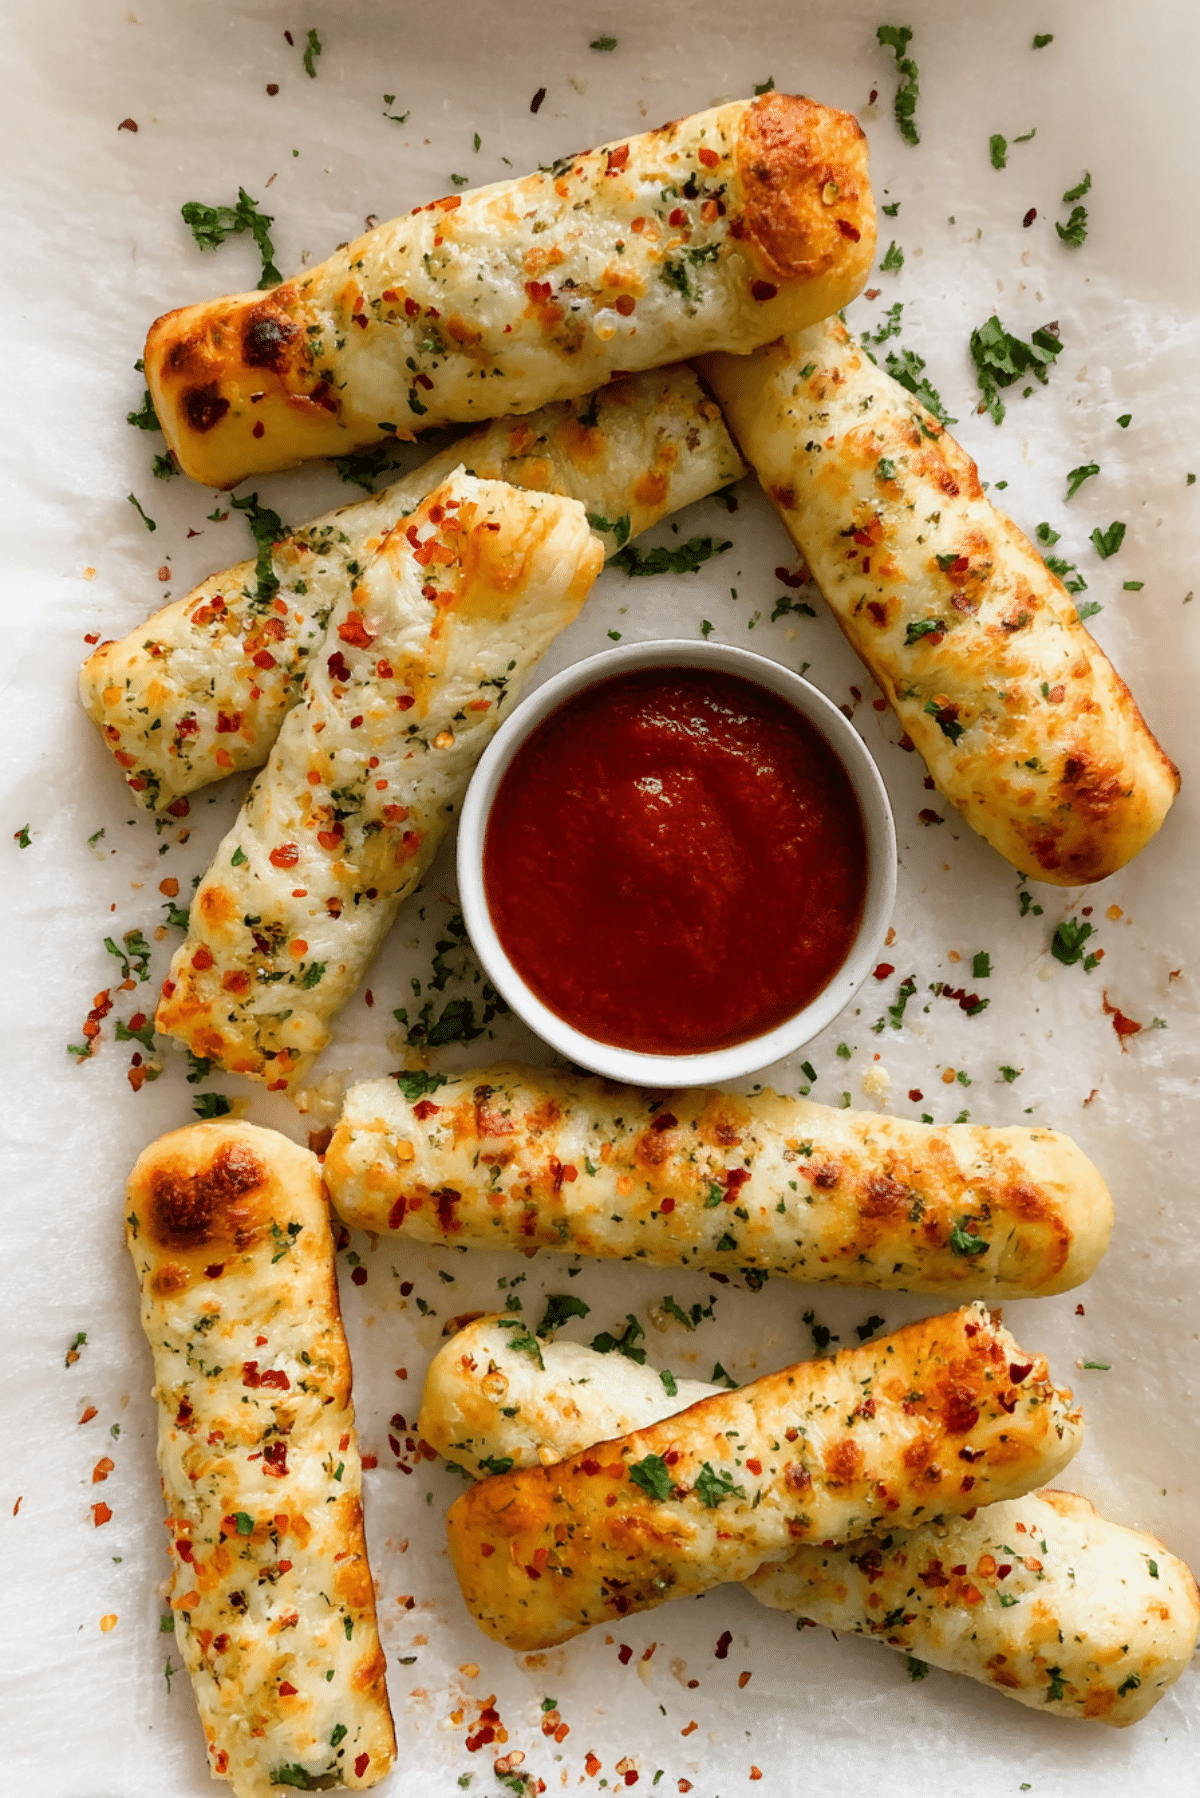
Cheese-Stuffed Breadsticks
There is something almost magical about pulling apart a warm breadstick and watching melted cheese stretch slowly between your fingers. The smell alone, that buttery, garlicky aroma drifting through the kitchen, is enough to make anyone gather around before they are even out of the oven. Trust me, you’re going to love this, because it is simple, comforting, and honestly, a little addictive.
Why These Breadsticks Always Steal the Show
You know those recipes that disappear within minutes of serving? This is one of them. The outside turns lightly crisp and golden, while the inside stays soft and fluffy, wrapping around gooey cheese that melts into every bite. It feels like something you would order at a cozy restaurant, yet it comes together right in your own kitchen with such ease.
A Little Backstory Behind This Cheesy Favorite
Breadsticks have long been part of Italian-inspired cooking, often served alongside pasta or soups. Over time, home cooks began adding their own twist, and stuffing them with cheese quickly became a favorite upgrade. It turns a simple side into something richer, more indulgent, and let me tell you, it is worth every bite.
What Makes This Recipe So Reliable and Loved
Versatile: You can serve these with pasta, soups, or even as a snack on their own, and they fit every occasion beautifully.
Budget-Friendly: The ingredients are simple pantry staples, which means you do not need anything fancy to make something impressive.
Quick and Easy: The steps are straightforward, and even if you are new to baking, you can follow along without stress.
Customizable: You can switch up cheeses or add herbs and spices to match your taste.
Crowd-Pleasing: These disappear fast, whether it is family dinner or a casual gathering.
Make-Ahead Friendly: You can prepare the dough in advance and bake when ready.
Great for Leftovers: If you somehow have leftovers, they reheat wonderfully and stay soft.
A Few Insider Tips Before You Start
Before diving into the process, a few small details can make a big difference.
- Let your yeast activate properly, the water should be warm, not hot
- Do not overstuff the dough, or the cheese may leak out
- Brush with butter right after baking for extra flavor
Tools That Make This Easier
Getting everything ready ahead makes the process smoother.
Mixing Bowl: For combining and kneading the dough easily.
Measuring Cups and Spoons: To keep everything balanced and consistent.
Baking Sheet: A flat surface for even baking.
Pastry Brush: Perfect for spreading that buttery topping evenly.
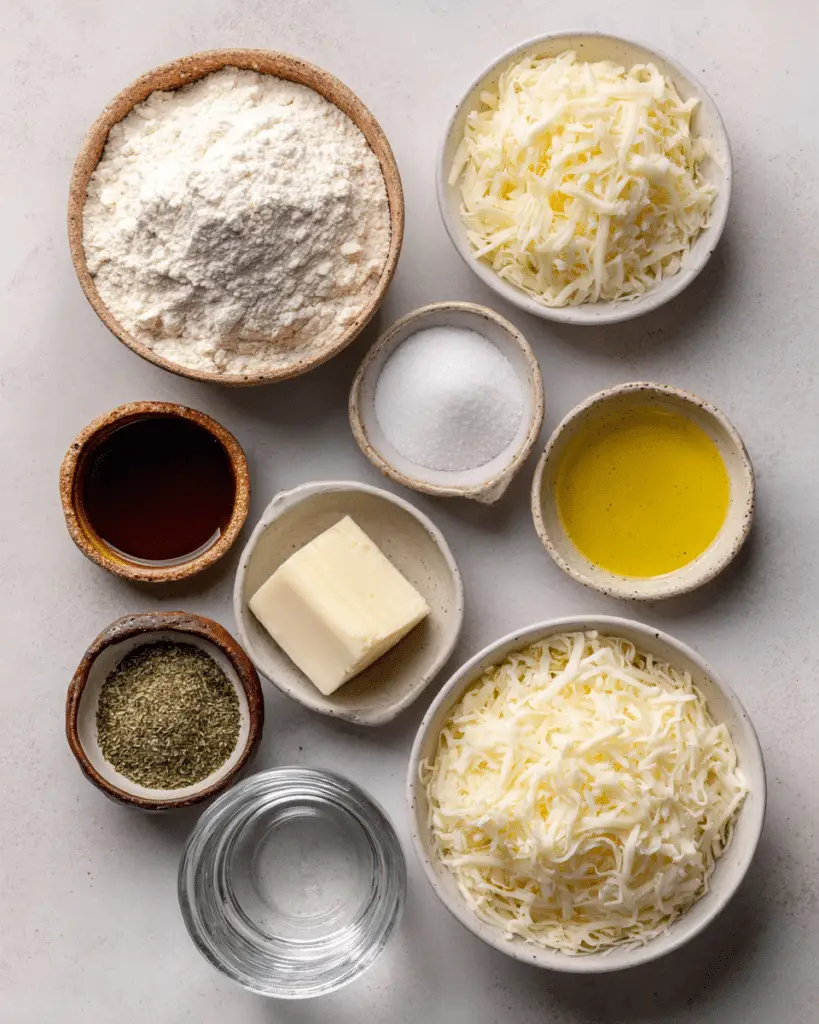
Ingredients That Bring It All Together
The beauty of this dish is how simple ingredients transform into something so comforting and flavorful.
- All-Purpose Flour: 3 cups, forms the base and gives structure to the dough
- Active Dry Yeast: 2 1/4 teaspoons, helps the dough rise and become fluffy
- Sugar: 1 tablespoon, feeds the yeast and adds a subtle sweetness
- Salt: 1 teaspoon, balances and enhances all flavors
- Warm Water: 1 cup, activates the yeast and binds the dough
- Olive Oil: 2 tablespoons, adds softness and richness
- Shredded Mozzarella Cheese: 1 1/2 cups, the star that melts into gooey goodness
- Butter: 2 tablespoons, melted for brushing and flavor
- Garlic Powder: 1 teaspoon, adds that irresistible savory note
- Dried Parsley: 1 teaspoon, brings a fresh finish
Easy Ingredient Swaps You Can Try
Sometimes you want to play around a little, and that works beautifully here.
Mozzarella Cheese: Try cheddar or a blend for a sharper taste
Olive Oil: Substitute with melted butter for a richer dough
Dried Parsley: Fresh herbs like basil or oregano work just as well
Spotlight on the Stars of the Recipe
Mozzarella Cheese: This is what gives that signature stretch and creamy bite that makes every pull so satisfying.
Garlic Powder: It might seem small, but it adds a warm, savory depth that ties everything together.
Let’s Get Cooking Step by Step
And now let’s dive into the part where everything comes to life.
- Preheat Your Equipment: Preheat your oven to 200°C and line a baking sheet with parchment paper.
- Combine Ingredients: In a bowl, mix warm water, sugar, and yeast. Let it sit for about 5 minutes until foamy. Add flour, salt, and olive oil, then mix until a soft dough forms.
- Prepare Your Cooking Vessel: Lightly grease your baking sheet or line it to prevent sticking.
- Assemble the Dish: Roll the dough into a rectangle, cut into strips, place cheese inside each strip, then fold and seal into breadsticks.
- Cook to Perfection: Arrange on the baking sheet and bake for 12 to 15 minutes until golden brown.
- Finishing Touches: Brush immediately with melted butter mixed with garlic powder and sprinkle parsley.
- Serve and Enjoy: Serve warm while the cheese is still soft and stretchy.
The Texture and Flavor You Can Expect
Each bite starts with a lightly crisp outer layer that gives way to a soft, airy interior. Then comes the best part, that melted cheese, warm and creamy, stretching just enough to make you pause and smile. The garlic butter seeps into every crevice, adding a rich, savory finish that lingers just right.
Helpful Tips for Even Better Results
- Use freshly shredded cheese for better melting
- Let the dough rest if it feels too tight while shaping
- Do not overcrowd the baking sheet, give each piece space
What to Watch Out For While Making Them
- Overheating the water can kill the yeast, keep it just warm
- Not sealing the edges properly can cause cheese to leak
- Overbaking can make them too dry, keep an eye on the color
Nutritional Snapshot to Keep in Mind
Servings: 8
Calories per serving: 210
Note: These are approximate values.
Timing Everything Just Right
Prep Time: 20 minutes
Cook Time: 15 minutes
Total Time: 35 minutes
Planning Ahead and Storing Smartly
You can prepare the dough ahead and keep it in the fridge for up to 24 hours. Once baked, store leftovers in an airtight container for up to 3 days. Reheat in the oven for a few minutes to bring back that soft inside and slightly crisp outside. Freezing also works well, just thaw and warm before serving.
Serving Ideas That Make It Even Better
Pair these with marinara sauce for dipping, or serve alongside pasta and salads. They also make a great snack on their own, especially when shared fresh out of the oven.
Turning Leftovers Into Something New
Slice them up and turn them into cheesy croutons for soups. You can also reheat and use them as a base for mini sandwiches with simple fillings.
Extra Tips to Elevate Every Batch
A light sprinkle of grated cheese on top before baking adds a crisp finish. You can also brush with butter twice, once before and once after baking, for deeper flavor.
Making Them Look as Good as They Taste
Arrange them neatly on a plate, sprinkle a bit of fresh parsley, and serve with a small bowl of sauce. The golden color and soft texture will already do most of the work.
Fun Variations to Try Next Time
Try adding a pinch of chili flakes for heat. You can also mix herbs into the dough for extra flavor or swap the cheese for a different blend to change things up.
FAQ’s
1. Can I use instant yeast instead of active dry yeast?
Yes, you can, and you can skip the activation step, just mix it directly with the dry ingredients.
2. Why is my dough not rising?
It could be the yeast or the water temperature. Make sure both are right.
3. Can I make these ahead of time?
Yes, prepare the dough earlier and bake when ready.
4. What cheese works best besides mozzarella?
Cheddar or a mix of cheeses works great for a different flavor.
5. Can I freeze them after baking?
Yes, let them cool completely before freezing.
6. How do I reheat without drying them out?
Use the oven instead of the microwave for better texture.
7. Can I make them gluten free?
You can try a gluten free flour blend, though texture may vary.
8. How do I keep the cheese from leaking?
Seal the edges well and avoid overfilling.
9. Can I add toppings before baking?
Yes, a little cheese or herbs on top works beautifully.
10. Are they good without garlic?
They are still tasty, but garlic adds a lot of flavor.
Conclusion
And there you have it, a batch of warm, cheesy breadsticks that are simple to make yet feel incredibly satisfying. This one’s a total game-changer for quick snacks or side dishes, and once you try it, you will probably come back to it again and again. Let me tell you, it is worth every bite.
Print
Cheese-Stuffed Breadsticks
- Prep Time: 20 minutes
- Cook Time: 15 minutes
- Total Time: 35 minutes
- Yield: 8 servings 1x
- Category: Appetizer
- Method: Baking
- Cuisine: Italian-inspired
- Diet: Vegetarian
Description
Soft, golden breadsticks stuffed with gooey melted cheese and brushed with flavorful garlic butter, perfect as a comforting snack or side.
Ingredients
- 3 cups all-purpose flour
- 2 1/4 teaspoons active dry yeast
- 1 tablespoon sugar
- 1 teaspoon salt
- 1 cup warm water
- 2 tablespoons olive oil
- 1 1/2 cups shredded mozzarella cheese
- 2 tablespoons butter, melted
- 1 teaspoon garlic powder
- 1 teaspoon dried parsley
Instructions
- Preheat oven to 200°C and line a baking sheet with parchment paper.
- In a bowl, mix warm water, sugar, and yeast. Let sit for 5 minutes until foamy.
- Add flour, salt, and olive oil, then mix until a soft dough forms.
- Roll the dough into a rectangle and cut into strips.
- Place shredded mozzarella inside each strip, fold over, and seal edges tightly.
- Arrange on the prepared baking sheet.
- Bake for 12 to 15 minutes until golden brown.
- Mix melted butter with garlic powder and brush over warm breadsticks.
- Sprinkle dried parsley on top and serve warm.
Notes
- Use freshly shredded cheese for better melting texture.
- Seal the dough well to prevent cheese from leaking during baking.
- Reheat in the oven to maintain crisp edges and soft interior.
Nutrition
- Serving Size: 1 breadstick
- Calories: 210
- Sugar: 2g
- Sodium: 320mg
- Fat: 8g
- Saturated Fat: 4g
- Unsaturated Fat: 3g
- Trans Fat: 0g
- Carbohydrates: 28g
- Fiber: 1g
- Protein: 7g
- Cholesterol: 15mg
Keywords: cheese stuffed breadsticks, homemade breadsticks, cheesy bread recipe, baked breadsticks, easy appetizer