Cookie-Capped S’mores
There is something instantly comforting about a warm cookie that tastes like a campfire treat, and this one really brings that magic home. You get golden edges, a soft center, puddles of chocolate, and little clouds of marshmallow in every bite. Trust me, you’re going to love this, because it feels nostalgic and bakery-worthy at the same time.
Why This Cozy Treat Always Steals the Show
Some desserts try too hard, but this one wins people over in the easiest way possible. It takes the classic flavor trio everyone loves and tucks it into a thick, tender cookie that feels familiar and exciting all at once. The first bite gives you buttery dough, rich chocolate, and those sweet marshmallow pockets that make everything feel just a little more fun.
It is the kind of bake that disappears from the cooling rack faster than you expect. Let me tell you, it’s worth every bite, especially when the centers are still slightly warm and the chocolate is soft enough to melt on your fingertips.
The Sweet Story Behind the Campfire Inspiration
Before we get into what makes this bake such a keeper, it helps to know why the flavor combination is so loved in the first place. S’mores have been around for generations, tied to campfires, summer evenings, and that simple joy of roasting marshmallows until they turn golden and gooey.
This cookie version borrows that same spirit, but brings it indoors in a way that feels easier and a little more dependable. Instead of balancing crackers and sticky fillings in your hands, you get all those beloved flavors in one sturdy, bakery-style cookie. It keeps the nostalgic charm, but turns it into something you can bake any day of the year.
What Makes This Recipe So Easy to Trust
Now that the story has set the mood, let’s talk about why this one deserves a spot in your regular baking rotation. This one’s a total game-changer, because it delivers big flavor without making the process feel complicated.
Versatile: These cookies fit just about any moment, from after-school treats to weekend baking sessions to holiday dessert trays. They feel casual enough for everyday snacking and special enough to bring to a gathering.
Budget-Friendly: The ingredient list is made from simple baking staples plus chocolate and marshmallows. You get a very satisfying homemade dessert without needing anything fancy or expensive.
Quick and Easy: The dough comes together with basic mixing steps, and the bake time is short. Even on a busy day, this recipe feels manageable.
Customizable: You can adjust the chocolate type, use mini marshmallows or halved regular ones, and even change the cookie size depending on the mood. It gives you room to make it your own.
Crowd-Pleasing: Kids love the gooey sweetness, and adults love the nostalgic campfire flavor. It is one of those rare treats that gets everyone reaching for seconds.
Make-Ahead Friendly: The dough can be chilled ahead of time and baked later, which is perfect when you want fresh cookies without last-minute prep. You can also freeze dough balls for future cravings.
Great for Leftovers: If you somehow have any left, they stay delicious for days and reheat beautifully. A few seconds of warmth brings the soft center right back to life.
Smart Baker Secrets for the Best Batch
And now that you know why these cookies are worth making, let’s dive into the little tricks that make them even better. A few small choices can take them from good to truly memorable.
Chill the dough: Even a short chill helps the cookies bake up thicker and keeps the marshmallows from spreading too wildly.
Press extra toppings on top: Saving a few chocolate chunks and marshmallow pieces for the tops makes the finished cookies look prettier and more tempting.
Do not overbake: The centers should still look slightly soft when they come out. They finish setting on the hot baking sheet.
Use parchment paper: Marshmallows can get sticky as they bake, and parchment makes cleanup much easier.
Space the dough well: These are generous cookies, so giving them room helps them bake evenly and keeps them from merging together.
The Simple Tools That Make Baking Easier
Before the ingredients hit the bowl, it helps to gather a few kitchen basics. Nothing here is fussy, and that is part of the charm.
Mixing Bowls: You will need one bowl for the dry ingredients and one larger bowl for the butter and sugars.
Hand Mixer or Stand Mixer: This helps cream the butter and sugars until light and fluffy, which gives the cookies a better texture.
Measuring Cups and Spoons: Accurate measuring keeps the dough balanced and helps the cookies bake consistently.
Rubber Spatula: Perfect for folding in the chocolate and marshmallows without overmixing.
Baking Sheet: A sturdy sheet pan helps the cookies bake evenly from edge to center.
Parchment Paper: This keeps the marshmallows from sticking and makes cleanup so much easier.
Cookie Scoop: Great for making evenly sized dough portions so every cookie bakes at the same pace.
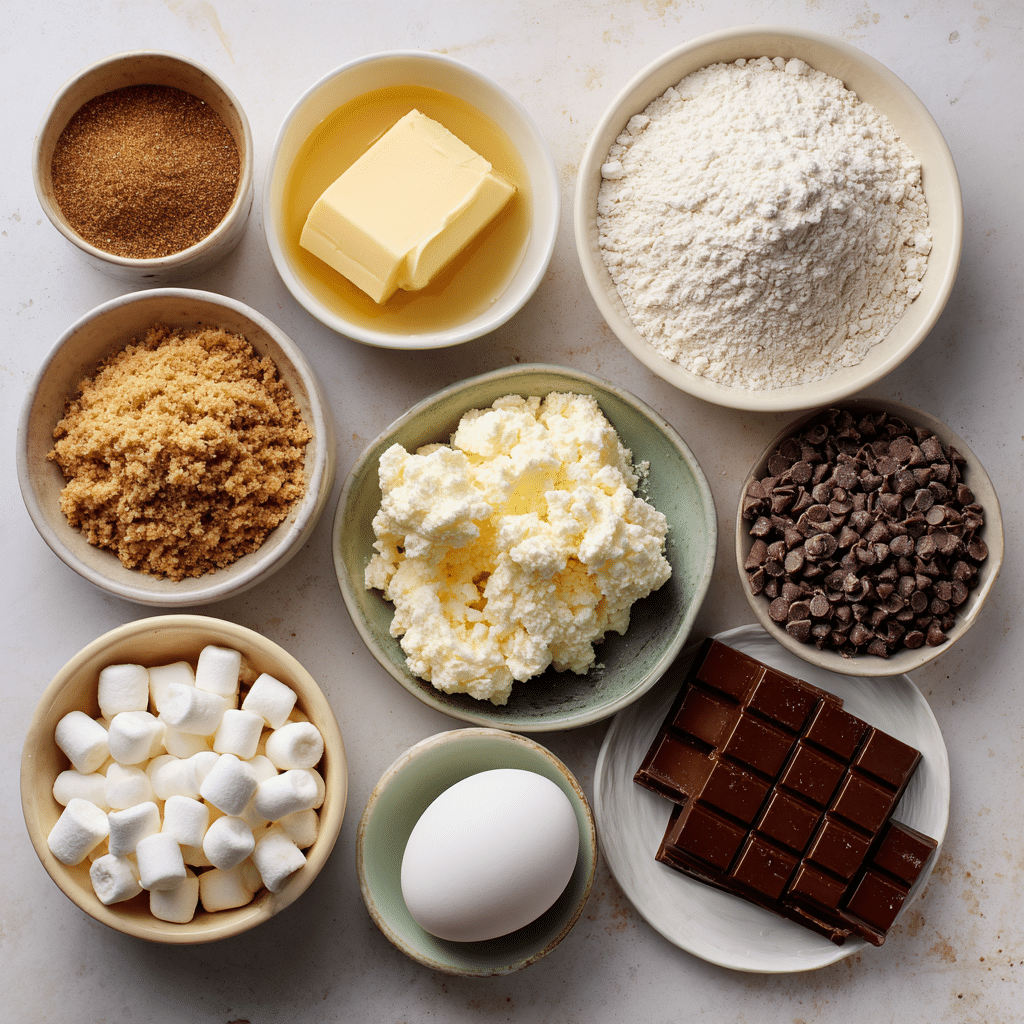
Everything That Comes Together in the Dough
And now for the part where all the magic starts. Each ingredient has a job to do, and together they create a cookie that is buttery, chewy, soft, and packed with those classic campfire-inspired flavors.
- All-Purpose Flour: 2 1/4 cups, this gives the cookies their structure and helps create that thick bakery-style body.
- Baking Soda: 1 teaspoon, this lifts the dough and keeps the cookies from turning dense.
- Salt: 1/2 teaspoon, this balances the sweetness and makes the chocolate flavor pop.
- Unsalted Butter: 3/4 cup, softened, this brings richness and helps the dough bake up tender and flavorful.
- Light Brown Sugar: 3/4 cup, packed, this adds moisture and gives the cookies a soft, chewy center with a light caramel note.
- Granulated Sugar: 1/2 cup, this adds sweetness and helps the edges turn lightly crisp.
- Large Egg: 1, this binds the dough and adds richness.
- Vanilla Extract: 2 teaspoons, this rounds out the sweetness and gives the dough a warm bakery aroma.
- Graham Cracker Crumbs: 3/4 cup, this brings in that unmistakable s’mores flavor and a subtle sandy texture.
- Milk Chocolate Bar: 1 1/2 cups, chopped, this melts into rich pockets that mimic classic s’mores chocolate.
- Mini Chocolate Chips: 1/2 cup, these scatter chocolate through every bite and make the cookies extra satisfying.
- Mini Marshmallows: 1 cup, these create gooey sweet bursts and that signature toasted treat feel.
Easy Swaps When You Need to Improvise
Once you see how simple the ingredient list is, it becomes even easier to adapt. A few small swaps can save the day without changing the heart of the recipe.
All-Purpose Flour: Use a cup-for-cup gluten-free flour blend if needed.
Unsalted Butter: Use salted butter, but reduce the added salt to 1/4 teaspoon.
Light Brown Sugar: Dark brown sugar works too, and it gives a slightly deeper caramel flavor.
Milk Chocolate Bar: Use semisweet chocolate chunks for a less sweet finish.
Mini Chocolate Chips: Swap in more chopped chocolate if that is what you have on hand.
Mini Marshmallows: Use regular marshmallows cut into smaller pieces.
Graham Cracker Crumbs: Crushed digestive biscuits can work in a pinch.
The Ingredients That Really Make the Magic Happen
A few ingredients do more than just show up here, they shape the whole personality of the cookie.
Graham Cracker Crumbs: This is the ingredient that quietly ties everything back to the campfire inspiration. It brings a subtle honeyed, toasty flavor that makes the dough taste more layered and special.
Mini Marshmallows: These are the playful star of the batch. They melt into little gooey pockets and puff on top, which gives the cookies that unmistakable s’mores look and feel.
Let’s Bake These Soft and Gooey Cookies
Now comes the fun part, and this is where the kitchen starts to smell incredible. Here are the steps you’re going to follow, and each one moves you closer to a tray of warm, chocolate-filled cookies.
- Preheat Your Equipment: Preheat your oven to 350°F and line a baking sheet with parchment paper. This gets everything ready so the dough can go straight into the oven once mixed.
- Combine Ingredients: In a medium bowl, whisk together the flour, baking soda, salt, and graham cracker crumbs. In a large bowl, beat the softened butter, brown sugar, and granulated sugar until light and fluffy. Beat in the egg and vanilla extract, then gradually mix in the dry ingredients until just combined. Fold in the chopped milk chocolate and mini chocolate chips, then gently stir in most of the mini marshmallows, saving a small handful for topping.
- Prepare Your Cooking Vessel: Scoop the dough into large portions, about 3 tablespoons each, and place them on the prepared baking sheet with plenty of space between them. Press a few extra chocolate pieces and the reserved mini marshmallows onto the tops.
- Assemble the Dish: Lightly shape each dough mound so it stays tall rather than flat. This helps create thick cookies with soft centers and gives the toppings a nice bakery-style look.
- Cook to Perfection: Bake for 10 to 12 minutes, or until the edges look lightly golden and the centers still appear slightly soft. The marshmallows may puff and turn lightly golden in spots, which is exactly what you want.
- Finishing Touches: Let the cookies cool on the baking sheet for 10 minutes before moving them to a wire rack. If any marshmallow spreads too much, use a spoon to nudge it back toward the cookie while still warm.
- Serve and Enjoy: Enjoy them slightly warm for the fullest gooey texture, with the chocolate still soft and the marshmallow tender. They are wonderful on their own and even better with a glass of cold milk.
Where the Texture and Flavor Really Shine
As the cookies bake, the butter, sugars, and graham crumbs create a deep golden dough with a soft center and lightly crisp edge. Then the chocolate melts into rich pockets, and the marshmallows puff into sweet little clouds that almost caramelize on top.
That contrast is what makes each bite so good. You get chewiness, melty richness, a bit of crispness around the edge, and a nostalgic toasted sweetness that lingers. It is layered without feeling complicated, and that is exactly why people keep coming back for another one.
Helpful Tricks for an Even Better Batch
By now you can probably already imagine the smell in the kitchen, so here are a few extra pointers to help everything go smoothly.
- Use slightly damp fingers: If the dough feels sticky while shaping, a tiny bit of water on your fingertips makes it easier to handle.
- Reserve the prettiest toppings: A few visible marshmallows and chocolate chunks on top make the cookies look extra inviting after baking.
- Bake one test cookie first: This helps you check the spread and adjust the dough with a short chill if needed.
- Let them rest: Giving the cookies a few minutes on the pan helps the centers set without losing that soft texture.
What Can Get in the Way of Perfect Cookies
Even easy recipes have a few spots where things can go sideways, but the fixes are simple once you know what to watch for.
- Overmixing the dough: This can make the cookies tougher than they need to be. Mix just until the flour disappears.
- Overbaking: If you wait for the centers to look fully done, the cookies may lose their softness. Pull them when the edges are set and the middle still looks a little tender.
- Too many marshmallows on the outside: Marshmallows exposed on the edges can melt away or stick. Keep most of them tucked into the dough.
- Crowding the pan: If the dough balls are too close, the cookies may spread into each other. Give them space.
A Quick Look at the Nutrition
Before we wrap up the practical details, here is a helpful snapshot of what to expect per serving.
Servings: 12 cookies
Calories per serving: 280
Note: These are approximate values.
The Timing You’ll Want to Know
And now let’s keep the planning simple, because knowing the timing always makes baking feel easier.
Prep Time: 15 minutes
Cook Time: 12 minutes
Total Time: 27 minutes
How to Prep Ahead and Store Them Well
One of the nicest things about these cookies is how flexible they are once the dough is made. You can prepare the dough ahead, cover it tightly, and refrigerate it for up to 24 hours before baking. In fact, a little chilling often improves the texture.
For storage, keep baked cookies in an airtight container at room temperature for up to 4 days. If you want to freeze them, place cooled cookies in a freezer-safe container with parchment between layers for up to 2 months. You can also freeze unbaked dough balls and bake them straight from frozen, just adding 1 to 2 extra minutes. To reheat, warm a cookie in the microwave for about 8 to 10 seconds to bring back that gooey center.
The Best Ways to Serve Them
Once the cookies are ready, serving them is honestly half the fun. They are perfect with cold milk, hot cocoa, or a simple cup of coffee if you want something cozy and sweet.
For a dessert plate, serve them slightly warm with vanilla ice cream and a drizzle of chocolate sauce. They also make a wonderful addition to party trays, lunchbox treats, or movie-night snacks. If you want to lean into the campfire vibe, pair them with warm drinks and a few extra graham cracker crumbs sprinkled over the plate for a playful look.
Clever Ways to Use the Leftovers
If you happen to have leftovers, and that is a big if, there are some fun ways to give them a second life. Crumble a cookie over vanilla yogurt or ice cream for a quick dessert with plenty of texture.
You can also sandwich softened ice cream between two cookies for an easy frozen treat. Another good idea is chopping them into chunks and folding them into a brownie batter or using them as a topping for a dessert parfait. They are already packed with flavor, so it does not take much to turn them into something new.
A Few More Little Details That Help
Before you head into your own batch, here are a few extra things that make the whole process even smoother.
Use room temperature butter: It creams more easily with the sugars and helps create a lighter dough.
Chop the chocolate unevenly: A mix of small shards and bigger chunks makes every cookie look more natural and gives you a nice variety of melted pockets.
Keep an eye on the marshmallows: They can brown quickly, so check the cookies near the end of baking.
Cool on parchment: This helps prevent sticking if any marshmallow bubbles over.
Simple Touches That Make Them Look Bakery-Worthy
And now for the finishing details, because these cookies deserve to look as good as they taste. Pressing a few extra chocolate chunks into the tops right after baking makes them look glossy and irresistible.
For serving, stack them loosely on a plate so the marshmallow tops and chunky chocolate pieces show off. A light dusting of graham cracker crumbs around the plate can add a subtle hint of texture without making things messy. Even a simple white plate makes the golden cookies and dark chocolate stand out beautifully.
Fun Variations to Bake Next Time
Once you make the original version, it is very hard not to start thinking of new twists. Here are a few that work especially well.
Dark Chocolate Twist: Swap the milk chocolate for dark chocolate chunks for a richer, deeper flavor.
Stuffed Center Version: Tuck a few extra mini marshmallows into the center of each dough ball for an even gooier middle.
Mini Cookie Style: Make smaller dough portions and reduce the bake time to about 8 to 9 minutes for bite-sized treats.
Sea Salt Finish: Add a tiny pinch of flaky salt on top after baking to balance the sweetness and sharpen the chocolate flavor.
Double Graham Flavor: Add a little extra graham cracker crumb to the tops before baking for a toastier, more pronounced flavor.
FAQ’s
Q1: Can I chill the dough before baking?
Yes, and it often helps. Chilling the dough for 20 to 30 minutes can make the cookies thicker and easier to shape.
Q2: Can I use regular marshmallows instead of mini marshmallows?
Yes. Cut regular marshmallows into smaller pieces so they distribute more evenly through the dough.
Q3: Why did my marshmallows melt out of the cookies?
That usually happens when too many marshmallows sit on the outer edges. Try keeping most of them tucked inside the dough.
Q4: Can I make these cookies smaller?
Absolutely. Use a smaller scoop and reduce the baking time by a couple of minutes.
Q5: Do I need to use graham cracker crumbs?
They really help create that classic s’mores flavor, but crushed digestive biscuits can work as a backup.
Q6: What kind of chocolate works best here?
Milk chocolate gives the most classic flavor, but semisweet or dark chocolate also work well if you want a less sweet finish.
Q7: Can I freeze the dough?
Yes. Scoop the dough into portions, freeze them on a tray, then transfer to a container or freezer bag.
Q8: How do I keep the cookies soft?
Store them in an airtight container and avoid overbaking. A few seconds in the microwave also brings back softness.
Q9: Can I bake these on foil instead of parchment?
Parchment is the better choice because marshmallows can stick badly to foil once melted.
Q10: Are these best warm or cooled?
They are delicious both ways, but slightly warm is where they really shine. The chocolate is softer and the marshmallow feels extra tender.
Conclusion
These cookies take all the cozy charm of a campfire favorite and turn it into something thick, gooey, and easy to bake at home. They are sweet, nostalgic, a little playful, and packed with enough chocolate and marshmallow goodness to make every bite feel special.
Whether you bake them for a party, a weekend treat, or just because the craving hits, they bring a lot of joy for very little effort. Trust me, you’re going to love this one, and once you pull that first warm tray from the oven, you will see exactly why.
Print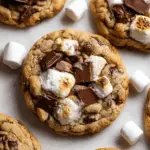
Cookie-Capped S’mores
- Prep Time: 15 minutes
- Cook Time: 12 minutes
- Total Time: 27 minutes
- Yield: 12 cookies 1x
- Category: Dessert
- Method: Baking
- Cuisine: American
- Diet: Vegetarian
Description
Soft and chewy bakery-style cookies inspired by classic campfire flavors, packed with graham cracker crumbs, chopped milk chocolate, mini chocolate chips, and gooey mini marshmallows.
Ingredients
- 2 1/4 cups all-purpose flour
- 1 teaspoon baking soda
- 1/2 teaspoon salt
- 3/4 cup unsalted butter, softened
- 3/4 cup light brown sugar, packed
- 1/2 cup granulated sugar
- 1 large egg
- 2 teaspoons vanilla extract
- 3/4 cup graham cracker crumbs
- 1 1/2 cups milk chocolate bar, chopped
- 1/2 cup mini chocolate chips
- 1 cup mini marshmallows
Instructions
- Preheat the oven to 350°F and line a baking sheet with parchment paper.
- In a medium bowl, whisk together the flour, baking soda, salt, and graham cracker crumbs.
- In a large bowl, beat the softened butter, brown sugar, and granulated sugar until light and fluffy.
- Beat in the egg and vanilla extract until smooth.
- Gradually mix the dry ingredients into the wet ingredients until just combined.
- Fold in the chopped milk chocolate and mini chocolate chips, then gently stir in most of the mini marshmallows, reserving a small handful for topping.
- Scoop the dough into 12 portions, about 3 tablespoons each, and place them on the prepared baking sheet with space between them.
- Press the reserved mini marshmallows and a few extra chocolate pieces onto the tops of the dough portions.
- Bake for 10 to 12 minutes, until the edges are lightly golden and the centers still look slightly soft.
- Let the cookies cool on the baking sheet for 10 minutes, then transfer to a wire rack before serving.
Notes
- Chilling the dough for 20 to 30 minutes helps the cookies stay thick.
- Do not overbake, the cookies will continue to set as they cool.
- Keep most marshmallows tucked inside the dough so they do not melt off the edges.
- Warm leftovers for a few seconds in the microwave for a gooier texture.
Nutrition
- Serving Size: 1 cookie
- Calories: 280
- Sugar: 20 g
- Sodium: 170 mg
- Fat: 13 g
- Saturated Fat: 8 g
- Unsaturated Fat: 4 g
- Trans Fat: 0 g
- Carbohydrates: 38 g
- Fiber: 1 g
- Protein: 3 g
- Cholesterol: 33 mg
Keywords: s’mores cookies, marshmallow cookies, chocolate chunk cookies, graham cracker cookies, bakery-style cookies, easy dessert recipe