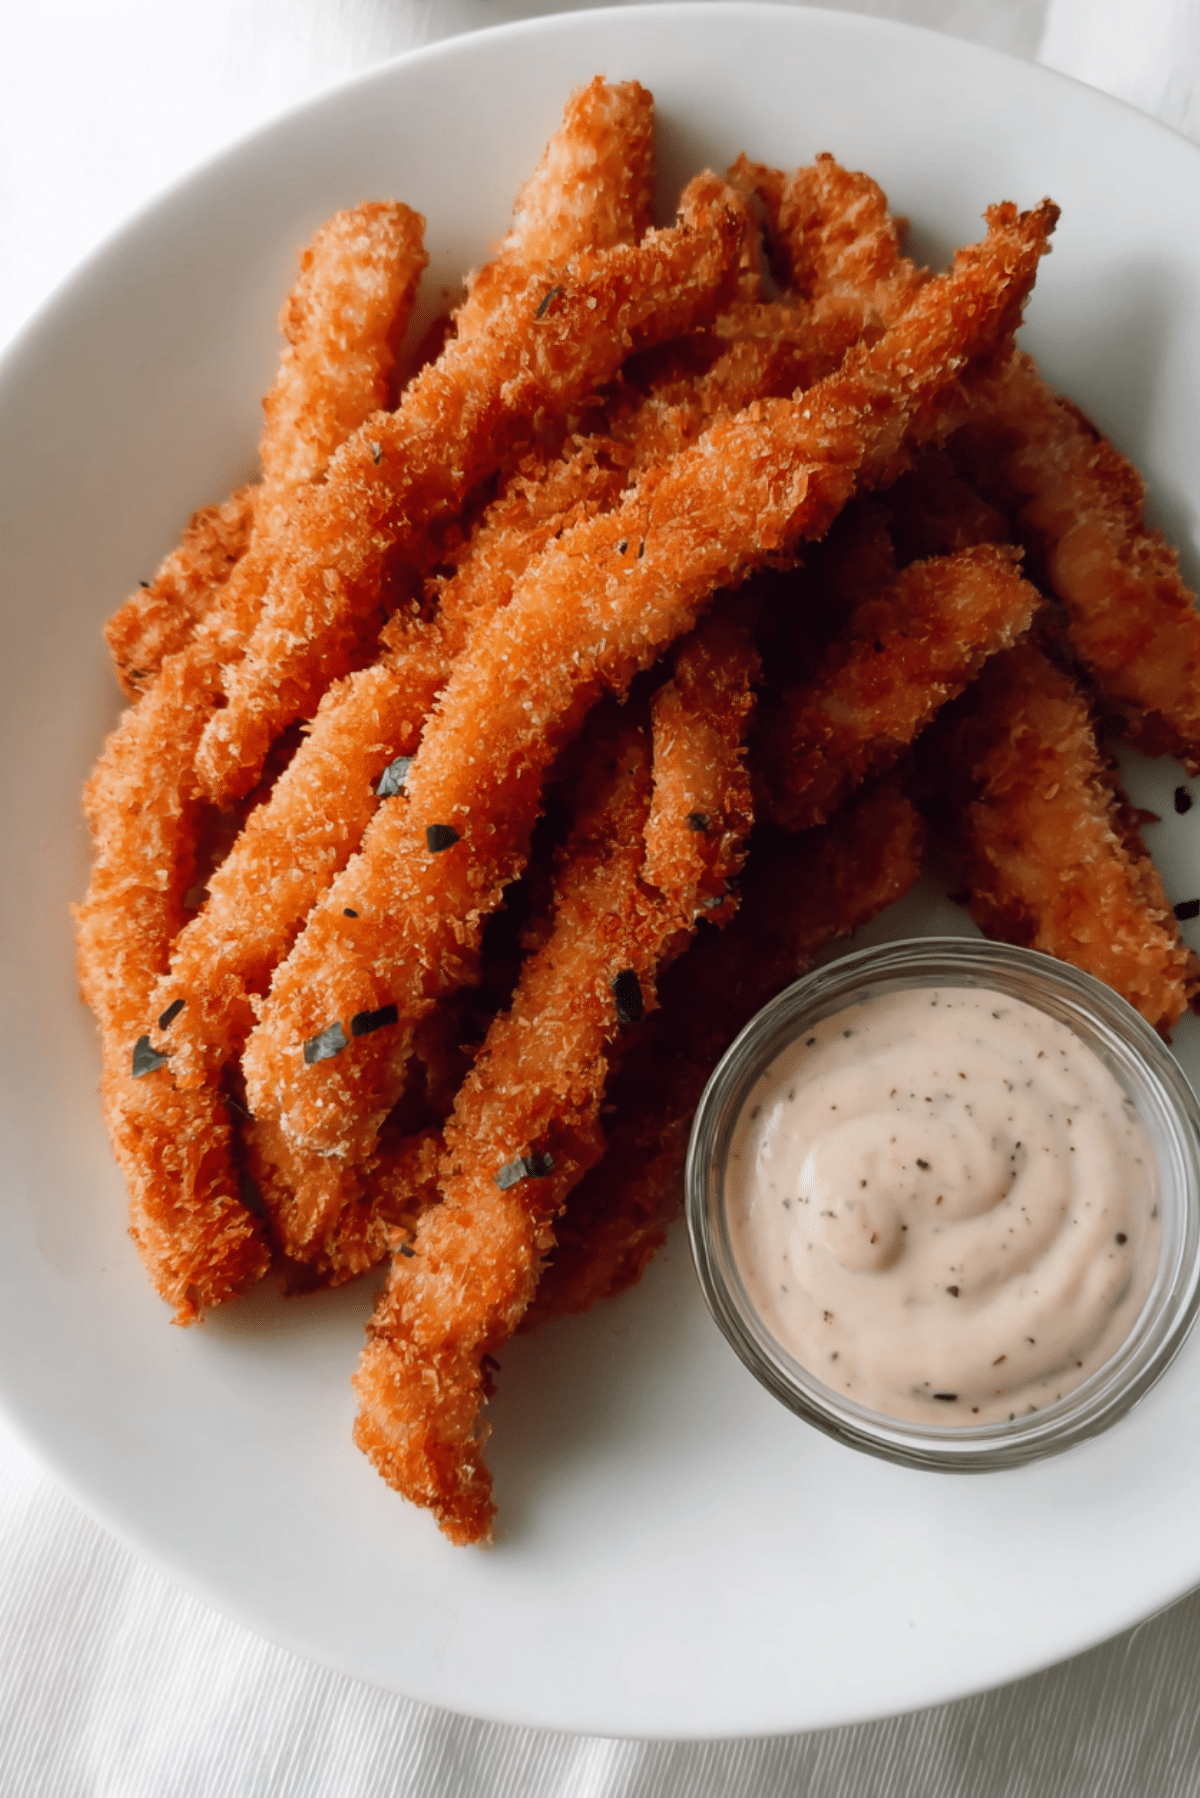
Crispy Chicken Fries
There’s something about crispy chicken fries that instantly brings comfort, nostalgia, and that feel-good crunch we all crave. Whether you’re whipping them up for game night, a casual family dinner, or simply because you’re craving something golden and irresistible, these fries hit the spot every time. Trust me, once you try making them at home, you won’t want to go back to the fast food version.
Why This Recipe Will Be Your New Favorite
Let’s talk about why you’ll find yourself coming back to this one again and again.
Adaptable: You can spice them up or keep them mild. Perfect with a variety of dipping sauces, or even tossed into wraps or bowls.
Easy on the Wallet: Simple pantry ingredients and budget-friendly chicken tenders make this recipe easy on your grocery bill.
No-Fuss: The steps are straightforward, and no fancy equipment is needed. You can whip these up in no time.
Easy to Tweak: Want them gluten-free? Use gluten-free flour and breadcrumbs. Prefer extra crunch? Double-dip in the breading.
Always a Hit: These disappear fast at parties, get devoured by kids, and even adults sneak in a few extra.
Great for Planning Ahead: You can prep and freeze a batch for future cravings or busy weeknights.
Leftover-Friendly: Reheat them in the oven or air fryer and they’re just as crispy as day one.
Behind the Recipe
I first tried making chicken fries at home after a road trip left me hooked on a certain fast food version. But once I realized how simple they were to make from scratch, with better flavor and no mystery ingredients, I never looked back. It quickly became a staple for movie nights and weekend snacks, and now it’s something everyone in the house looks forward to.
Ingredients You’ll Need
It’s amazing how a few simple ingredients come together to create something this crave-worthy. Each component adds texture, flavor, and that signature crunch.
- Chicken tenders: 1 pound, cut into thin strips. These are the base of your fries and cook quickly while staying juicy.
- All-purpose flour: ½ cup, used for the first layer of coating to help everything stick.
- Cornstarch: ¼ cup, adds extra crispiness when combined with flour.
- Garlic powder: 1 teaspoon, infuses a subtle garlicky depth.
- Onion powder: 1 teaspoon, adds a savory, aromatic background.
- Smoked paprika: 1 teaspoon, gives warmth and color.
- Salt: 1 teaspoon, enhances all the other flavors.
- Black pepper: ½ teaspoon, for a mild bite.
- Eggs: 2 large, beaten to create a binding layer.
- Buttermilk: ¼ cup, tenderizes the chicken and adds tang.
- Breadcrumbs: 1 cup, creates the crunchy outer shell.
- Vegetable oil: For frying, enough to fill your pan with about 2 inches of oil.

Time Needed to Make This Recipe
Prep Time: 20 minutes
Cook Time: 15 minutes
Total Time: 35 minutes
Special Equipment You’ll Need
No need to overthink this just a few basics from your kitchen will do the job.
Mixing bowls: For dredging and coating your chicken.
Tongs: Essential for keeping your fingers safe and your coating intact.
Heavy-bottomed pan or skillet: Ensures even frying and stable heat.
Wire rack or paper towels: For draining excess oil and keeping that crunch.
Step-by-Step Instructions
Let’s get to the good part cooking! These steps are super beginner-friendly.
- Set up your dredging stations: In one bowl, combine the flour, cornstarch, garlic powder, onion powder, paprika, salt, and pepper. In another, whisk together the eggs and buttermilk. In a third, pour in the breadcrumbs.
- Coat the chicken strips: Dip each chicken strip into the flour mixture first, then into the egg mixture, and finally coat it well in breadcrumbs. Press gently to help the coating stick.
- Heat the oil: In a heavy-bottomed pan, heat vegetable oil over medium-high heat until it reaches 350°F (175°C).
- Fry in batches: Carefully place a few coated chicken strips into the oil at a time. Fry for 3 to 4 minutes per side, until golden brown and crispy. Don’t overcrowd the pan.
- Drain and rest: Transfer cooked chicken fries to a paper towel-lined plate or wire rack to drain. Let them sit for a minute or two to maintain their crunch.
- Serve immediately: Enjoy hot with your favorite dipping sauces like honey mustard, ranch, or spicy mayo.
Serving Suggestions & Presentation Tips
Presentation makes all the difference, especially with finger foods. Serve your chicken fries in a parchment-lined basket or a platter with dipping sauces in ramekins. Sprinkle with fresh herbs like chopped parsley for a pop of color. Pair with fries, a crisp slaw, or even a light salad to round out your plate.
Extra Tips for Best Results
Here’s how to make your chicken fries absolutely irresistible every time.
- Pat the chicken dry before coating to help the breading stick better.
- Chill the breaded chicken for 10 minutes before frying for an even crisper finish.
- Use a thermometer to monitor oil temperature for consistent results.
- Avoid overcrowding in the frying pan which can lower the oil temp and make them soggy.
Variations You Can Try
Don’t be afraid to mix things up. Here are a few twists to keep it exciting.
- Spicy Chicken Fries: Add cayenne pepper or hot sauce to the egg mixture for a fiery version.
- Herb Crusted: Mix dried oregano and thyme into the breadcrumb layer for a fragrant herb crust.
- Parmesan Crusted: Stir grated parmesan cheese into your breadcrumbs for extra richness.
- Air Fryer Style: Spray breaded chicken fries with oil and air fry at 400°F for 12-15 minutes, flipping halfway.
- Gluten-Free Option: Use gluten-free flour and breadcrumbs for an allergy-friendly version.
Make Ahead and Storage
You can easily prep these ahead of time. Coat the chicken strips, then place them on a tray and freeze until solid. Transfer to a zip-top bag and store for up to 1 month. When ready to cook, fry directly from frozen, adding a few extra minutes. Leftovers? Pop them into the oven or air fryer to re-crisp they come out as good as new.
Chef’s Pro Tips for Perfect Results
To really master this recipe, here’s what to keep in mind:
- Always coat your chicken evenly for that all-around crunch.
- Letting the breaded strips rest before frying helps the coating stay intact.
- Use fresh oil if you’re frying multiple batches to avoid burnt bits.
Nutrition Facts
Servings: 4
Calories per serving: 370
Note: These are approximate values.
FAQ’s
Q1: Can I bake these instead of frying?
Yes, you can. Bake at 425°F on a parchment-lined tray for 20-25 minutes, flipping halfway. Spray lightly with oil for better crisp.
Q2: How do I know when the chicken is fully cooked?
The internal temperature should reach 165°F, and the outside should be golden brown.
Q3: What dipping sauces pair well with these?
Try ranch, BBQ sauce, honey mustard, or spicy mayo. They all add a delicious twist.
Q4: Can I use chicken thighs instead of tenders?
Yes, just cut them into thin strips. Thighs may be juicier but slightly fattier.
Q5: How do I make them spicier?
Add cayenne pepper, chili flakes, or hot sauce to your seasoning or batter.
Q6: Are these freezer-friendly after cooking?
Definitely. Store in an airtight container and reheat in the oven or air fryer for best results.
Q7: Can I double the recipe?
Absolutely. Just fry in batches and refresh your oil as needed to prevent burning.
Q8: Can I use panko breadcrumbs?
Yes, they give an extra light and crispy texture.
Q9: What oil is best for frying?
Use a neutral oil with a high smoke point like vegetable or canola oil.
Q10: What sides go well with chicken fries?
Think fries, coleslaw, mac and cheese, or even a crunchy salad.
Conclusion
Whether you’re cooking for friends or just treating yourself, these crispy chicken fries are the kind of thing that disappears fast and gets rave reviews every time. Let me tell you, it’s worth every bite.
Print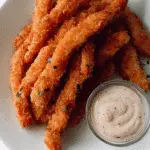
Crispy Chicken Fries
- Prep Time: 20 minutes
- Cook Time: 15 minutes
- Total Time: 35 minutes
- Yield: 4 servings 1x
- Category: Appetizer
- Method: Frying
- Cuisine: American
- Diet: Halal
Description
Crispy chicken fries made from juicy chicken tenders, coated in a seasoned breadcrumb crust and fried to golden perfection. Perfect for snacking, dipping, or serving at parties.
Ingredients
- 1 pound chicken tenders, cut into strips
- 1/2 cup all-purpose flour
- 1/4 cup cornstarch
- 1 teaspoon garlic powder
- 1 teaspoon onion powder
- 1 teaspoon smoked paprika
- 1 teaspoon salt
- 1/2 teaspoon black pepper
- 2 large eggs
- 1/4 cup buttermilk
- 1 cup breadcrumbs
- Vegetable oil, for frying
Instructions
- Set up your dredging stations with seasoned flour, egg and buttermilk mixture, and breadcrumbs in separate bowls.
- Dip each chicken strip into the flour mix, then the egg mix, and finally coat with breadcrumbs, pressing gently.
- Heat oil in a deep skillet to 350°F.
- Fry chicken strips in batches for 3–4 minutes per side until golden and crispy.
- Drain on paper towels or a wire rack before serving.
- Serve hot with your favorite dipping sauce.
Notes
- Chill the breaded strips before frying for extra crunch.
- Use a thermometer to maintain oil temperature.
- Double the batch and freeze for easy future meals.
Nutrition
- Serving Size: 1 serving
- Calories: 370
- Sugar: 1g
- Sodium: 630mg
- Fat: 18g
- Saturated Fat: 3g
- Unsaturated Fat: 12g
- Trans Fat: 0g
- Carbohydrates: 25g
- Fiber: 1g
- Protein: 27g
- Cholesterol: 120mg
Keywords: chicken fries, crispy chicken, homemade chicken fingers, party snacks, fried chicken tenders