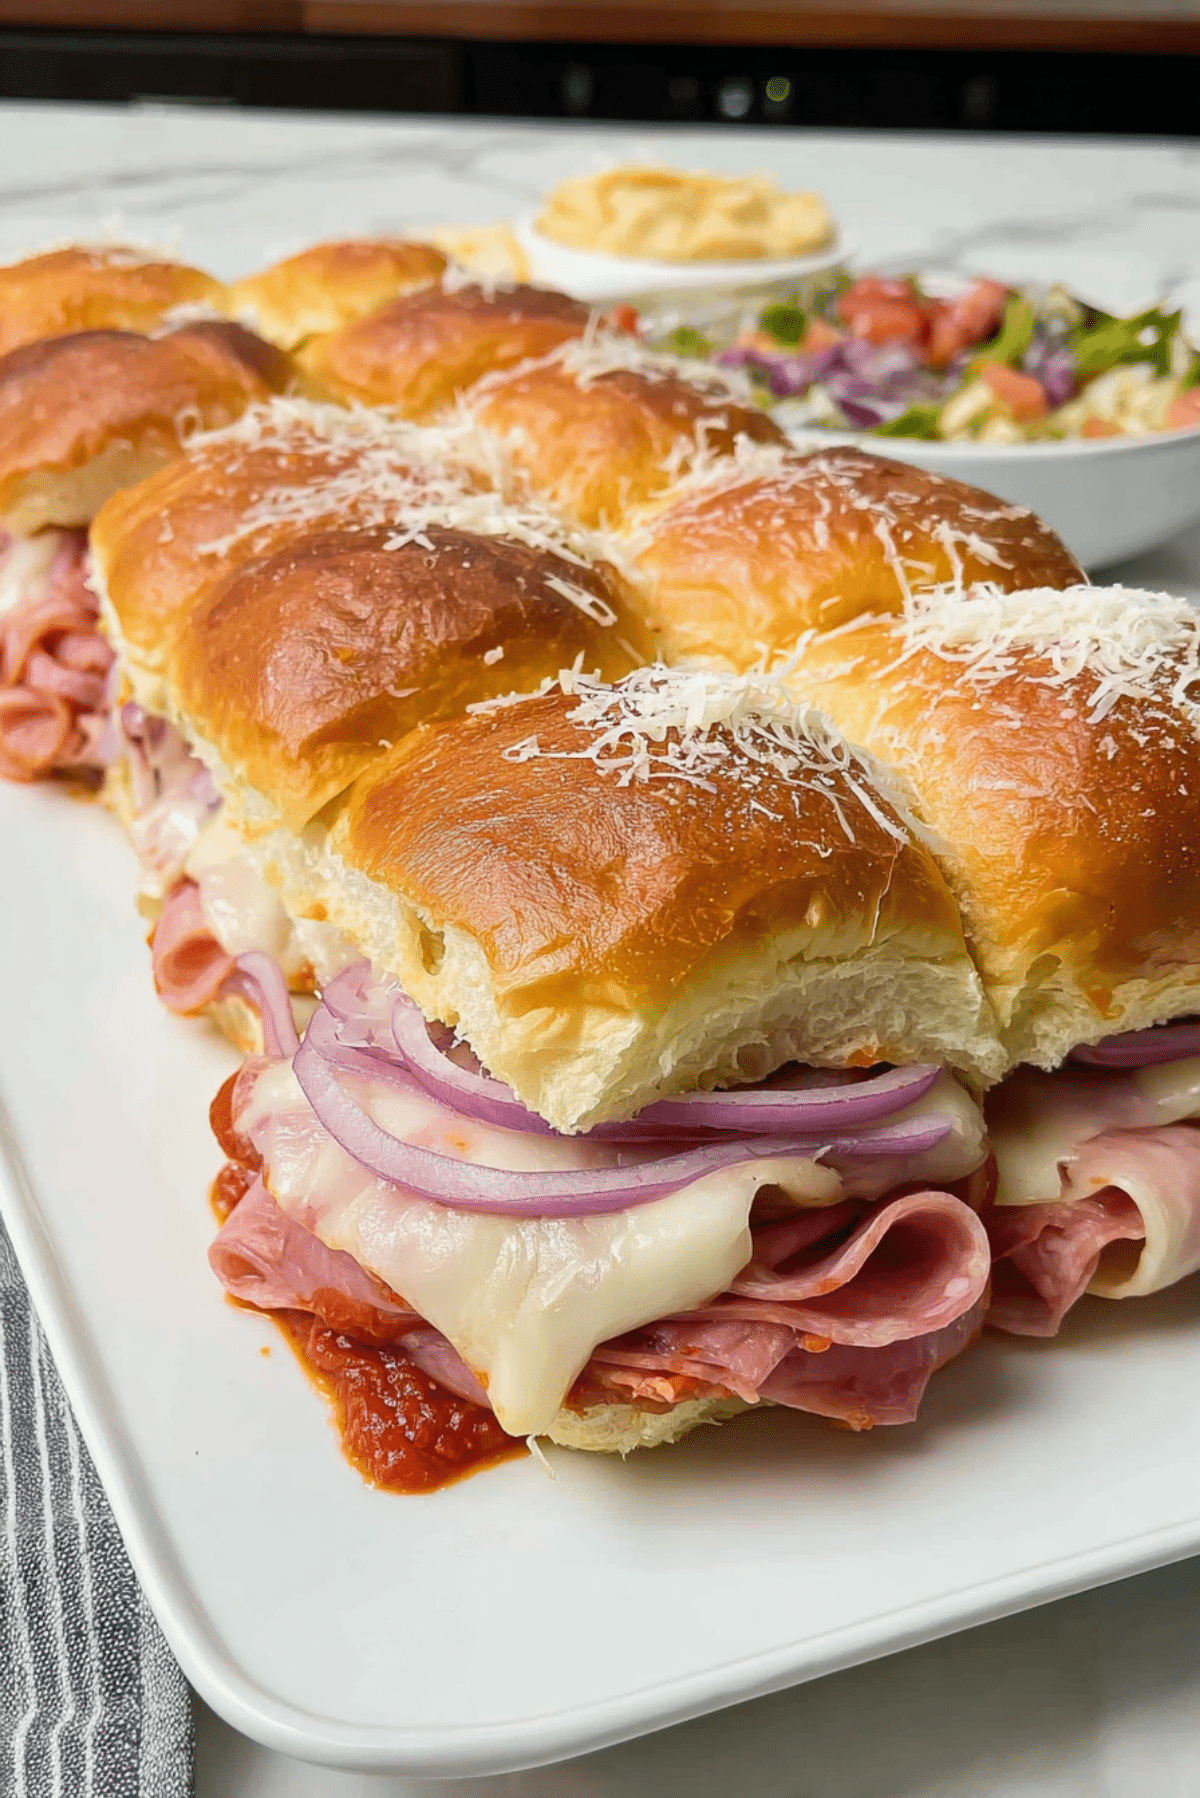
Italian Sliders
There is something about pulling apart a tray of warm, cheesy sliders that instantly makes the table feel more fun. These little sandwiches come out golden on top, packed with savory deli meat, tangy peppers, soft onions, and melty cheese, all tucked into fluffy rolls that soak up just enough sauce to make every bite rich and satisfying. Trust me, you’re going to love this, especially when that first warm bite gives you buttery bread, gooey cheese, and a pop of zippy Italian flavor all at once.
Why These Sliders Always Steal the Show
Some recipes are good, and then some recipes make everyone gather around the pan before you even set it down. This one absolutely belongs in the second category. The tops bake up glossy and lightly crisp, while the inside stays soft, cheesy, and loaded with bold deli flavor.
What makes them extra special is the balance. You get salty, savory layers from the ham and salami, a little brightness from the pepperoncini and red onion, and a cozy spoonful of marinara that ties it all together. Let me tell you, it’s worth every bite.
A Little Italian Deli Inspiration Behind the Tray
Before we get deeper into the recipe, it helps to know why these flavors work so naturally together. These sliders borrow inspiration from the classic Italian deli sandwich, the kind stacked with cured meats, provolone, peppers, and onions, often served on hearty bread with plenty of personality.
What makes this version so lovable is that it takes those bold sandwich shop flavors and turns them into something warm, pull-apart, and party-ready. Instead of building one big sandwich at a time, you bake the whole batch together, which gives you that irresistible shared-edge softness and those lightly crisp tops that feel just right for gatherings, game nights, or an easy family dinner.
Reasons This Recipe Earns a Spot in Your Rotation
Once you see how easily these come together, it becomes obvious why people make them again and again. This one’s a total game-changer when you need something comforting that still feels exciting.
Versatile: These work beautifully for lunch, dinner, game day, or casual entertaining. You can serve them as a main dish or set them out as a hearty appetizer.
Budget-Friendly: Deli meats, slider buns, and cheese come together in a way that feels generous without getting overly expensive. A single tray can feed several people and still feel satisfying.
Quick and Easy: The filling is simple to layer, the prep is low stress, and the oven does most of the work. That makes this recipe perfect for busy days.
Customizable: You can tweak the meat, cheese, sauce, or peppers to match your taste. It is easy to make these a little milder or a little bolder.
Crowd-Pleasing: Warm bread and melted cheese have a way of winning people over fast. Even picky eaters tend to reach for seconds.
Make-Ahead Friendly: You can assemble the tray earlier in the day and bake it when you are ready. That takes a lot of pressure off when guests are coming.
Great for Leftovers: These reheat surprisingly well, and the flavors settle together even more after a little rest. Next-day sliders are never a bad idea.
Smart Tricks That Make a Big Difference
Now that the craving is officially real, let’s talk about the little things that help these come out bakery-golden and packed with flavor.
- Keep the rolls connected: Slicing the entire slab of buns in half makes assembly much easier and helps everything stay neatly in place while baking.
- Pat the deli meat into even layers: This keeps some sliders from getting overloaded while others feel empty.
- Do not overdo the sauce: A thin layer is perfect. Too much can make the bottoms soggy.
- Cover first, then uncover: Covering the pan at the beginning helps the cheese melt smoothly, and uncovering at the end gives the tops that beautiful color.
- Rest for a few minutes before cutting: This helps the cheese settle slightly so the sliders hold together better when served.
Kitchen Tools That Help Everything Run Smoothly
Before we move into the ingredients, it is helpful to get a few basics ready. Nothing fancy is required here, which is another reason this recipe feels so doable.
Baking dish: A 9×13-inch baking dish gives the sliders enough room to bake evenly while keeping them snug.
Serrated knife: This makes it easier to slice the connected slider buns cleanly without crushing them.
Small bowl: You will use this for mixing the melted butter, seasoning, and parmesan topping.
Pastry brush or spoon: This helps spread the buttery topping over the buns so every corner gets flavor.
Aluminum foil: Covering the dish for part of the baking time helps the cheese melt before the tops brown too much.
What You Need to Build These Flavor-Packed Sliders
This is where the magic really starts. Each ingredient brings something important, and together they create that warm, deli-style bite that tastes way more impressive than the effort involved.
- Slider buns: 12 connected soft slider rolls, these create the fluffy pull-apart base and top that hold all the fillings together.
- Deli ham: 8 ounces, folded into loose layers for savory, slightly smoky flavor without making the sandwiches too heavy.
- Salami: 6 ounces, this adds that classic Italian deli richness and a little extra depth.
- Provolone cheese: 8 slices, this melts beautifully and gives the sliders their creamy, stretchy center.
- Red onion: 1/2 medium, thinly sliced, this brings a little sharpness and crunch that cuts through the richness.
- Pepperoncini rings: 1/2 cup, drained, these add tangy brightness and a touch of zip.
- Marinara sauce: 1/2 cup, spread lightly for moisture and a cozy, tomato-rich layer.
- Unsalted butter: 3 tablespoons, melted, this helps the tops brown and adds rich flavor.
- Italian seasoning: 1 teaspoon, stirred into the butter for herby aroma and that familiar pizzeria-style finish.
- Garlic powder: 1/2 teaspoon, this boosts the savory flavor without overpowering the fillings.
- Grated parmesan cheese: 2 tablespoons, sprinkled on top for a salty, nutty finish.
- Nonstick cooking spray: as needed, this keeps the baking dish easy to serve and clean.
Easy Swaps When You Want to Change Things Up
And now that you know the core lineup, here are a few easy substitutions in case you want to work with what you already have.
Deli ham: Turkey ham or extra salami.
Salami: Pepperoni or capicola.
Provolone cheese: Mozzarella or sliced Swiss.
Red onion: Sweet onion or very thin shallots.
Pepperoncini rings: Banana peppers.
Marinara sauce: Pizza sauce.
Italian seasoning: A mix of dried oregano and basil.
Grated parmesan cheese: Romano cheese.
The Ingredients That Quietly Do the Heavy Lifting
Some ingredients blend into the background, and some completely shape the personality of the dish. In this recipe, two ingredients really make the whole tray sing.
Provolone cheese: This is the creamy glue that pulls everything together. It melts into the meat and sauce, giving each slider that soft, stretchy bite people always go back for.
Pepperoncini rings: These little tangy slices brighten the entire sandwich. Without them, the sliders would still be tasty, but with them, the flavor feels more layered and lively.

Let’s Build and Bake These Sliders
This is the fun part, and honestly, it comes together fast. Here are the steps you’re going to follow, and each one moves you closer to a bubbling, golden tray that smells incredible.
- Preheat Your Equipment: Preheat your oven to 350°F. Lightly coat a 9×13-inch baking dish with nonstick cooking spray.
- Combine Ingredients: In a small bowl, stir together the melted butter, Italian seasoning, garlic powder, and grated parmesan cheese until evenly mixed.
- Prepare Your Cooking Vessel: Using a serrated knife, slice the connected slider buns horizontally as one whole slab. Place the bottom half into the prepared baking dish.
- Assemble the Dish: Spread the marinara sauce evenly over the bottom buns. Layer on the deli ham, then the salami, then the provolone cheese. Scatter the thin red onion slices and drained pepperoncini rings over the cheese. Place the top half of the buns over everything.
- Cook to Perfection: Brush or spoon the butter mixture evenly over the tops. Cover the dish loosely with foil and bake for 15 minutes. Remove the foil and continue baking for 8 to 10 minutes, until the tops are golden and the cheese is fully melted.
- Finishing Touches: Let the sliders rest for 5 minutes after baking. This helps the layers settle and makes them easier to cut cleanly.
- Serve and Enjoy: Slice along the bun lines and serve warm while the cheese is still melty and the tops are lightly crisp.
The Texture and Flavor Story in Every Bite
What makes these sliders so satisfying is how many little contrasts happen at once. The tops of the buns turn glossy and lightly toasted, while the inside stays soft and pillowy. The cheese melts down into the folds of ham and salami, creating a rich, savory layer that feels comforting without being too heavy.
Then the red onion and pepperoncini step in and wake everything up. You get that tiny bit of crunch, a little tang, and a brightness that keeps the sliders from tasting flat. Add the warm tomato sauce underneath, and suddenly every bite tastes layered, cozy, and just a little bit addictive.
Helpful Cooking Tips for Even Better Results
By the time you make these once, you will already be thinking about the next batch. These small tips help keep things smooth from start to finish.
- Use room temperature deli meat for easier layering and more even heating.
- Drain the pepperoncini well so the sliders stay flavorful, not watery.
- Slice the onions very thin so they soften nicely in the oven.
- Serve them warm, not piping hot, for the best texture and easiest slicing.
What to Watch Out For While Making Them
A few common mistakes can get in the way, but they are easy to avoid once you know what to look for.
- Adding too much sauce can make the bottom buns soggy, so keep the layer light and even.
- Overstuffing the sliders may sound tempting, but it can make them harder to cut and serve neatly.
- Skipping the foil at the start can brown the tops too quickly before the cheese fully melts.
- Cutting them immediately out of the oven can cause the fillings to slide, so give them a short rest first.
Nutrition Facts You Can Plan Around
If you are serving these for dinner, lunch, or a party tray, it helps to know the basic numbers. These are approximate values, but they offer a good guide for planning.
Servings: 12 sliders
Calories per serving: 255
Note: These are approximate values.
Time Breakdown Before You Get Cooking
One of the nicest things about this recipe is that it delivers big comfort without keeping you in the kitchen all day.
Prep Time: 15 minutes
Cook Time: 25 minutes
Total Time: 40 minutes
Make-Ahead and Storage Tips That Actually Help
If you like getting ahead, this recipe makes that easy. You can assemble the sliders, cover the dish, and refrigerate it for up to 8 hours before baking. When you are ready to cook, let the dish sit at room temperature for about 15 minutes while the oven preheats.
For leftovers, store the cooled sliders in an airtight container in the refrigerator for up to 3 days. To reheat, place them in a baking dish, cover loosely with foil, and warm in a 325°F oven until heated through. You can also freeze them after baking and cooling. Wrap them well, then freeze for up to 2 months. Reheat from thawed for the best texture.
Best Ways to Serve These Warm and Cheesy Sliders
These sliders are hearty enough to stand on their own, but they also pair beautifully with simple sides. A crisp green salad with Italian dressing works especially well because it balances the richness of the meat and cheese. A bowl of extra warm marinara on the side is also a very good idea.
For something a little more casual, serve them with kettle chips, roasted vegetables, or a light pasta salad. They also fit right into a game day spread alongside pickles, crunchy slaw, or fruit for a little contrast.
Clever Ways to Turn Leftovers Into Something New
If you happen to have leftovers, and that is a big if, there are a few fun ways to give them a second life. Slice them apart and reheat them in a skillet for a toastier bottom. You can also chop the leftover filling and tuck it into a wrap or fold it into scrambled eggs for a savory breakfast twist.
Another easy move is to warm the sliders and serve them with extra marinara for dipping, almost like a sandwich-meets-pizza-night situation. Trust me, you’re going to love that version too.
Extra Little Tips for More Flavor and Less Fuss
Sometimes it is the smallest details that push a recipe from good to really memorable. A very thin extra sprinkle of parmesan after baking adds a nice salty finish. A tiny spoonful of marinara on the side keeps every bite extra saucy without soaking the bread.
You can also lightly toast the bottom slab of buns for 3 minutes before assembly if you know you prefer a sturdier base. It is not required, but it can be helpful if you want a little more structure.
How to Make the Tray Look Party-Ready
Presentation matters, especially with something this golden and inviting. Once the sliders are baked, let them cool just enough to cut neatly, then arrange them close together on a platter so they still look abundant and warm.
A little sprinkle of extra parmesan on top gives them a finished look, and a small bowl of warm marinara nearby makes the platter feel complete. The glossy tops, the peek of melted cheese, and those colorful peppers and onions make the whole tray look festive without much extra work.
Variations to Try When You Want a New Twist
Once you have the basic version down, there are plenty of delicious directions you can take it.
Spicy version: Add sliced pickled cherry peppers and use spicy provolone for more heat.
Extra cheesy version: Layer in a little shredded mozzarella along with the provolone for an even gooier center.
Veggie-loaded version: Add a thin layer of sautéed bell peppers and onions for more sweetness and texture.
Pizza-inspired version: Swap the salami for turkey pepperoni and add a spoonful of pizza sauce instead of marinara.
Herb-forward version: Mix a little dried basil and oregano into the butter topping for an even more fragrant finish.
FAQ’s
Q1: Can I make these a few hours ahead of time?
Yes, you can assemble them earlier in the day, cover the dish, and refrigerate it. Bake when ready, adding a couple of extra minutes if they are still cold from the fridge.
Q2: What is the best cheese for these sliders?
Provolone is a great choice because it melts smoothly and complements the deli meats beautifully. Mozzarella also works well if you want a milder flavor.
Q3: Can I use a different sauce?
Yes, pizza sauce works nicely, and even a thicker tomato sauce can do the job. Just keep the amount moderate so the bread stays soft, not soggy.
Q4: Do I have to use pepperoncini?
Not at all. They add a nice tangy bite, but banana peppers are a great substitute, or you can leave them out if you want a milder tray.
Q5: How do I keep the bottoms from getting soggy?
Use only a thin layer of sauce and make sure any pickled ingredients are drained well. That keeps moisture in balance.
Q6: Can I double the recipe?
Absolutely. Just use two baking dishes so the sliders have enough room to bake evenly and stay easy to serve.
Q7: Are these good for parties?
They are excellent for parties because they bake in one dish, slice easily, and stay delicious even as they cool slightly on the table.
Q8: Can I freeze them before baking?
It is better to freeze them after baking for the most reliable texture. Fresh buns and cheese tend to hold up better that way.
Q9: What sides go best with them?
A crisp salad, pasta salad, roasted vegetables, or chips all pair well. Anything fresh and crunchy works especially nicely.
Q10: How do I reheat leftovers without drying them out?
Cover them loosely with foil and warm them in the oven at 325°F until heated through. That helps keep the bread soft and the cheese melty.
Conclusion
Italian Sliders are one of those recipes that feel easy to love from the very first bite. They are warm, cheesy, full of savory deli flavor, and just bright enough from the peppers and onions to keep every bite interesting. Whether you make them for a weeknight dinner, a party platter, or a cozy weekend lunch, they bring that comforting, shared-table feeling that always makes food more memorable. This one’s a total game-changer, and once you pull that golden tray from the oven, you’ll see exactly why.
Print
Italian Sliders
- Prep Time: 15 minutes
- Cook Time: 25 minutes
- Total Time: 40 minutes
- Yield: 12 sliders 1x
- Category: Main Course
- Method: Baking
- Cuisine: Italian-American
- Diet: Low Calorie
Description
Warm, cheesy Italian-style sliders baked on soft rolls with deli ham, salami, provolone, red onion, pepperoncini, and marinara, finished with a buttery parmesan topping.
Ingredients
- 12 connected soft slider rolls
- 8 ounces deli ham
- 6 ounces salami
- 8 slices provolone cheese
- 1/2 medium red onion, thinly sliced
- 1/2 cup pepperoncini rings, drained
- 1/2 cup marinara sauce
- 3 tablespoons unsalted butter, melted
- 1 teaspoon Italian seasoning
- 1/2 teaspoon garlic powder
- 2 tablespoons grated parmesan cheese
- Nonstick cooking spray, as needed
Instructions
- Preheat the oven to 350°F and lightly coat a 9×13-inch baking dish with nonstick cooking spray.
- In a small bowl, stir together the melted butter, Italian seasoning, garlic powder, and grated parmesan cheese.
- Slice the connected slider rolls horizontally as one slab and place the bottom half in the prepared baking dish.
- Spread the marinara sauce evenly over the bottom buns.
- Layer the deli ham, salami, provolone cheese, red onion slices, and pepperoncini rings over the sauce.
- Place the top half of the rolls over the filling.
- Brush or spoon the butter mixture evenly over the tops of the buns.
- Cover loosely with foil and bake for 15 minutes.
- Remove the foil and bake for 8 to 10 minutes more, until the tops are golden and the cheese is melted.
- Let the sliders rest for 5 minutes, then slice and serve warm.
Notes
- Use a light hand with the marinara sauce so the bottom buns stay soft, not soggy.
- Drain the pepperoncini well before adding them to the sliders.
- You can assemble the sliders up to 8 hours ahead and refrigerate before baking.
- Reheat leftovers covered in a 325°F oven for the best texture.
Nutrition
- Serving Size: 1 slider
- Calories: 255
- Sugar: 3g
- Sodium: 640mg
- Fat: 13g
- Saturated Fat: 6g
- Unsaturated Fat: 5g
- Trans Fat: 0g
- Carbohydrates: 18g
- Fiber: 1g
- Protein: 14g
- Cholesterol: 32mg
Keywords: Italian sliders, baked sliders, deli meat sliders, provolone sliders, party sandwiches, easy baked sandwiches