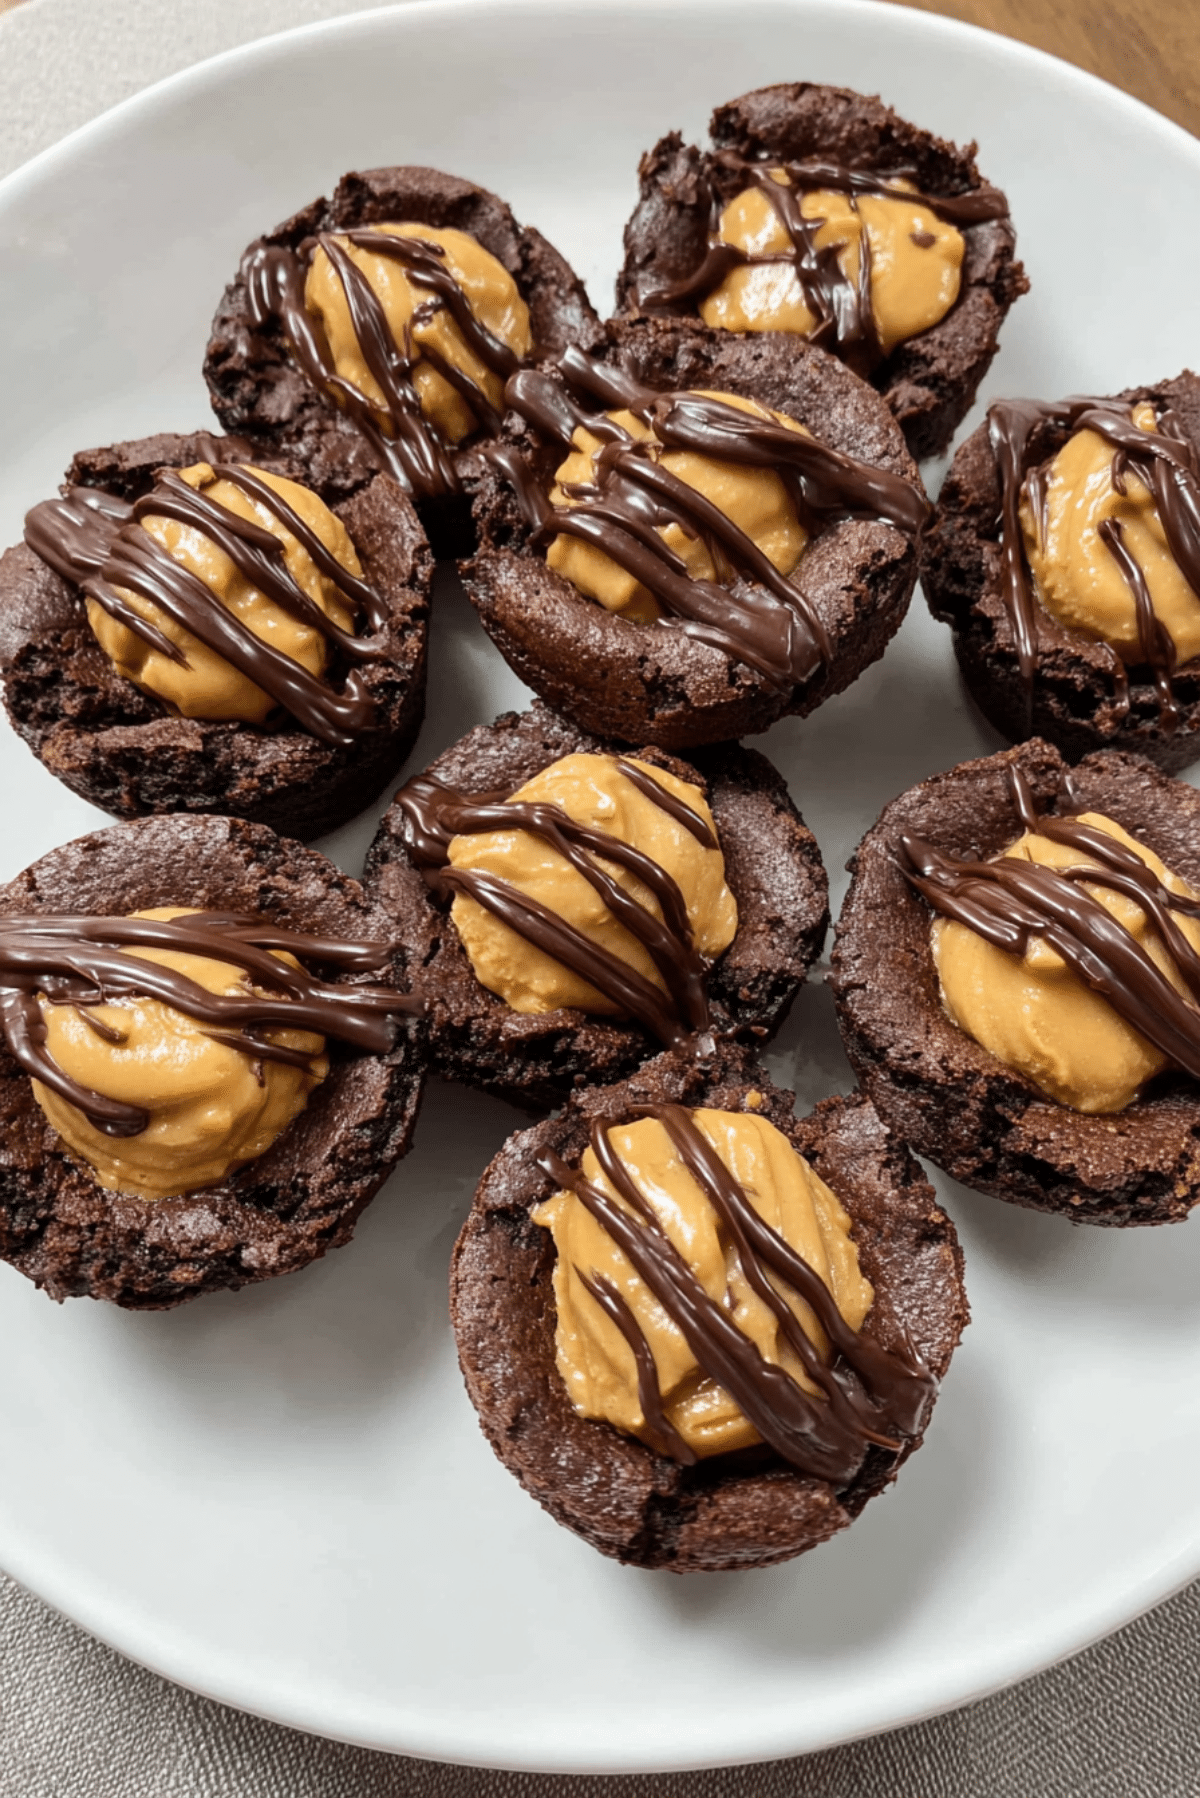
Peanut Butter Brownie Bites
The first thing you notice is that deep chocolate aroma, the kind that makes the kitchen feel instantly warmer. Then comes the peanut butter, soft, creamy, and just salty enough to make every bite feel balanced instead of overly sweet. These little treats may be tiny, but let me tell you, they deliver big dessert energy in the best possible way.
What makes them especially fun is the contrast. You get a fudgy brownie base, a smooth peanut butter center, and that glossy chocolate drizzle right on top. Trust me, you’re going to love this. They look bakery-worthy, but the process is surprisingly simple, which honestly makes them even better.
Why These Little Bites Keep Disappearing So Fast
There is something about a dessert you can pick up in one or two bites that makes it nearly impossible to resist. These brownie cups have that rich, chewy chocolate base that feels almost truffle-like around the edges, while the creamy peanut butter topping brings in a soft, melt-in-your-mouth finish.
And now let’s dive a little deeper into what makes them so lovable. They are great for parties, easy to stack on dessert trays, and perfect when you want a homemade treat that looks polished without needing complicated decorating skills. This one’s a total game-changer for anyone who loves the classic chocolate and peanut butter combo.
A Sweet Story Behind This Chocolate and Peanut Butter Favorite
Chocolate and peanut butter have been a beloved pairing in American dessert culture for decades, and it is not hard to understand why. The bittersweet richness of cocoa plays so well with the nutty, creamy depth of peanut butter that the combination feels familiar, comforting, and just a little nostalgic.
Mini brownie desserts also became popular because they bring all the satisfaction of a full pan of brownies into a smaller, more shareable form. Over time, bakers started turning them into brownie cups, brownie bites, and brownie muffins, often filling or topping them with peanut butter for extra indulgence. That little twist turns a simple brownie into something that feels festive and special.
Why This Recipe Earns a Spot in Your Dessert Rotation
Before we get into the mixing bowls and muffin pan, it helps to know why this recipe is such a reliable keeper. It is the kind of dessert that works when you need something easy, crowd-friendly, and seriously satisfying.
Versatile: These bites fit right in at birthday tables, holiday platters, lunchbox treats, or late-night dessert cravings. They feel casual enough for a weekday and pretty enough for a celebration.
Budget-Friendly: Most of the ingredients are pantry basics, which means you can make a batch without chasing down anything fancy. That is always a win.
Quick and Easy: The brownie batter comes together fast, and the peanut butter topping is a simple stir-and-shape situation. No complicated frosting techniques here.
Customizable: You can tweak the chocolate intensity, swap the drizzle style, or make the peanut butter center a little sweeter or saltier depending on your taste.
Crowd-Pleasing: Chocolate and peanut butter is one of those combinations that rarely misses. Put these on a plate and watch them disappear.
Make-Ahead Friendly: You can bake the brownie cups ahead, add the topping later, and still end up with a fresh-looking dessert.
Great for Leftovers: They hold up beautifully for snacking over the next few days, which is helpful if you somehow manage not to eat them all at once.
Smart Baker Secrets for Better Results Every Time
Once you know these few little tricks, the whole process feels even smoother. A few thoughtful details make the difference between good brownie bites and absolutely irresistible ones.
- Use a mini muffin pan and grease it well, even if it looks nonstick. Fudgy batters love to cling.
- Do not overbake the brownie base. You want the centers just set so the texture stays rich and soft.
- Let the brownie cups cool before adding the peanut butter topping, otherwise the filling can soften too much.
- If the peanut butter mixture feels sticky, chill it for 10 to 15 minutes before shaping.
- Melt the chocolate drizzle gently so it stays smooth and glossy instead of thick and clumpy.
The Kitchen Tools That Make This Recipe Easy
Before the fun starts, gather a few basics. Nothing fancy is needed, but the right tools make the process much more relaxed.
Mini muffin pan: This gives the dessert its signature bite-sized shape and helps the brownie edges bake up beautifully.
Mixing bowls: You will need one for the brownie batter and one for the peanut butter topping.
Whisk: Perfect for blending the wet ingredients until smooth and glossy.
Rubber spatula: Great for folding in the dry ingredients without overmixing the batter.
Cookie scoop or spoon: Helpful for portioning the batter evenly into the mini muffin cups.
Microwave-safe bowl: Makes melting the chocolate drizzle quick and easy.
Everything That Goes Into These Rich Little Treats
Now we are getting to the good part, where every ingredient starts pulling its weight. Each one has a purpose, and together they create that dreamy mix of fudgy, creamy, sweet, and slightly salty.
- Unsalted Butter: 1/2 cup, melted, this gives the brownie batter richness and helps create that soft, dense crumb.
- Granulated Sugar: 3/4 cup, this sweetens the batter and helps form those delicate crackly tops.
- Large Eggs: 2, room temperature, these add structure and keep the brownie cups tender.
- Vanilla Extract: 1 teaspoon, this rounds out both the chocolate and peanut butter flavors.
- Unsweetened Cocoa Powder: 1/3 cup, this brings the deep chocolate base that gives the dessert its bold flavor.
- All-Purpose Flour: 1/2 cup, this provides just enough structure without making the brownie base cakey.
- Salt: 1/4 teaspoon, this sharpens the chocolate flavor and balances the sweetness.
- Creamy Peanut Butter: 3/4 cup, divided, this is the star of the topping and gives the dessert its signature nutty finish.
- Powdered Sugar: 3/4 cup, this sweetens and firms up the peanut butter topping so it can be shaped easily.
- Unsalted Butter: 2 tablespoons, softened, this makes the topping smoother and more luscious.
- Semisweet Chocolate Chips: 1/3 cup, melted, these become the glossy drizzle that finishes the bites so nicely.
Easy Swaps When You Need a Flexible Option
That lovely balance of chocolate and peanut butter is easy to keep, even if you need to tweak a few ingredients. Here are some simple swaps that still work beautifully.
Unsalted butter: Salted butter works too, just reduce the added salt a little.
All-purpose flour: A measure-for-measure gluten-free flour blend can be used for a gluten-free version.
Creamy peanut butter: Smooth almond butter or cashew butter can be used for a different nutty flavor.
Semisweet chocolate chips: Dark chocolate chips work well if you want a deeper, less sweet finish.
Vanilla extract: Vanilla bean paste can be used for a slightly richer flavor.
The Ingredients That Truly Make It Shine
Some ingredients do more than just show up, they completely define the personality of the dessert. Here are the ones that really make these bites memorable.
Cocoa Powder: This is what gives the brownie base its intense chocolate backbone. It creates that dark, rich flavor that stands up beautifully against the sweetness of the topping.
Creamy Peanut Butter: This brings the smooth, nutty center that makes each bite feel extra indulgent. It softens the boldness of the cocoa and adds that classic sweet-salty contrast everyone loves.

Let’s Bake These Step by Step
This is the part where everything starts to smell amazing. Once you move through the steps, the process feels easy and satisfying, and the end result looks like you spent way more effort than you actually did.
- Preheat Your Equipment: Preheat your oven to 350°F. Lightly grease a 24-cup mini muffin pan so the brownie bites release easily after baking.
- Combine Ingredients: In a medium bowl, whisk together the melted 1/2 cup butter and granulated sugar until glossy. Add the eggs and vanilla extract, then whisk until smooth. Stir in the cocoa powder, flour, and salt just until no dry streaks remain.
- Prepare Your Cooking Vessel: Spoon the brownie batter evenly into the mini muffin cups, filling each about two-thirds full so they have room to rise without spilling over.
- Assemble the Dish: While the brownie cups bake, stir together 3/4 cup peanut butter, powdered sugar, and the softened 2 tablespoons butter in a small bowl until smooth. Scoop and roll into small rounded portions once the mixture is firm enough to handle.
- Cook to Perfection: Bake the brownie cups for 10 to 12 minutes, until the tops are set and a toothpick near the edge comes out with a few moist crumbs. Let them cool in the pan for 10 minutes, then gently press the centers if needed to create a slight nest shape and transfer them to a rack to cool completely.
- Finishing Touches: Place one rounded peanut butter portion on top of each cooled brownie cup. Melt the semisweet chocolate chips in short bursts, stirring until smooth, then drizzle lightly over the tops.
- Serve and Enjoy: Let the chocolate set for a few minutes before serving. The finished bites should be fudgy at the base, creamy in the center, and glossy on top, basically everything you want in one neat little dessert.
The Texture Story That Makes Each Bite So Good
What really makes these bites stand out is the layered texture. The brownie base is soft and dense with those slightly chewy edges that brownie lovers chase every single time. Then the peanut butter topping comes in with a creamy, almost truffle-like softness that melts against the chocolate.
As the flavors settle, the contrast becomes even better. The cocoa gives you depth, the peanut butter adds warmth and nuttiness, and the drizzle ties the whole thing together with a silky finish. Let me tell you, it’s worth every bite.
Handy Tricks for Foolproof Brownie Bites
A few little adjustments can make the process feel extra easy and help the final texture come out just right every time.
- Chill the peanut butter topping briefly if it feels too soft to shape.
- Use a small scoop for even brownie cups so they bake at the same rate.
- Do not overmix the batter once the flour goes in, because that can make the texture less fudgy.
- Let the brownie cups cool fully before topping so the peanut butter centers stay neat and rounded.
Common Slip-Ups and How to Avoid Them
Even simple desserts have a few places where things can go off track. The good news is that each one is easy to fix once you know what to watch for.
- Overbaking the brownie cups can make them dry, so pull them when the centers are just set.
- Skipping pan greasing can make removal tricky, especially with fudgy batters.
- Adding the topping while the bites are warm can cause the peanut butter to slump.
- Using natural peanut butter that is too oily can make the topping too loose, so a regular creamy style works best here.
A Quick Look at the Nutrition
These bites feel indulgent, and they are, but that is part of the charm. Since they are small, they are also easy to portion for sharing.
Servings: 24 bites
Calories per serving: 135
Note: These are approximate values.
Timing at a Glance
One of the nicest things about this dessert is that it looks impressive without taking over your whole afternoon.
Prep Time: 20 minutes
Cook Time: 12 minutes
Total Time: 32 minutes
Make-Ahead and Storage Tips That Actually Help
If you are planning ahead, these are wonderfully cooperative. You can bake the brownie cups a day in advance and keep them covered at room temperature. Then add the peanut butter topping and chocolate drizzle closer to serving time if you want them to look extra fresh.
For storage, keep the finished bites in an airtight container in the refrigerator for up to 5 days. They also freeze well. Place them on a tray until firm, then transfer to a freezer-safe container. When you are ready to enjoy them, let them thaw in the fridge or at cool room temperature. For the best texture, serve them once the peanut butter center has softened slightly.
Fun Ways to Serve Them
These little desserts are stars on a cookie tray, but they can also be dressed up in simple ways. Serve them with cold milk, hot coffee, or a scoop of vanilla ice cream if you want to lean into full dessert mode.
They also look beautiful piled onto a white platter with a little extra chocolate drizzle across the plate. For parties, you can tuck them into mini paper liners to make serving even easier and a little more polished.
Clever Ideas for Leftovers
If you have leftovers, and that is a big if, there are some fun ways to change them up. Crumble a couple over a bowl of vanilla yogurt or ice cream for a quick dessert with texture.
You can also chop them and fold them into a milkshake or layer them into a simple parfait with whipped cream. That fudgy brownie and peanut butter combo works in more places than you might think.
Extra Little Details That Make a Difference
Sometimes the final result comes down to the smallest choices. Use good cocoa powder if you can, because the chocolate flavor really matters here. A smooth peanut butter also gives the topping a cleaner, prettier finish.
And now let’s dive into the little presentation choices that make these feel even more special. A light drizzle looks more elegant than a heavy one, and a tiny pinch of flaky salt on top can be lovely if you enjoy that sweet-salty contrast.
How to Make Them Look Bakery-Worthy
Presentation is part of the fun with a dessert like this. Since the shape is already charming, you do not need much to make them stand out. Keep the peanut butter topping rounded and centered so every bite looks neat and intentional.
For the drizzle, use a spoon or a small piping bag and let the lines fall naturally across the tops. Do not overthink it. That slightly imperfect homemade look is actually part of what makes them feel irresistible.
Fun Variations to Try Next Time
Once you make the base recipe, it is very easy to play around with the flavors while keeping the same cozy spirit.
Dark Chocolate Version: Use dark chocolate chips for the drizzle and add a little extra pinch of salt for a deeper, more grown-up flavor.
Crunchy Center Version: Swap creamy peanut butter for crunchy peanut butter in the topping if you want a little extra texture.
Espresso Chocolate Version: Stir 1 teaspoon instant espresso powder into the brownie batter to intensify the cocoa flavor.
Peanut Butter Swirl Version: Instead of a rounded topping, pipe the peanut butter mixture in a soft swirl for a slightly different look.
Mini Cookie Crumb Finish: Sprinkle a few crushed chocolate cookie crumbs over the drizzle before it sets for a more playful dessert tray look.
FAQ’s
1. Can I make these in a regular muffin pan?
Yes, but the yield will be smaller and the baking time will need to be increased. Keep an eye on them and bake until the centers are just set.
2. Do I have to use creamy peanut butter?
Creamy works best for that smooth rounded topping, but crunchy can be used if you want added texture.
3. Can I use boxed brownie mix instead of homemade batter?
Yes, that can work well when you want a shortcut. Prepare just enough batter for 24 mini muffin cups.
4. Why did my brownie cups stick to the pan?
They usually stick when the pan is not greased enough or when they are removed too early. Let them cool for a few minutes first.
5. Can I make the topping less sweet?
Yes, reduce the powdered sugar slightly, but keep enough so the peanut butter mixture can hold its shape.
6. How do I get a neat chocolate drizzle?
Melt the chocolate until smooth and use a spoon or small bag with a tiny corner snipped off for more control.
7. Can I freeze them after decorating?
Yes, they freeze well. Chill them first so the topping firms up, then store in a sealed container.
8. Are they better cold or at room temperature?
They are delicious both ways, but room temperature gives you the softest peanut butter center and fudgiest texture.
9. Can I add chopped peanuts on top?
Yes, a small sprinkle can add crunch, though the bites are also lovely with the simple drizzle alone.
10. How far ahead can I make these for a party?
You can make them 1 to 2 days ahead and store them chilled. They hold up nicely and still taste fresh.
Conclusion
These little bites are everything a good dessert should be, rich, easy, comforting, and just a little bit dramatic in the best way. You get deep chocolate, creamy peanut butter, and that glossy drizzle all wrapped into one tidy little treat that feels homemade and special at the same time.
Whether you are making them for a gathering or just because the chocolate-peanut butter craving hits hard, this recipe is one you will want to keep close. Trust me, once you make a batch, it is going to be very hard not to make them again.
Print
Peanut Butter Brownie Bites
- Prep Time: 20 minutes
- Cook Time: 12 minutes
- Total Time: 32 minutes
- Yield: 24 bites 1x
- Category: Dessert
- Method: Baking
- Cuisine: American
- Diet: Vegetarian
Description
Rich mini brownie cups topped with a smooth peanut butter center and finished with a glossy chocolate drizzle. These bite-sized treats are fudgy, creamy, and perfect for parties, snack trays, or an easy homemade dessert.
Ingredients
- 1/2 cup unsalted butter, melted
- 3/4 cup granulated sugar
- 2 large eggs
- 1 teaspoon vanilla extract
- 1/3 cup unsweetened cocoa powder
- 1/2 cup all-purpose flour
- 1/4 teaspoon salt
- 3/4 cup creamy peanut butter, divided
- 3/4 cup powdered sugar
- 2 tablespoons unsalted butter, softened
- 1/3 cup semisweet chocolate chips
Instructions
- Preheat the oven to 350°F and lightly grease a 24-cup mini muffin pan.
- In a medium bowl, whisk together the melted 1/2 cup butter and granulated sugar until glossy. Add the eggs and vanilla extract, then whisk until smooth.
- Stir in the cocoa powder, flour, and salt just until combined and no dry streaks remain.
- Spoon the brownie batter evenly into the mini muffin cups, filling each about two-thirds full.
- Bake for 10 to 12 minutes, until the tops are set and a toothpick inserted near the edge comes out with a few moist crumbs.
- Let the brownie cups cool in the pan for 10 minutes. Gently press the centers if needed to create a slight nest shape, then transfer to a rack to cool completely.
- In a small bowl, mix 3/4 cup peanut butter, powdered sugar, and the softened 2 tablespoons butter until smooth. Scoop and roll into small rounded portions.
- Place one rounded peanut butter portion on top of each cooled brownie cup.
- Melt the semisweet chocolate chips in short bursts, stirring until smooth, then drizzle over the tops.
- Let the chocolate set slightly before serving.
Notes
- Chill the peanut butter topping for 10 to 15 minutes if it feels too soft to shape.
- Do not overbake the brownie cups, or they can lose their fudgy texture.
- Let the brownie cups cool fully before topping for the neatest finish.
- Store leftovers in an airtight container in the refrigerator for up to 5 days.
Nutrition
- Serving Size: 1 bite
- Calories: 135
- Sugar: 11g
- Sodium: 45mg
- Fat: 8g
- Saturated Fat: 3g
- Unsaturated Fat: 4g
- Trans Fat: 0g
- Carbohydrates: 14g
- Fiber: 1g
- Protein: 3g
- Cholesterol: 23mg
Keywords: peanut butter brownie bites, brownie cups, mini brownie desserts, chocolate peanut butter dessert, bite-sized brownies