Ripple Fries Sweetgreen Copycat
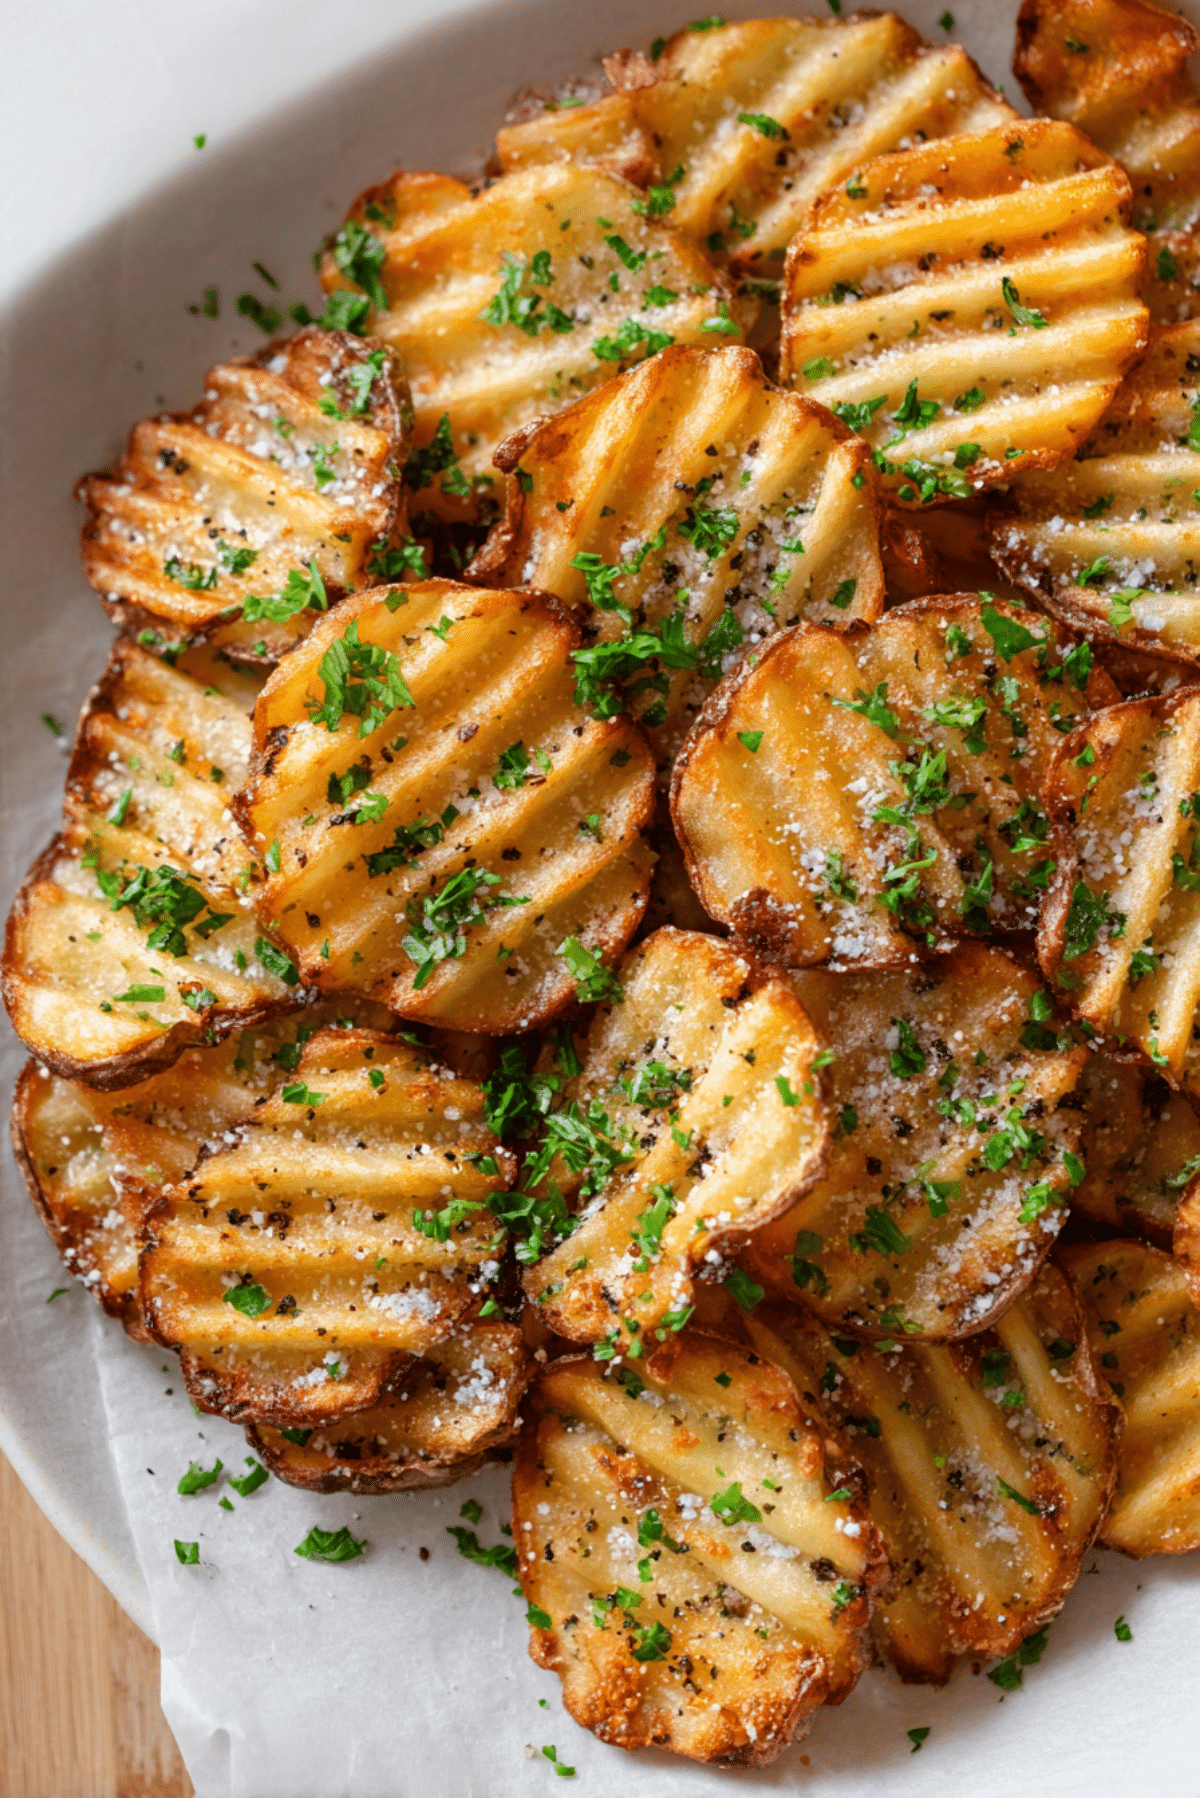
There is something wildly satisfying about a tray of golden ripple fries, especially when they come out hot, crisp at the edges, and dusted with just enough salt to make every bite pop. These fries have that same craveable feel people love from the Sweetgreen version, but this homemade take brings even more comfort to the table. You get the contrast of crunchy ridges, soft potato centers, and those little flecks of parsley that make the whole thing feel fresh and bright. Trust me, you’re going to love this.
What Makes These Fries So Hard to Stop Eating
Some foods are good, and then some foods make you reach for just one more piece until the tray is suddenly empty. That is exactly what happens here. The ridges catch the oil and seasoning in the best way, which means every fry gets those crisp golden edges and a deeply savory finish. Let me tell you, it’s worth every bite.
These fries feel familiar, but they also have that fast-casual restaurant magic that makes them extra fun. They are simple enough for a weeknight side, but they also feel special enough to serve with burgers, grain bowls, or roasted chicken. This one’s a total game-changer when you want something easy that still feels exciting.
A Little Backstory Behind This Crispy Favorite
Before we get deeper into the crispy details, it helps to know why this style of fry stands out. Ripple-cut fries have been around for years because the wavy shape is not just pretty, it is practical too. Those curves create more surface area, which means more crunch and more room for seasoning to cling.
The Sweetgreen version helped make this style feel fresh again by pairing that nostalgic shape with cleaner, more modern flavors. Instead of heavy seasoning blends or deep-fryer heaviness, the focus is on potato flavor, crisp texture, salt, pepper, and a fresh herbal finish. That balance is exactly what makes this homemade version feel so satisfying.
Why This Version Works Every Single Time
Now that you know the story, let’s talk about why this one deserves a place in your regular rotation.
Versatile: These fries slide easily into all kinds of meals. Serve them next to sandwiches, tuck them beside grilled chicken, or add them to a grain bowl for a crispy finish.
Budget-Friendly: Potatoes, oil, salt, pepper, and parsley keep the ingredient list refreshingly simple. You get a restaurant-style side without spending much at all.
Quick and Easy: Once the potatoes are sliced, the rest is mostly hands-off. A hot oven does the heavy lifting while you get the rest of dinner ready.
Customizable: You can keep them minimal or add a little garlic powder, smoked paprika, or extra herbs. The base is classic, which makes it easy to build on.
Crowd-Pleasing: Crispy potatoes rarely disappoint. Kids love them, adults hover over the tray, and they disappear fast at casual dinners.
Make-Ahead Friendly: You can soak and slice the potatoes in advance, which makes prep feel much easier when the day gets busy.
Great for Leftovers: Any extras can be reheated until crisp again, and they are wonderful tucked into wraps or served with eggs the next morning.
Smart Tricks That Make Them Even Better
A few little details can take homemade fries from decent to deeply craveable. And now let’s dive into the kind of kitchen advice that makes a real difference.
- Soak the potatoes: A short soak in cold water helps remove excess surface starch, which gives you a better, crispier finish.
- Dry them very well: Moisture is the enemy of browning. Pat the slices thoroughly before adding oil.
- Use enough space on the pan: Crowded fries steam instead of roast, so spread them out in a single layer.
- Flip halfway through: This helps both sides get evenly golden and crisp.
- Season right after baking: Salt sticks best while the fries are still hot.
The Kitchen Tools That Make This Easy
Before the potatoes hit the pan, it helps to have a few basics ready. Nothing fancy here, just the kind of tools that make the process smooth and stress-free.
Mandoline or crinkle cutter: This gives the potatoes that classic ripple shape and helps keep the slices even for consistent cooking.
Large mixing bowl: Perfect for soaking the potatoes and later tossing them with oil and seasoning.
Clean kitchen towel or paper towels: Essential for drying the slices really well before roasting.
Large baking sheet: A roomy pan helps the fries roast instead of steam.
Parchment paper: Makes cleanup easier and helps prevent sticking.
Thin spatula: Useful for flipping the fries without tearing them.
What You Need to Build These Crispy Layers of Flavor
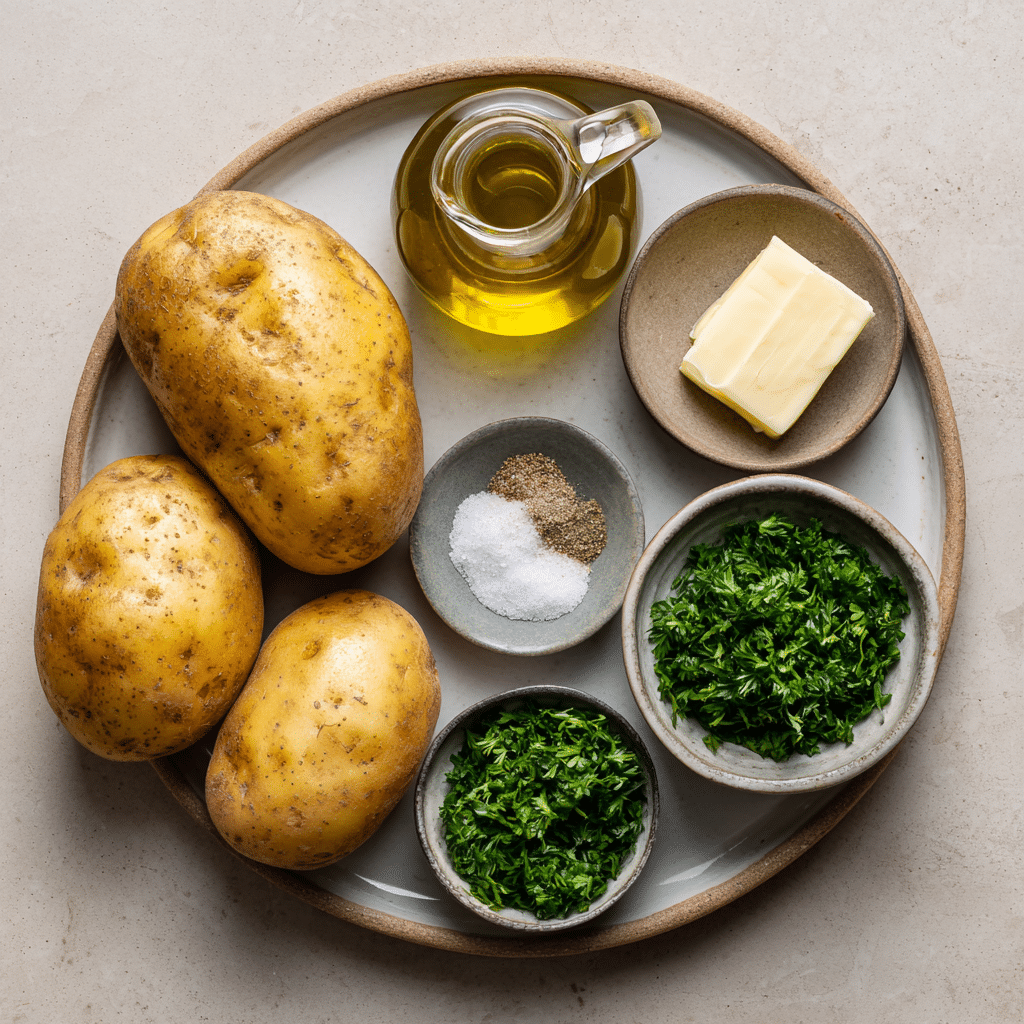
The beauty of this dish is how a short ingredient list can create something that tastes so complete. Every ingredient has a clear role, and together they turn humble potatoes into something irresistible.
- Russet potatoes: 2 large russet potatoes, about 1 1/2 pounds total. These are starchy and roast beautifully, giving you a fluffy center and crisp edges.
- Olive oil: 2 tablespoons. This coats the slices lightly and helps the ridges turn golden in the oven.
- Kosher salt: 3/4 teaspoon, plus more to taste. Salt wakes up the potato flavor and gives the fries that restaurant-style finish.
- Black pepper: 1/2 teaspoon. It adds a gentle bite that keeps the flavor from feeling flat.
- Garlic powder: 1/4 teaspoon. Just a little adds savory depth without taking over.
- Fresh parsley: 1 tablespoon, finely chopped. This brings color and a fresh, clean contrast right at the end.
Easy Swaps If You Want to Tweak the Flavor
Once you have the base down, there is plenty of room to make this fit your mood or pantry. That is part of the fun.
Olive oil: Avocado oil.
Fresh parsley: Fresh chives.
Garlic powder: Onion powder.
Russet potatoes: Yukon Gold potatoes, though the texture will be a little creamier and slightly less crisp.
Kosher salt: Fine sea salt, use a bit less since it tastes saltier by volume.
The Ingredients That Really Steal the Show
Some ingredients do more than just show up, they define the whole experience. In this case, two of them do the heavy lifting.
Russet potatoes: These are the reason the fries get that dreamy contrast between crisp outer ridges and a soft, fluffy interior. Their starch content makes all the difference.
Fresh parsley: It might seem small, but that final sprinkle makes the fries feel bright and fresh instead of heavy. It gives the whole tray a clean finish.
Let’s Make a Batch Worth Reaching For
And now let’s dive into the part where the kitchen starts smelling amazing. These steps are simple, but each one helps build the texture that makes the final tray so good.
- Preheat Your Equipment: Heat your oven to 425°F. Line a large baking sheet with parchment paper so the fries roast evenly and lift off easily once crisp.
- Combine Ingredients: Wash the potatoes well and slice them into thin ripple rounds, about 1/4 inch thick. Place them in a bowl of cold water and let them soak for 20 minutes. Drain, then dry them very thoroughly with a clean towel. Transfer the slices to a dry bowl and toss with olive oil, kosher salt, black pepper, and garlic powder until evenly coated.
- Prepare Your Cooking Vessel: Spread the seasoned potato slices across the lined baking sheet in a single layer. Make sure the pieces are not overlapping too much so they can brown instead of steam.
- Assemble the Dish: Give the tray one last quick look and separate any slices that are sticking together. This small step really helps the edges crisp up beautifully.
- Cook to Perfection: Roast for 15 minutes, then flip the slices carefully with a spatula. Return the tray to the oven and roast for another 12 to 15 minutes, until the fries are golden brown with crisp edges and tender centers.
- Finishing Touches: As soon as the fries come out of the oven, sprinkle over the chopped fresh parsley and add a little more salt if needed. The heat helps the seasoning settle right into the ridges.
- Serve and Enjoy: Serve immediately while the fries are hot and at their crispiest. They are wonderful on their own or paired with your favorite bowl, sandwich, or dipping sauce.
The Texture and Flavor Payoff
Once these fries are done, the whole point becomes clear. The edges are crisp and lightly crackly, the centers stay tender, and those little waves hold onto every bit of seasoning. You get a gentle hit of garlic, the warmth of pepper, and the clean freshness of parsley all at once.
That balance is what makes them feel a little lighter than classic diner fries, while still being deeply comforting. They are salty, earthy, crisp, and soft in the same bite, which is exactly why they disappear so fast.
Helpful Tricks for Even Better Results
By this point, you already know the basics, but a few extra pointers can make the process feel even smoother.
- Slice evenly: Similar thickness means the potatoes roast at the same pace, which saves you from a tray of mixed results.
- Use a hot oven: A properly heated oven gives you a stronger start and better browning.
- Work in batches if needed: Two pans are better than one crowded pan if you are doubling the recipe.
- Taste at the end: Potatoes sometimes need a final pinch of salt once they are hot and ready.
Mistakes That Can Get in the Way
Even easy recipes have a few little traps, and knowing them ahead of time makes everything feel easier.
- Skipping the soak: The fries can still cook, but they will usually be less crisp.
- Not drying the potatoes enough: Any lingering water encourages steaming, not roasting.
- Overcrowding the pan: When slices pile up, they soften instead of turning golden.
- Pulling them too early: They need enough time for the ridges and edges to really brown.
A Quick Look at the Nutrition
Before you serve them up, here is a practical snapshot of what to expect per portion.
Servings: 4
Calories per serving: 140
Note: These are approximate values.
Time Breakdown So You Can Plan Ahead
This is one of those recipes that feels easy to fit into the day, especially once you know how the timing flows.
Prep Time: 30 minutes
Cook Time: 30 minutes
Total Time: 1 hour
Make-Ahead and Storage Tips That Actually Help
These fries are at their absolute best straight from the oven, but there are still smart ways to prep ahead. You can slice the potatoes and keep them in cold water in the refrigerator for several hours before baking. When you are ready, just drain and dry them very well.
For leftovers, store the cooled fries in an airtight container in the refrigerator for up to 3 days. To reheat, spread them on a baking sheet and warm them in a 400°F oven for about 8 to 10 minutes. They can also be frozen after baking, though the texture is best when enjoyed fresh. Reheat from frozen in a hot oven until crisp again.
The Best Ways to Serve Them
Once the tray is ready, there are so many fun directions you can go. These fries are excellent beside a burger, grilled chicken, or a hearty sandwich. They also fit beautifully next to a chopped salad or grain bowl when you want that restaurant-inspired feel at home.
For a simple snack moment, serve them with ketchup, garlic yogurt sauce, or a little lemony aioli. The clean seasoning makes them incredibly flexible, which is part of their charm.
Smart and Tasty Ways to Reinvent Leftovers
If you happen to have leftovers, and that is a big if, they can become something new the next day. Tuck reheated fries into a breakfast plate with eggs, or chop them up and crisp them in a skillet like a quick breakfast hash.
They are also surprisingly good folded into a wrap with greens and a simple sauce. You can even scatter them over a bowl with roasted vegetables for a crispy topping that feels a little unexpected.
A Few More Details That Make Life Easier
Sometimes the smallest adjustments make the biggest difference. Use the largest baking sheet you have, and do not be afraid to rotate the pan if your oven browns unevenly. A final pinch of flaky salt right after roasting adds a nice little pop of texture too.
Fresh parsley works best here because it wakes everything up, but you can keep the garnish light if you want the potato flavor to stay front and center. The beauty of this dish is that it never needs much to shine.
Make Them Look as Good as They Taste
Presentation matters, especially with something as golden and inviting as this. Pile the fries onto a white platter or shallow bowl so the color stands out. Then finish with a gentle scatter of parsley and just a touch of flaky salt.
That little contrast between golden brown potatoes and bright green herbs makes the whole dish feel polished, even though it is wonderfully simple. Let me tell you, people eat with their eyes first, and these absolutely deliver.
Fun Twists to Try Next Time
Once you have made the classic version, it is easy to branch out a little.
Lemon Herb Version: Add a little fresh lemon zest right after baking for a brighter finish.
Spicy Version: Toss the potatoes with a pinch of cayenne or smoked paprika before roasting.
Chive Finish: Swap the parsley for finely chopped chives for a slightly sharper herbal flavor.
Parmesan Style: Add a light dusting of finely grated Parmesan after baking for a savory finish.
Garlicky Herb Batch: Increase the garlic powder slightly and add a touch of dried oregano for more depth.
FAQ’s
Q1: Can I leave the skins on the potatoes?
Yes, absolutely. The skins add a rustic look and a little extra texture, which works beautifully here.
Q2: Do I need a crinkle cutter for this?
It helps create the ripple look, but a mandoline with a crinkle blade works too. Even regular thin slices can still taste great.
Q3: Why are my fries not getting crisp?
Usually it comes down to too much moisture or crowding on the pan. Dry the slices well and give them space.
Q4: Can I use another kind of potato?
Yes. Yukon Gold works, but the fries will be slightly creamier and a little less crisp than russets.
Q5: Can I make these in an air fryer?
Yes, you can. Cook them in batches at 375°F until golden and crisp, shaking the basket partway through.
Q6: Is parsley necessary?
Not strictly, but it adds a fresh finish that balances the richness of the potatoes really nicely.
Q7: Can I add more seasoning?
Definitely. Garlic powder, onion powder, smoked paprika, or even a pinch of chili powder all work well.
Q8: How thin should I slice the potatoes?
About 1/4 inch is a good target. Too thin and they can overbrown fast, too thick and they may stay soft.
Q9: Can I prep the potatoes the night before?
Yes, keep them sliced in cold water in the refrigerator. Just dry them very thoroughly before roasting.
Q10: What should I serve with them?
They go with burgers, bowls, wraps, grilled meats, salads, and dipping sauces. They are one of those sides that fit almost anywhere.
Conclusion
There is something so comforting about a tray of crispy, golden potatoes, especially when they are this simple and this satisfying. These ripple fries bring that familiar Sweetgreen-inspired vibe home in a way that feels easy, fresh, and seriously delicious. Once you hear that first crisp bite and catch the warm scent of roasted potatoes and parsley, you will get exactly why this one is worth making again and again.
Print
Ripple Fries Sweetgreen Copycat
- Prep Time: 30 minutes
- Cook Time: 30 minutes
- Total Time: 1 hour
- Yield: 4 servings 1x
- Category: Side Dish
- Method: Baked
- Cuisine: American
- Diet: Vegan
Description
Crispy oven-baked ripple-cut potato fries with golden edges, fluffy centers, simple seasoning, and a fresh parsley finish.
Ingredients
- 2 large russet potatoes, about 1 1/2 pounds total
- 2 tablespoons olive oil
- 3/4 teaspoon kosher salt, plus more to taste
- 1/2 teaspoon black pepper
- 1/4 teaspoon garlic powder
- 1 tablespoon fresh parsley, finely chopped
Instructions
- Preheat the oven to 425°F and line a large baking sheet with parchment paper.
- Wash the potatoes and slice them into thin ripple rounds, about 1/4 inch thick.
- Place the potato slices in a bowl of cold water and soak for 20 minutes.
- Drain the potatoes and dry them very well with a clean kitchen towel or paper towels.
- Transfer the dried potato slices to a bowl and toss with olive oil, kosher salt, black pepper, and garlic powder until evenly coated.
- Arrange the slices in a single layer on the prepared baking sheet, making sure they are not overcrowded.
- Bake for 15 minutes, then flip the slices carefully.
- Return to the oven and bake for 12 to 15 minutes more, until golden brown and crisp at the edges.
- Remove from the oven, sprinkle with chopped fresh parsley, and add a little more salt if needed.
- Serve immediately while hot and crisp.
Notes
- Soaking the potatoes helps remove excess starch and improves crispness.
- Drying the slices thoroughly is essential for good browning.
- For best texture, serve right away or reheat in a hot oven to crisp them again.
- You can swap parsley for fresh chives for a slightly different finish.
Nutrition
- Serving Size: 1/4 of recipe
- Calories: 140
- Sugar: 1g
- Sodium: 450mg
- Fat: 7g
- Saturated Fat: 1g
- Unsaturated Fat: 6g
- Trans Fat: 0g
- Carbohydrates: 19g
- Fiber: 2g
- Protein: 2g
- Cholesterol: 0mg
Keywords: ripple fries, sweetgreen copycat, baked potato fries, crispy oven fries, potato side dish